Difference between revisions of "Outcasts"
(minor grammar tweaks) |
(→Prospect: added table) |
||
| Line 394: | Line 394: | ||
<big><u>'''Prospect Class Small Salvager'''</u><br/> | <big><u>'''Prospect Class Small Salvager'''</u><br/> | ||
The Prospect is the premiere mining vessel for the Outcasts. The ship fields an impressive salvager, considering it's size. In addition, there is also supplementary systems to aid in salvage and mining operations.</big> | The Prospect is the premiere mining vessel for the Outcasts. The ship fields an impressive salvager, considering it's size. In addition, there is also supplementary systems to aid in salvage and mining operations.</big> | ||
| + | {| class="wikitable" | ||
| + | |rowspan="10" colspan="3"|[[File:Prospect.png|700px]] | ||
| + | !colspan="3"|<big>Stats</big> | ||
| + | |- | ||
| + | !Class | ||
| + | |colspan="2" style="text-align:center;"| Mining Ship | ||
| + | |- | ||
| + | !Blueprint Class | ||
| + | |colspan="2" style="text-align:center;"| Mining | ||
| + | |- | ||
| + | !Mass <br/><small>(Base/ With Docks)</small> | ||
| + | |style="text-align:center;"| 18,867||style="text-align:center;"|18,975.8 | ||
| + | |- | ||
| + | !Dimensions<br/> <small>(Length/Height/Width)</small> | ||
| + | |colspan="2" style="text-align:center;"| 80m / 38m / 43m | ||
| + | |- | ||
| + | !Power <span style="color: cornflowerblue">■</span> <br/><small>(Total/Recharge)</small> | ||
| + | |width="100px" style="text-align:center;"| 307,927.9|| style="text-align:center;"| 101,366.3 e/sec | ||
| + | |- | ||
| + | !Thrust / Max Speed <span style="color: darkgreen">■</span> | ||
| + | |style="text-align:center;"|2,622.7||style="text-align:center;"| 136.8 | ||
| + | |- | ||
| + | !Shields <span style="color: orange">■</span><br/> <small>(Total/Recharge)</small> | ||
| + | |style="text-align:center;"|14,891|| style="text-align:center;"| 1,210 s/sec | ||
| + | |- | ||
| + | !Armor Hit Points <span style="color: grey">■</span> | ||
| + | |colspan="3" style="text-align:center;"| 650,175 | ||
| + | |- | ||
| + | !Structure Hit Points <span style="color: green">■</span> | ||
| + | |colspan="3" style="text-align:center;"| 732,725 | ||
| + | |- | ||
| + | !colspan="7"|<big>Systems</big> | ||
| + | |- | ||
| + | !style="border-bottom: solid 1px;" rowspan="44" width="30px"|Equipment | ||
| + | |rowspan="7" width="50px" style="text-align:center;"|[[File:Salvage Computer.png|100px]][[File:Cannon Computer.png|100px]] ||rowspan="7" width="70px" style="text-align:center;"|[[Salvage Computer]]<br/>+[[Cannon Computer]] (100%) | ||
| + | !Stat !!colspan="2"| Value | ||
| + | |- | ||
| + | |Number of Arrays ||colspan="2" style="text-align:center;"| 67 | ||
| + | |- | ||
| + | |Salvage Strength<span style="color: grey"><small>(Per Array)</small></span> ||colspan="2" style="text-align:center;"| 48<br/>50 | ||
| + | |- | ||
| + | |Tick Rate<span style="color: grey"><small> (In Seconds)</small></span>||colspan="2" style="text-align:center;"| 0<span style="color: grey">.03</span> | ||
| + | |- | ||
| + | |Reload<span style="color: grey"><small> (In Seconds)</small></span> ||colspan="2" style="text-align:center;"| 0<span style="color: grey">.0</span> | ||
| + | |- | ||
| + | |Range<span style="color: grey"><small> (In Sector Lengths)</small></span> ||colspan="2" style="text-align:center;"| 0<span style="color: grey">.48</span> | ||
| + | |- | ||
| + | |Power Usage<span style="color: grey"><small> (Per Array/Per Activation)</small></span> || style="text-align:center;"| 19<span style="color: grey">.2</span><br/>20<span style="color: grey">.0</span>||style="text-align:center;"| 52,572<span style="color: grey">.90</span> | ||
| + | |- | ||
| + | |rowspan="10" width="50px" style="text-align:center;"|[[File:Damage Beam Computer.png|75px]][[File:Cannon Computer.png|75px]][[File:Pull Effect Computer.png|75px]] ||rowspan="10" width="70px" style="text-align:center;"|[[Damage Beam Computer]]<br/>+[[Cannon Computer]](100%)<br/>+[[Punch-Through Effect Computer|Punch-Through Effect]] (100%) | ||
| + | !Stat !!colspan="2"| Value | ||
| + | |- | ||
| + | |Number of Arrays ||colspan="2" style="text-align:center;"| 9 | ||
| + | |- | ||
| + | |Pull Output <span style="color: grey"><small>(Per Tick/Per Second)</small></span> || style="text-align:center;"| 76||style="text-align:center;"|380 | ||
| + | |- | ||
| + | |Tick Rate<span style="color: grey"><small>(In Seconds)</small></span> || colspan="2" style="text-align:center;"| 0<span style="color: grey">.2</span> | ||
| + | |- | ||
| + | |Burst Time <span style="color: grey"><small>(In Seconds)</small></span> || colspan="2" style="text-align:center;"| 1<span style="color: grey">.0</span> | ||
| + | |- | ||
| + | |Block Penetration||colspan="2" style="text-align:center;"| 0 | ||
| + | |- | ||
| + | |Reload<span style="color: grey"><small> (In Seconds)</small></span> ||colspan="2" style="text-align:center;"| 1<span style="color: grey">.0</span> | ||
| + | |- | ||
| + | |Shots<span style="color: grey"><small> (Per Activation)</small></span> ||colspan="2" style="text-align:center;"| 1 | ||
| + | |- | ||
| + | |Range<span style="color: grey"><small> (In Sector Lengths)</small></span> ||colspan="2" style="text-align:center;"| 1<span style="color: grey">.0</span> | ||
| + | |- | ||
| + | |Power Usage<span style="color: grey"><small> (Per Tick/Per Activation)</small></span> || style="text-align:center;"| 0<span style="color: grey">.00</span>||style="text-align:center;"| 92,081<span style="color: grey">.20</span> | ||
| + | |- | ||
| + | |rowspan="4" width="50px" style="text-align:center;"|[[File:Storage.png|100px]]||rowspan="4" width="70px" style="text-align:center;"|[[Storage|Cargo System]] | ||
| + | !colspan="3" height="30px"|Cargo Capacity | ||
| + | |- | ||
| + | |Cargo 1 ||colspan="2" style="text-align:center;"| 25,700 | ||
| + | |- | ||
| + | |style="border-bottom: solid 1px;"|Cargo 2 ||colspan="2" style="border-bottom: solid 1px; text-align:center;"| 100 | ||
| + | |- | ||
| + | |Total Capacity||colspan="2" style="text-align:center;"| 25,800 | ||
| + | |- | ||
| + | |rowspan="4" width="50px" style="text-align:center;"|[[File:Overdrive Effect Computer.png|100px]]||rowspan="4" width="70px" style="text-align:center;"|[[Overdrive Effect Computer|Defensive Overdrive Effect]] | ||
| + | !Stat !!colspan="2"| Value | ||
| + | |- | ||
| + | |Number of Blocks||colspan="2" style="text-align:center;"| 517 | ||
| + | |- | ||
| + | |Effect Strength||colspan="2" style="text-align:center;"| 50% | ||
| + | |- | ||
| + | |Power Usage<span style="color: grey"><small> (Per Second)</small></span> || colspan="2" style="text-align:center;"| 5,176<span style="color: grey">.80</span> | ||
| + | |- | ||
| + | |rowspan="4" width="50px" style="text-align:center;"|[[File:Punch-Through Effect Computer.png|100px]]||rowspan="4" width="70px" style="text-align:center;"|[[Punch-Through Effect Computer|Defensive Punch-Through Effect]] | ||
| + | !Stat !!colspan="2"| Value | ||
| + | |- | ||
| + | |Number of Blocks||colspan="2" style="text-align:center;"| 167 | ||
| + | |- | ||
| + | |Effect Strength||colspan="2" style="text-align:center;"| 25% | ||
| + | |- | ||
| + | |Power Usage<span style="color: grey"><small> (Per Second)</small></span> || colspan="2" style="text-align:center;"| 1,672<span style="color: grey">.60</span> | ||
| + | |- | ||
| + | |rowspan="6" style="text-align:center;"|[[File:Scanner Computer.png|100px]] ||rowspan="6" style="text-align:center;"|[[Scanner Computer|Scanner System]] | ||
| + | !Stat !!colspan="2"| Value | ||
| + | |- | ||
| + | |Number of Blocks ||colspan="2" style="text-align:center;"| 99 | ||
| + | |- | ||
| + | |Total Charged Needed ||colspan="2" style="text-align:center;"| 433,588<span style="color: grey">.56</span> | ||
| + | |- | ||
| + | |Charge Time<span style="color: grey"><small> (Approx.)</small></span> || colspan="2" style="text-align:center;"| 58<span style="color: grey">.00</span> sec | ||
| + | |- | ||
| + | |Power Usage<span style="color: grey"><small> (Per Second)</small></span> || colspan="2" style="text-align:center;"| 7,475<span style="color: grey">.00</span> | ||
| + | |- | ||
| + | |Modules/Modules Needed|| style="text-align:center;"| 99||style="text-align:center;"| 944 | ||
| + | |- | ||
| + | |rowspan="6" style="text-align:center;"|[[File:Jump Drive Computer.png|100px]] ||rowspan="6" style="text-align:center;"|[[Jump Drive Computer|Jump Drive System]] | ||
| + | !Stat !!colspan="2"| Value | ||
| + | |- | ||
| + | |Number of Blocks ||colspan="2" style="text-align:center;"| 210 | ||
| + | |- | ||
| + | |Total Charged Needed ||colspan="2" style="text-align:center;"| 861,757<span style="color: grey">.0</span> | ||
| + | |- | ||
| + | |Charge Time<span style="color: grey"><small> (Approx.)</small></span> || colspan="2" style="text-align:center;"| 42<span style="color: grey">.00</span> sec | ||
| + | |- | ||
| + | |Power Usage<span style="color: grey"><small> (Per Second while Charging)</small></span> || colspan="2" style="text-align:center;"| 20,500<span style="color: grey">.00</span> | ||
| + | |- | ||
| + | |Modules/Modules Needed|| style="text-align:center;"| 210||style="text-align:center;"| 990 | ||
| + | |- | ||
| + | | style="text-align:center;"|[[File:Inner Ship Remote.png|100px]] || style="text-align:center;"|[[Inner Ship Remote]]"no data" | ||
| + | |colspan="3" style="text-align:center;"|''Toggles the Engine lights on and off.'' | ||
| + | |- | ||
| + | | style="text-align:center;"|[[File:Inner Ship Remote.png|100px]] || style="text-align:center;"|[[Inner Ship Remote]]"no data" | ||
| + | |colspan="3" style="text-align:center;"|''Launches the Spade. (Currently does not work)'' | ||
| + | |- | ||
| + | | style="border-bottom: solid 1px; text-align:center;"|[[File:Rail Docker.png|100px]] || style="border-bottom: solid 1px; text-align:center;"|[[Rail Docker]] <br/><small>(Location: 6,4,15)</small> | ||
| + | |colspan="3" style="border-bottom: solid 1px; text-align:center;"|''Part of a USD dock on the vessel's right side.'' | ||
| + | |- | ||
| + | !rowspan="15" width="30px"|Dock(s) | ||
| + | |rowspan="4" style="text-align:center;"|<big>1 x Rail Elevator</big>||rowspan="4" style="text-align:center;"|''Used as the primary means to enter the vessel'' | ||
| + | !Stat !!colspan="2"| Value | ||
| + | |- | ||
| + | |Mass||colspan="2" style="text-align:center;"| 0.4 | ||
| + | |- | ||
| + | |Armor Hit Points <span style="color: grey">■</span> | ||
| + | |colspan="3" style="text-align:center;"| 300 | ||
| + | |- | ||
| + | |Structure Hit Points <span style="color: green">■</span> | ||
| + | |colspan="3" style="text-align:center;"| 120 | ||
| + | |- | ||
| + | |rowspan="4" style="text-align:center;"|<big>1 x [[#Spade|Spade]]</big>||rowspan="4" style="text-align:center;"|''Docked Ship'' | ||
| + | !Stat !!colspan="2"| Value | ||
| + | |- | ||
| + | |Mass||colspan="2" style="text-align:center;"| 108.4 | ||
| + | |- | ||
| + | |Armor Hit Points <span style="color: grey">■</span> | ||
| + | |colspan="3" style="text-align:center;"| 45,375 | ||
| + | |- | ||
| + | |Structure Hit Points <span style="color: green">■</span> | ||
| + | |colspan="3" style="text-align:center;"| 29,705 | ||
| + | |} | ||
| + | |||
====Scud==== | ====Scud==== | ||
<big><u>'''Scud Class Shuttle'''</u><br/> | <big><u>'''Scud Class Shuttle'''</u><br/> | ||
Revision as of 21:56, 11 March 2017
| This article is a work-in-progress. Edits are welcome, however please keep in mind that they may be overwritten or removed if they are not in line with the intention of the article. |
The Outcasts are a neutral band of misfits made of up of an assortment of alien species. They generally avoid contact with other factions but can be befriended through diplomacy.
Contents
Overview
"The Outcasts is a loose organization comprised of many different alien species. The harshness of space has left these people without a home, and so they rely on each to survive. The Outcasts are not particularly strong, but treat outsiders with justifiable wariness. The Outcasts are spread thin across the stars and seek to avoid the attention of others."
Blueprints
Ships
Blight
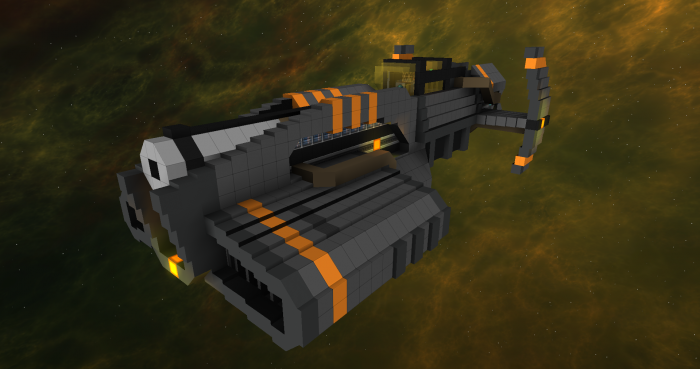
Blight Class Bomber
The Blight Class Bomber is a standardized military vessel for the Outcast. The ship is fairly straight-forward and reflects larger military ships in it's design. The ship has seating for a pilot and the bomber.
|
Stats | |||||
|---|---|---|---|---|---|---|
| Class | Bomber | |||||
| Blueprint Class | Defense | |||||
| Mass |
292.2 | |||||
| Dimensions (Length/Height/Width) |
45m / 14m / 21m | |||||
| Power ■ (Total/Recharge) |
564,240.6 | 35,192.4 e/sec | ||||
| Thrust / Max Speed ■ | 556.2 | 180.3 | ||||
| Shields ■ (Total/Recharge) |
6,379 | 280 s/sec | ||||
| Armor Hit Points ■ | 110,850 | |||||
| Structure Hit Points ■ | 128,455 | |||||
| Systems | ||||||
| Weapons |    |
Missile Computer +Cannon Computer(85.3%) +Piercing Effect (36.8%) |
Stat | Value | ||
| Number of Arrays | 1 | |||||
| Type | Dumb Fire | |||||
| Firing Direction (In relation to the vessel) | Forward (Top) | |||||
| Damage Output (Per Array) | 9,237.6 | |||||
| Blast Radius (In Blocks) | 7.8 | |||||
| Reload (In Seconds) | 3.06 | |||||
| Shots (Per Activation) | 1 | |||||
| Projectile Speed (In Meters per Second) | 503.3 | |||||
| Range (In Sector Lengths) | 1.6 | |||||
| Power Usage (Per Array & Per Activation) | 46,188.2 | |||||
   |
Missile Computer +Damage Beam Computer(38.2%) +Piercing Effect (100%) |
Stat | Value | |||
| Number of Arrays | 1 | |||||
| Type | Lock On | |||||
| Firing Direction (In relation to the vessel) | Forward (Bottom) | |||||
| Damage Output (Per Array) | 85,764.7 | |||||
| Blast Radius (In Blocks) | 17.0 | |||||
| Reload (In Seconds) | 26.4 | |||||
| Shots (Per Activation) | 1 | |||||
| Projectile Speed (In Meters per Second) | 257.1 | |||||
| Range (In Sector Lengths) | 2.8 | |||||
| Power Usage (Per Array & Per Activation) | 428,823.5 | |||||
| Equipment |  |
Scanner System | Stat | Value | ||
| Number of Blocks | 20 | |||||
| Total Charged Needed | 251,623.6 | |||||
| Charge Time (Approx.) | 45.00 sec | |||||
| Power Usage (Per Second) | 5,500.00 | |||||
| Modules/Modules Needed | 20 | 164 | ||||
 |
Jump Drive System | Stat | Value | |||
| Number of Blocks | 34 | |||||
| Total Charged Needed | 478,587.1 | |||||
| Charge Time (Approx.) | 41.00 sec | |||||
| Power Usage (Per Second while Charging) | 11,700.00 | |||||
| Modules/Modules Needed | 34 | 147 | ||||
 |
Inner Ship Remote"no data" | Toggles the Engine lights on and off. | ||||
 |
Rail Docker (Location: 16,5,27) |
Located underneath the vessel. | ||||
Blitz
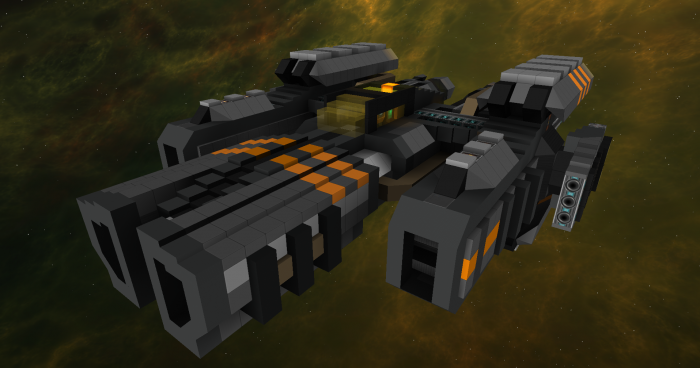
Blitz Class Patrol Ship
Despite it's size, the ship employs the use of two turrets along with a hard mounted cannon. While it may not have the defensive capability of a Trading Guild patrol ship, the two can still go toe to toe with one another. This version improves upon the original design in many ways. Many of the external components have now been seated behind armor panels. The entire ship performs better. The cockpit was moved to the rear to avoid being directly in the line of fire from oncoming attacks.
|
Stats | |||||
|---|---|---|---|---|---|---|
| Class | Light Fighter | |||||
| Blueprint Class | Defense | |||||
| Mass (Base/ With Docks) |
315.9 | 328.6 | ||||
| Dimensions (Length/Height/Width) |
36m / 13m / 23m | |||||
| Power ■ (Total/Recharge) |
50,000 | 59,337 e/sec | ||||
| Thrust / Max Speed ■ | 681.2 | 193 | ||||
| Shields ■ (Total/Recharge) |
5,091 | 506 s/sec | ||||
| Armor Hit Points ■ | 127,600 | |||||
| Structure Hit Points ■ | 117,770 | |||||
| Systems | ||||||
| Weapons |    |
Cannon Computer +Cannon Computer(55.5%) +Punch-Through Effect (100%) |
Stat | Value | ||
| Number of Arrays | 1 | |||||
| Damage Output (Per Array/Total DPS) | 1,522.6 | 2,380 | ||||
| Block Penetration | 18 | |||||
| Reload (In Seconds) | 0.5 | |||||
| Shots (Per Activation) | 1 | |||||
| Projectile Speed (In Meters per Second) | 937.5 | |||||
| Range (In Sector Lengths) | 1.0 | |||||
| Power Usage (Per Array/Per Activation) | 15,225.00 | 15,225.00 | ||||
| Equipment |  |
Scanner System | Stat | Value | ||
| Number of Blocks | 40 | |||||
| Total Charged Needed | 279,730.28 | |||||
| Charge Time (Approx.) | 47.00 sec | |||||
| Power Usage (Per Second) | 6,000.00 | |||||
| Modules/Modules Needed | 40 | 175 | ||||
 |
Jump Drive System | Stat | Value | |||
| Number of Blocks | 83 | |||||
| Total Charged Needed | 492,728.47 | |||||
| Charge Time (Approx.) | 35.00 sec | |||||
| Power Usage (Per Second while Charging) | 14,150.00 | |||||
| Modules/Modules Needed | 83 | 165 | ||||
 |
Inner Ship Remote"Engine" | Toggles the Engine lights on and off. | ||||
 |
Rail Docker (Location: 19,15,28) |
Located on the under side of the vessel. | ||||
| Dock(s) | 2 x Cannon Turret (Small)    |
Docked on the left and right side of the vessel. (Location(s): 5,13,12/27,13,12) |
Stat | Value | ||
| Number of Arrays | 1 | |||||
| Type | Cannon +Cannon +Punch-Through Effect | |||||
| Damage Output (Per Array/Total DPS) | 139.5 | 160 | ||||
| Shields ■(Total/Recharge of both Base & Barrel) | 0 | 0 s/sec | ||||
| Armor Hit Points ■ (of both Base & Barrel) | 2,850 | |||||
| Structure Hit Points ■ (of both Base & Barrel) | 2,140 | |||||
Pioneer
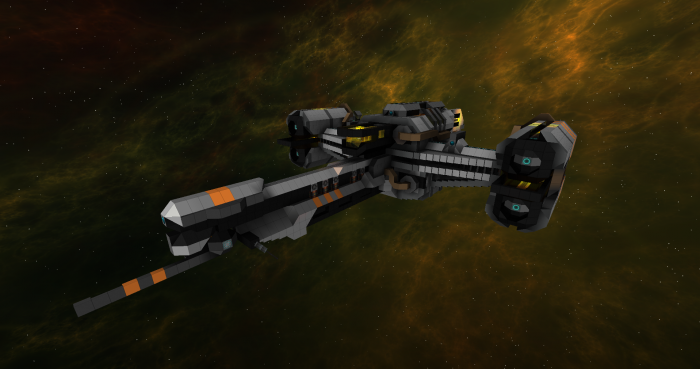
Pioneer Class Small Exploration Vessel
The design of the Outcast's dedicated exploration vessel is unusual. The vessel comes with no offensive capabilities, and minor defenses. Instead it relies on it's massive engines to get it out of trouble in a pinch. It also employs the use of a large sensor array, which comprises most of the bow. If needed, it can also activate it's anti gravity generator located in the stern, to combat the effects of gravity wells. Underneath the ship is room for a detachable Pioneer Pod and the lower hull serves as a cargo bay for any salvage one may bring in.
|
Stats | |||||
|---|---|---|---|---|---|---|
| Class | Scout | |||||
| Blueprint Class | General | |||||
| Mass (Base/ With Docks) |
584.1 | 611.2 | ||||
| Dimensions (Length/Height/Width) |
75m / 16m / 51m | |||||
| Power ■ (Total/Recharge) |
112,079.5 | 60,352 e/sec | ||||
| Thrust / Max Speed ■ | 918.1 | 150.2 | ||||
| Shields ■ (Total/Recharge) |
17,797 | 462 s/sec | ||||
| Armor Hit Points ■ | 293,575 | |||||
| Structure Hit Points ■ | 186,570 | |||||
| Systems | ||||||
| Equipment |  |
Defensive Stop Effect | Stat | Value | ||
| Number of Blocks | 149 | |||||
| Effect Strength | 100% | |||||
| Power Usage (Per Second) | 1,733.5 | |||||
 |
Scanner System | Stat | Value | |||
| Number of Blocks | 722 | |||||
| Total Charged Needed | 578,332.0 | |||||
| Charge Time (Approx.) | 25.00 sec | |||||
| Power Usage (Per Second) | 23,050.00 | |||||
| Modules/Modules Needed | 722 | 390 | ||||
 |
Jump Drive System | Stat | Value | |||
| Number of Blocks | 203 | |||||
| Total Charged Needed | 632,626.56 | |||||
| Charge Time (Approx.) | 31.00 sec | |||||
| Power Usage (Per Second while Charging) | 20,150.00 | |||||
| Modules/Modules Needed | 203 | 306 | ||||
 |
Inner Ship Remote"no data" | Toggles the Engine lights on and off. | ||||
 |
Rail Docker (Location: 16,8,31) |
Located underneath the vessel. | ||||
| Dock(s) | 1 x Rail Door | Used as the primary means to enter the vessel | Stat | Value | ||
| Mass | 0.65 | |||||
| Armor Hit Points ■ | 550 | |||||
| Structure Hit Points ■ | 145 | |||||
| 1 x Rail Elevator | Elevator that connects the gangplank bottom to the command deck. | Stat | Value | |||
| Mass | 0.55 | |||||
| Armor Hit Points ■ | 450 | |||||
| Structure Hit Points ■ | 135 | |||||
| 1 x Pioneer Pod | Docked Pod | Stat | Value | |||
| Mass | 25.9 | |||||
| Armor Hit Points ■ | 12,925 | |||||
| Structure Hit Points ■ | 5,950 | |||||
Pioneer Pod
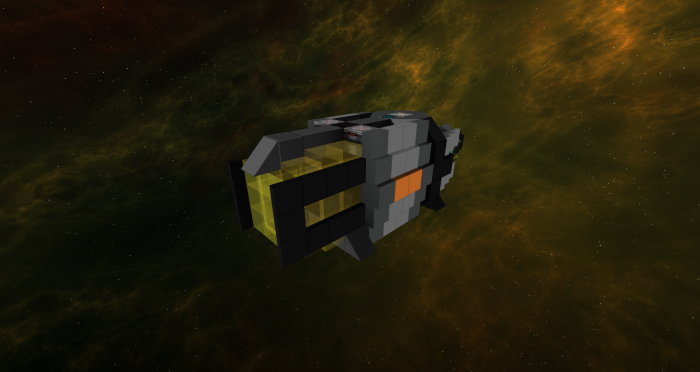
Pioneer Pod | Outcast Exploration Pod
The Outcast's are first and foremost, scavengers. Not the dangerous pirate-y kind. They do not have a massive established economic empire such as the Trading Guild. As such, they often explore the wrecks of derelict ships and stations throughout the region. This exploration pod allows them to get into the tighter spaces of these vessels.
|
Stats | |||||
|---|---|---|---|---|---|---|
| Class | Scout Pod | |||||
| Blueprint Class | General | |||||
| Mass | 25.9 | |||||
| Dimensions (Length/Height/Width) |
15m / 5m / 5m | |||||
| Power ■ (Total/Recharge) |
50,000 | 3,002.8 e/sec | ||||
| Thrust / Max Speed ■ | 48.7 | 178.4 | ||||
| Shields ■ (Total/Recharge) |
0 | 0 s/sec | ||||
| Armor Hit Points ■ | 12,925 | |||||
| Structure Hit Points ■ | 5,950 | |||||
| Systems | ||||||
| Equipment | ||||||
 |
Inner Ship Remote"Engine" | Toggles the Engine lights on and off. | ||||
 |
Rail Docker (Location: 16,18,14) |
Located on the top of the vessel | ||||
 |
Rail Docker (Location: 16,14,16) |
Located on the bottom of the vessel | ||||
Prospect
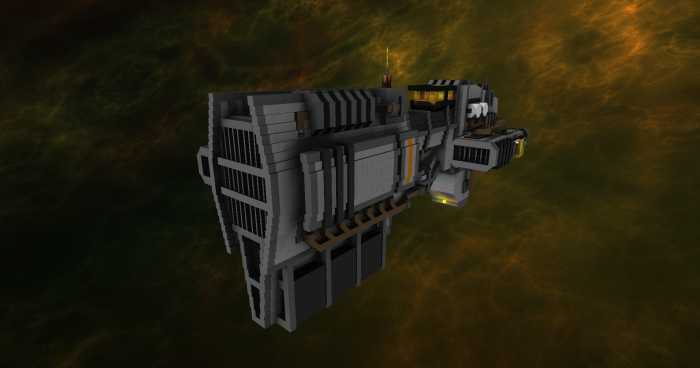
Prospect Class Small Salvager
The Prospect is the premiere mining vessel for the Outcasts. The ship fields an impressive salvager, considering it's size. In addition, there is also supplementary systems to aid in salvage and mining operations.
|
Stats | |||||
|---|---|---|---|---|---|---|
| Class | Mining Ship | |||||
| Blueprint Class | Mining | |||||
| Mass (Base/ With Docks) |
18,867 | 18,975.8 | ||||
| Dimensions (Length/Height/Width) |
80m / 38m / 43m | |||||
| Power ■ (Total/Recharge) |
307,927.9 | 101,366.3 e/sec | ||||
| Thrust / Max Speed ■ | 2,622.7 | 136.8 | ||||
| Shields ■ (Total/Recharge) |
14,891 | 1,210 s/sec | ||||
| Armor Hit Points ■ | 650,175 | |||||
| Structure Hit Points ■ | 732,725 | |||||
| Systems | ||||||
| Equipment |   |
Salvage Computer +Cannon Computer (100%) |
Stat | Value | ||
| Number of Arrays | 67 | |||||
| Salvage Strength(Per Array) | 48 50 | |||||
| Tick Rate (In Seconds) | 0.03 | |||||
| Reload (In Seconds) | 0.0 | |||||
| Range (In Sector Lengths) | 0.48 | |||||
| Power Usage (Per Array/Per Activation) | 19.2 20.0 |
52,572.90 | ||||
   |
Damage Beam Computer +Cannon Computer(100%) +Punch-Through Effect (100%) |
Stat | Value | |||
| Number of Arrays | 9 | |||||
| Pull Output (Per Tick/Per Second) | 76 | 380 | ||||
| Tick Rate(In Seconds) | 0.2 | |||||
| Burst Time (In Seconds) | 1.0 | |||||
| Block Penetration | 0 | |||||
| Reload (In Seconds) | 1.0 | |||||
| Shots (Per Activation) | 1 | |||||
| Range (In Sector Lengths) | 1.0 | |||||
| Power Usage (Per Tick/Per Activation) | 0.00 | 92,081.20 | ||||
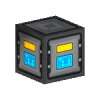 |
Cargo System | Cargo Capacity | ||||
| Cargo 1 | 25,700 | |||||
| Cargo 2 | 100 | |||||
| Total Capacity | 25,800 | |||||
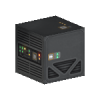 |
Defensive Overdrive Effect | Stat | Value | |||
| Number of Blocks | 517 | |||||
| Effect Strength | 50% | |||||
| Power Usage (Per Second) | 5,176.80 | |||||
 |
Defensive Punch-Through Effect | Stat | Value | |||
| Number of Blocks | 167 | |||||
| Effect Strength | 25% | |||||
| Power Usage (Per Second) | 1,672.60 | |||||
 |
Scanner System | Stat | Value | |||
| Number of Blocks | 99 | |||||
| Total Charged Needed | 433,588.56 | |||||
| Charge Time (Approx.) | 58.00 sec | |||||
| Power Usage (Per Second) | 7,475.00 | |||||
| Modules/Modules Needed | 99 | 944 | ||||
 |
Jump Drive System | Stat | Value | |||
| Number of Blocks | 210 | |||||
| Total Charged Needed | 861,757.0 | |||||
| Charge Time (Approx.) | 42.00 sec | |||||
| Power Usage (Per Second while Charging) | 20,500.00 | |||||
| Modules/Modules Needed | 210 | 990 | ||||
 |
Inner Ship Remote"no data" | Toggles the Engine lights on and off. | ||||
 |
Inner Ship Remote"no data" | Launches the Spade. (Currently does not work) | ||||
 |
Rail Docker (Location: 6,4,15) |
Part of a USD dock on the vessel's right side. | ||||
| Dock(s) | 1 x Rail Elevator | Used as the primary means to enter the vessel | Stat | Value | ||
| Mass | 0.4 | |||||
| Armor Hit Points ■ | 300 | |||||
| Structure Hit Points ■ | 120 | |||||
| 1 x Spade | Docked Ship | Stat | Value | |||
| Mass | 108.4 | |||||
| Armor Hit Points ■ | 45,375 | |||||
| Structure Hit Points ■ | 29,705 | |||||
Scud
Scud Class Shuttle
The Scud is a robust thing. Despite it's sturdy design, it is quite mediocre as far as shuttles go. It contains only two passenger seats and minimal cargo capacity. Still, many fit additional equipment in it's limited interior as they see fit.
Spade
Spade Class Mining Pod
The Spade is a one-man mining pod capable of docking to the Prospect. This vessel makes appearances on other large mining barges, but is generally accepted as a supplement to the Prospect only. If needed, a rudimentary AI system can be activated if the pilot is absent.
Transit
Transit Class Small Freighter
Here we see a prime example of Outcast Engineering. Many Outcast vessels make use of angled hulls. These ships are robust yet plain, and in some cases more utilitarian than the Trading Guild ships. While the Outcasts do not exactly piece their ships together as much as the Scavenger pirates do, there are still elements of randomness. Over time the design of the ship was modified, but the hull remained the same. As a result, many newer components of the latest versions are attached to the exterior. The freighter itself does not support as much cargo as the TG counterpart. Instead it boasts impressive thruster systems, and makes for a good blockade runner.
Ward
Ward Class Transport Frigate
The Ward serves as both a transport, and as a military vessel. The vessel was once solely a transport ship, intended to ferry citizens across space. Due to the dangers of space, the vessel now comes equipped with multiple weapon systems. It is the first ship in the Outcast lineup to be manufactured en-masse at major shipyards.