Difference between revisions of "Legacy Power Systems"
(Improving clarity of article. Future plans: removal of most references to outdated "cubic" reactors.) |
(Further improvements. Removal of any significant mention of outdated "cubic reactors": these are a footnote, and should not be given prominence in order to avoid confusion.) |
||
| Line 15: | Line 15: | ||
===Single Group Formula=== | ===Single Group Formula=== | ||
| − | The formula for | + | The formula for an entity with exactly one Power Reactor group is as follows: |
<tt style="font-size: large">'''GroupPower''' = BlockPower + SizePower</tt> | <tt style="font-size: large">'''GroupPower''' = BlockPower + SizePower</tt> | ||
| Line 32: | Line 32: | ||
'''BlockPower''' is the base power per second per block of [[Power Reactor Module|Power Reactors]]: 25e/sec/block. | '''BlockPower''' is the base power per second per block of [[Power Reactor Module|Power Reactors]]: 25e/sec/block. | ||
| − | SizePower is an extra power value dependent on SumOfDimensions: the sum of dimensions of the minimum bounding box for a given reactor group. SumOfDimensions, of course, is not dependent on aspect ratio: a 3x3x3, 1x1x7, and 2x2x5 bounding box all have a SumOfDimensions of 9. SizePower is of the greatest importance to efficient reactor design as it is an exponential function, and every successive increase in SumOfDimensions has greater value than the last. | + | '''SizePower''' is an extra power value dependent on SumOfDimensions: the sum of dimensions of the minimum bounding box for a given reactor group. SumOfDimensions, of course, is not dependent on aspect ratio: a 3x3x3, 1x1x7, and 2x2x5 bounding box all have a SumOfDimensions of 9. SizePower is of the greatest importance to efficient reactor design as it is an exponential function, and every successive increase in SumOfDimensions has greater value than the last. |
| − | Note that SizePower has a maximum value of 2,000,000e/sec, and suffers from diminishing returns as it approaches this value. Also note that for multiple reactor groups, the above formula is modified, and results in a diminishing return to TotalPower. TotalPower of an entity is not the sum of the GroupPower of each group. See the [[#Power Reactor Advanced Analysis|Advanced Analysis]] section for a more detailed explanation of the equation. | + | Note that SizePower has a maximum value of 2,000,000e/sec, and suffers from diminishing returns as it approaches this value. Also note that for multiple reactor groups, the above formula is modified, and results in a diminishing return to TotalPower. TotalPower of an entity is not the sum of the GroupPower of each group. See the Multiple Group Formula below, as well as the [[#Power Reactor Advanced Analysis|Advanced Analysis]] section, for a more detailed explanation of the equation. |
Here are some examples of power reactor groups and how their power outputs are calculated. | Here are some examples of power reactor groups and how their power outputs are calculated. | ||
| Line 46: | Line 46: | ||
===Multiple Group Formula=== | ===Multiple Group Formula=== | ||
| − | When there is only one power reactor group on an entity, the GroupPower of that reactor is equal to the total power regen of the entity. However, when there is more than one group, the total power regen of the entity is ''not'' the sum of the GroupPower of all groups. Rather, | + | When there is only one power reactor group on an entity, the GroupPower of that reactor is equal to the total power regen of the entity. However, when there is more than one group, the total power regen of the entity is ''not'' the sum of the GroupPower of all groups. Rather, TotalPower of an entity with multiple power reactor groups is subject to diminishing returns, and is given by the following formula: |
<tt style="font-size: large">'''TotalPower''' = BlockPower + GroupSumSizePower</tt> | <tt style="font-size: large">'''TotalPower''' = BlockPower + GroupSumSizePower</tt> | ||
| Line 62: | Line 62: | ||
<tt style="font-size:large">'''GroupSumPower''' = (SumOfDimensionsOfGroup<sub>1</sub>/3)<sup>1.7</sup> + (SumOfDimensionsOfGroup<sub>2</sub>/3)<sup>1.7</sup> ... + (SumOfDimensionsOfGroup<sub>''n''</sub>/3)<sup>1.7</sup></tt>, where ''n'' is the number of groups. | <tt style="font-size:large">'''GroupSumPower''' = (SumOfDimensionsOfGroup<sub>1</sub>/3)<sup>1.7</sup> + (SumOfDimensionsOfGroup<sub>2</sub>/3)<sup>1.7</sup> ... + (SumOfDimensionsOfGroup<sub>''n''</sub>/3)<sup>1.7</sup></tt>, where ''n'' is the number of groups. | ||
| − | + | ===Optimal Layouts=== | |
| − | |||
| − | |||
| − | |||
| − | |||
| − | |||
| − | |||
| − | |||
| − | |||
| − | |||
| − | |||
| − | |||
| − | |||
| − | |||
| − | |||
| − | |||
| − | |||
| − | |||
| − | |||
| − | |||
| − | |||
| − | |||
| − | |||
| − | |||
| − | |||
| − | |||
| − | |||
| − | |||
| − | |||
| − | |||
| − | |||
| − | |||
| − | |||
<gallery mode="traditional" widths=900px heights=300px perrow=1 caption="Optimal maximum-output layouts"> | <gallery mode="traditional" widths=900px heights=300px perrow=1 caption="Optimal maximum-output layouts"> | ||
| − | Image:OptimalPowerStructures.jpg|Five reactor | + | Image:OptimalPowerStructures.jpg|Background: Five efficient reactor shapes which all maximize the power output for 20 blocks.<br/>Foreground: A "cubic reactor", also 20 blocks: this is an inefficient design in terms of e/sec/block.<br/><br/>Statistics for the 5 efficient reactors:<br/>BlockPower=500e/s.<br/>SizePower=3426.8e/s<br/>TotalPower=3926.8e/s. |
</gallery> | </gallery> | ||
| − | Note that, though not pictured above, a straight line of Power | + | Every group pictured above (excluding the 3x3x3 "cubic reactor") consists of 20 blocks arranged in an optimal pattern. An optimal pattern for a group is one in which every block increases SumOfDimensions: this of the utmost importance to creating efficient (high power per second per block) reactors. Note that, though not pictured above, a straight line of Power Reactors is also a maximum-efficiency layout for a given block count. This is because each block increases SumOfDimensions, providing the maximum SizePower for the group. |
| − | + | The goal in design of a ship's power generation should be to both maximize every group's box dimensions (netting the greatest e/sec/block efficiency) while also reserving large contiguous volumes within the ship for other systems, as well as rooms of both functional (core room and access routes) and non-functional (miscellaneous roleplay/decorative rooms) nature. | |
| − | + | Outdated "cubic reactors", in which many small groups are tightly packed into a small cubic volume (5x5x5 being particularly common for this type), have a comparatively low e/sec/block value, and are not recommended under any circumstance. They are only an academic excercise, one used when the above formulas were first being uncovered and tested. | |
| − | + | The key points, therefore, of efficient reactor design are: | |
| − | * Build the largest optimized group possible within the volume of the ship: ideally, every Power Reactor in the group will increase SumOfDimensions. Simply placing long lines or 3- | + | * Build the largest optimized group possible within the volume of the ship: ideally, every Power Reactor in the group will increase SumOfDimensions. Simply placing long straight lines or 3-axis crosses is common, due to the simplicity of the shapes. |
** An allowable exception to this is where a minimal number of redundant (non-SumOfDimensions-increasing blocks) will allow an even greater increase in SumOfDimensions: eg. taking a small detour around other systems to provide a non-negligible increase in SumOfDimensions after the detour. | ** An allowable exception to this is where a minimal number of redundant (non-SumOfDimensions-increasing blocks) will allow an even greater increase in SumOfDimensions: eg. taking a small detour around other systems to provide a non-negligible increase in SumOfDimensions after the detour. | ||
| − | * Once the first (and usually largest) group is placed, it is likely that more will be required to reach the desired e/sec output. Where possible, run separate groups along the same path as the primary group, ensuring that you do not connect them at any point ( | + | * Once the first (and usually largest) group is placed, it is likely that more groups will be required to reach the desired e/sec output. |
| − | * Bear in mind that 1-block groups produce 140e/sec, compared to the 25e/sec that redundant blocks in a group will add. | + | **Where possible, run separate groups along the same path as the primary group, ensuring that you do not connect them at any point. |
| − | + | **Diagonal adjacency (that is to say, adjacent edges, rather than adjacent faces) is normally preferable. | |
| − | + | **Symmetry may prove useful in placing several groups simultaneously, as long as the layout does not have inconsistencies that cause additional groups to connect to each other. | |
| − | + | * Bear in mind that 1-block groups produce 140e/sec, compared to the 25e/sec that redundant blocks in a group will add. Therefore, fill gaps with small groups, rather than connecting large groups redundantly; the latter is likely to produce a loss in TotalPower. | |
| − | |||
| − | |||
==Power Auxiliary Rules== | ==Power Auxiliary Rules== | ||
| − | Power Auxiliaries add a | + | Power Auxiliaries add a separate auxiliary power pool to a ship, and gradually refill this over time when off. This pool can be stored up and then emptied into the main power pool for emergency recharging, or if the auxiliaries are left on, they will provide a constant boost to power generation. They should only be used once Power Reactor Modules have reached or surpassed their peak efficiency. They also provide a new element of risk to manage during ship design, as the chain reactions caused by destroying part of a Power Auxiliary group can be significant if not well-mitigated. |
{{main|Power Auxiliary}} | {{main|Power Auxiliary}} | ||
==Power Capacitor Rules== | ==Power Capacitor Rules== | ||
| − | [[Power Capacitor|Power Capacitors]] have a | + | [[Power Capacitor|Power Capacitors]] have a simple exponential equation governing their capacity. |
<tt style="font-size: large">'''GroupPower''' = 1000 * '''NumBlocks'''<sup>1.05</sup></tt> | <tt style="font-size: large">'''GroupPower''' = 1000 * '''NumBlocks'''<sup>1.05</sup></tt> | ||
| − | + | Note that the only variable is NumBlocks (total block count of the grouping). Since GroupPower is an exponential function, subsequent blocks provide greater increments than the ones before them. This increment is labelled "BonusPerBlock" in the table below. Because of this, the ideal configuration for any number of Power Capacitors is a single physically-contiguous group. Even if there are separate "clumps" or concentrations of blocks, all of these should be connected by thinner lines of capacitors, to ensure maximum output. It is also advisable to have redundant connections between clumps, to avoid the potential for battle damage breaking these connections. | |
| − | |||
| − | |||
| − | Here | + | Here are some sample group sizes and their value breakdowns. Note that values are rounded. |
{|class="wikitable" | {|class="wikitable" | ||
| Line 162: | Line 126: | ||
==Power Reactor Advanced Analysis== | ==Power Reactor Advanced Analysis== | ||
| − | This data is mostly of use for builders of large and very large ships. Even though a mid-sized ship might be able to make use of 2 million e/sec, it might not have the internal volume to make an optimized group of 800 or more power reactor modules. However, this analysis does show that small to medium ships should still try to utilize the largest optimized block structures that they can manage within the volume of their ship | + | This data is mostly of use for builders of large and very large ships. Even though a mid-sized ship might be able to make use of 2 million e/sec, it might not have the internal volume to make an optimized group of 800 or more power reactor modules. However, this analysis does show that small to medium ships should still try to utilize the largest optimized block structures that they can manage within the volume of their ship: this is always more effective than using outdated "efficient cube" reactor setups. |
| − | The following table lists the SizePower value generated by an optimal group of blocks of the given number. Note that SizePower does not | + | The following table lists the SizePower value generated by an optimal group of blocks of the given number. Note that SizePower does not reach its maximum value of 2,000,000 e/sec until the optimized group has 3415 blocks. |
{|class="wikitable" | {|class="wikitable" | ||
| Line 246: | Line 210: | ||
|} | |} | ||
| − | The above table is illustrated | + | The above table is illustrated more effectively in the following chart: |
<gallery mode="traditional" widths=600px heights=400px perrow=1 caption="Graphs of SizePower and GroupPower per Block"> | <gallery mode="traditional" widths=600px heights=400px perrow=1 caption="Graphs of SizePower and GroupPower per Block"> | ||
| Line 252: | Line 216: | ||
</gallery> | </gallery> | ||
| − | It is easy to see that SizePower has diminishing returns after about 900 blocks. The precise number is 895. This is the number of blocks in a group that yields the | + | It is easy to see that SizePower has diminishing returns after about 900 blocks. The precise number is 895. This is the number of blocks in a group that yields the maximum GroupPower per block, 1664.5, after which it begins to fall. This is due to the S-curve shape of the SizePower graph. This means that, in terms of mass, reactor systems which use larger groups, and fewer of them, are more efficent than greater numbers of smaller groups. |
| + | |||
| + | This diminishing return of SizePower, as well as the additional diminishing return for separate reactor groups, both serve to limit efficient reactors to about 2 million e/sec in practice. Consequently, large ships cannot efficiently generate much more than this without the addition of [[Power Auxiliary]] systems. An alternative is to simply continue adding Power Reactors: however, this is inefficient, and the power per second per block will eventually just be BlockPower (25e/sec/block) as SizePower reaches its absolute maximum. | ||
| + | |||
| − | |||
To get to 2 million e/sec (using optimal layouts with each group): | To get to 2 million e/sec (using optimal layouts with each group): | ||
| Line 282: | Line 248: | ||
|253||41||10373||2008595.1||259325||2009620.1||193.7 | |253||41||10373||2008595.1||259325||2009620.1||193.7 | ||
|} | |} | ||
| − | |||
| − | |||
| − | |||
| − | |||
| − | |||
| − | |||
| − | |||
| − | |||
| − | |||
| − | |||
| − | |||
| − | |||
| − | |||
| − | |||
| − | |||
| − | |||
| − | |||
| − | |||
| − | |||
| − | |||
[[Category:Articles]] | [[Category:Articles]] | ||
[[Category:Game Mechanics]] | [[Category:Game Mechanics]] | ||
Revision as of 01:50, 6 October 2016
This page describes the power generation and storage mechanisms in StarMade.
Contents
Power Generation and Storage Blocks
Power is generated using either Power Reactor Modules or Power Auxiliaries, although the latter is greatly preferable as a supplement to the former (when they have reached or surpassed their peak efficiency), not a replacement. Entities built from a Ship Core have an innate power regen rate of 1 power per second (commonly abbreviated as "e/sec"). Planets and Space Stations do not have this innate power generation. Ships also have a base power capacity of 50,000 energy (as with regeneration, planets and stations have no innate power capacity). Power capacity can be increased using Power Capacitors. All three types of power blocks are more efficient (in terms of power per second per block, or e/sec/block) when placed in particular configurations, as detailed in their sections below.
An important consideration is that all systems drain some amount of power from the ship's capacity, either at a constant rate for a period of time (passive effects, scanner and jump drive charging, or cloaking and jamming), or in instantaneous bursts of varying frequency (most weapons). If the instantaneous power cost of an action (eg. firing a large missile) is greater than the power capacity of the ship, the action will not occur, a "Power Failure" warning will appear below the targeting reticle (as well as a red "E" in a triangle, at the top of the screen), and no power will be drained for that action. In most situations, a ship should at least have sufficient capacity to fire one salvo of its alpha (high damage, long cooldown) weapons. Power capacity should usually also include leeway for power spikes caused by shield regeneration costs, thruster activation, and potentially even enemy EMP attacks (which can cause significant power drain if the attacking ship is focussed on such weaponry).
Power generation will ideally be greater than the maximum expected rate of power usage: failing this, there should be a great enough combination of capacity and regen that the ship will not rapidly drain its capacity if power drain exceeds normal levels. For example, although very few large ships have regen equal to the power demand of charging a large Jump Drive, their capacity is usually greater than the cost to charge the drive.
A further consideration for larger ships is the use of Power Auxiliaries. These blocks are not more useful than Power Reactor Modules until the latter has reached its peak efficiency (as detailed below, this is approximately 2,000,000 e/sec). After this point, the output of Power Reactor Modules peters out, making way for Power Auxiliaries. They have a similar "soft-cap", but this is per physically separate group, rather than a cap placed on a ship as a whole. However, when a block in a given group of them is destroyed, that group will be affected by a series of explosions, proportional to the size of the affected group. Because of this, they serve as a useful, if risky, way for large ships to further increase power generation.
Power Reactor Rules
Power Reactors have some relatively complex rules governing their power output, especially if one is concerned about efficiency (either in terms of power per block, or power per volume). Two separate formulas are used: one which deals with the output of a single group of reactors (which is only used when the ship has exactly one reactor group), and one which is used to calculate the total output of multiple separate groups on a ship.
Single Group Formula
The formula for an entity with exactly one Power Reactor group is as follows:
GroupPower = BlockPower + SizePower
where:
BlockPower = 25 * NumberOfBlocks
and:
SizePower = 2000000 * 2 / ( 1 + 1.000348-0.333*(SumOfDimensions/3)1.7) - 2000000
GroupPower is the sum of the following values.
BlockPower is the base power per second per block of Power Reactors: 25e/sec/block.
SizePower is an extra power value dependent on SumOfDimensions: the sum of dimensions of the minimum bounding box for a given reactor group. SumOfDimensions, of course, is not dependent on aspect ratio: a 3x3x3, 1x1x7, and 2x2x5 bounding box all have a SumOfDimensions of 9. SizePower is of the greatest importance to efficient reactor design as it is an exponential function, and every successive increase in SumOfDimensions has greater value than the last.
Note that SizePower has a maximum value of 2,000,000e/sec, and suffers from diminishing returns as it approaches this value. Also note that for multiple reactor groups, the above formula is modified, and results in a diminishing return to TotalPower. TotalPower of an entity is not the sum of the GroupPower of each group. See the Multiple Group Formula below, as well as the Advanced Analysis section, for a more detailed explanation of the equation.
Here are some examples of power reactor groups and how their power outputs are calculated.
- Example power reactor groups and power values
A power reactor by itself has a bounding box with dimensions 1 x 1 x 1.
SumOfDimensions=3.
BlockPower=25e.
SizePower=115e.
GroupPower=140e.
A power reactor group of 3 modules with a bounding box with dimensions 2 x 1 x 2.
SumOfDimensions=5.
BlockPower=75e.
SizePower=276e.
GroupPower=351e.
A power reactor group of 7 modules with a bounding box with dimensions 3 x 3 x 3.
SumOfDimensions=9.
BlockPower =175e.
SizePower=750e.
GroupPower=925e.


Multiple Group Formula
When there is only one power reactor group on an entity, the GroupPower of that reactor is equal to the total power regen of the entity. However, when there is more than one group, the total power regen of the entity is not the sum of the GroupPower of all groups. Rather, TotalPower of an entity with multiple power reactor groups is subject to diminishing returns, and is given by the following formula:
TotalPower = BlockPower + GroupSumSizePower
where:
BlockPower = 25 * TotalNumberOfBlocksInAllGroups
and:
GroupSumSizePower = 2000000 * 2 / ( 1 + 1.000348-0.333 * GroupSumPower) - 2000000
where:
GroupSumPower = (SumOfDimensionsOfGroup1/3)1.7 + (SumOfDimensionsOfGroup2/3)1.7 ... + (SumOfDimensionsOfGroupn/3)1.7, where n is the number of groups.
Optimal Layouts
- Optimal maximum-output layouts
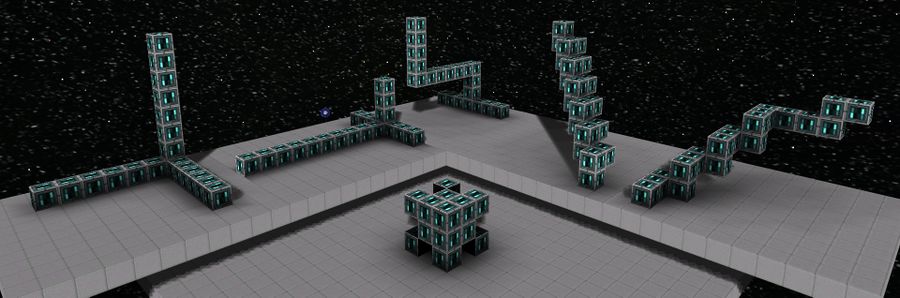
Background: Five efficient reactor shapes which all maximize the power output for 20 blocks.
Foreground: A "cubic reactor", also 20 blocks: this is an inefficient design in terms of e/sec/block.
Statistics for the 5 efficient reactors:
BlockPower=500e/s.
SizePower=3426.8e/s
TotalPower=3926.8e/s.

Every group pictured above (excluding the 3x3x3 "cubic reactor") consists of 20 blocks arranged in an optimal pattern. An optimal pattern for a group is one in which every block increases SumOfDimensions: this of the utmost importance to creating efficient (high power per second per block) reactors. Note that, though not pictured above, a straight line of Power Reactors is also a maximum-efficiency layout for a given block count. This is because each block increases SumOfDimensions, providing the maximum SizePower for the group.
The goal in design of a ship's power generation should be to both maximize every group's box dimensions (netting the greatest e/sec/block efficiency) while also reserving large contiguous volumes within the ship for other systems, as well as rooms of both functional (core room and access routes) and non-functional (miscellaneous roleplay/decorative rooms) nature.
Outdated "cubic reactors", in which many small groups are tightly packed into a small cubic volume (5x5x5 being particularly common for this type), have a comparatively low e/sec/block value, and are not recommended under any circumstance. They are only an academic excercise, one used when the above formulas were first being uncovered and tested.
The key points, therefore, of efficient reactor design are:
- Build the largest optimized group possible within the volume of the ship: ideally, every Power Reactor in the group will increase SumOfDimensions. Simply placing long straight lines or 3-axis crosses is common, due to the simplicity of the shapes.
- An allowable exception to this is where a minimal number of redundant (non-SumOfDimensions-increasing blocks) will allow an even greater increase in SumOfDimensions: eg. taking a small detour around other systems to provide a non-negligible increase in SumOfDimensions after the detour.
- Once the first (and usually largest) group is placed, it is likely that more groups will be required to reach the desired e/sec output.
- Where possible, run separate groups along the same path as the primary group, ensuring that you do not connect them at any point.
- Diagonal adjacency (that is to say, adjacent edges, rather than adjacent faces) is normally preferable.
- Symmetry may prove useful in placing several groups simultaneously, as long as the layout does not have inconsistencies that cause additional groups to connect to each other.
- Bear in mind that 1-block groups produce 140e/sec, compared to the 25e/sec that redundant blocks in a group will add. Therefore, fill gaps with small groups, rather than connecting large groups redundantly; the latter is likely to produce a loss in TotalPower.
Power Auxiliary Rules
Power Auxiliaries add a separate auxiliary power pool to a ship, and gradually refill this over time when off. This pool can be stored up and then emptied into the main power pool for emergency recharging, or if the auxiliaries are left on, they will provide a constant boost to power generation. They should only be used once Power Reactor Modules have reached or surpassed their peak efficiency. They also provide a new element of risk to manage during ship design, as the chain reactions caused by destroying part of a Power Auxiliary group can be significant if not well-mitigated.
- Main article: Power Auxiliary
Power Capacitor Rules
Power Capacitors have a simple exponential equation governing their capacity.
GroupPower = 1000 * NumBlocks1.05
Note that the only variable is NumBlocks (total block count of the grouping). Since GroupPower is an exponential function, subsequent blocks provide greater increments than the ones before them. This increment is labelled "BonusPerBlock" in the table below. Because of this, the ideal configuration for any number of Power Capacitors is a single physically-contiguous group. Even if there are separate "clumps" or concentrations of blocks, all of these should be connected by thinner lines of capacitors, to ensure maximum output. It is also advisable to have redundant connections between clumps, to avoid the potential for battle damage breaking these connections.
Here are some sample group sizes and their value breakdowns. Note that values are rounded.
| NumBlocks | GroupPower | BonusPerBlock |
|---|---|---|
| 1 | 1,000 | 0 |
| 2 | 2,071 | 35 |
| 3 | 3,169 | 56 |
| 4 | 4,287 | 72 |
| 5 | 5,419 | 84 |
| 6 | 6,562 | 94 |
| 7 | 7,715 | 102 |
| 8 | 8,877 | 110 |
| 9 | 10,045 | 116 |
| 10 | 11,220 | 122 |
| 50 | 60,802 | 216 |
| 100 | 125,893 | 259 |
Power Reactor Advanced Analysis
This data is mostly of use for builders of large and very large ships. Even though a mid-sized ship might be able to make use of 2 million e/sec, it might not have the internal volume to make an optimized group of 800 or more power reactor modules. However, this analysis does show that small to medium ships should still try to utilize the largest optimized block structures that they can manage within the volume of their ship: this is always more effective than using outdated "efficient cube" reactor setups.
The following table lists the SizePower value generated by an optimal group of blocks of the given number. Note that SizePower does not reach its maximum value of 2,000,000 e/sec until the optimized group has 3415 blocks.
| Blocks | Max SizePower | BlockPower | GroupPower | Power/Block Ratio |
|---|---|---|---|---|
| 25 | 4854.7 | 625.0 | 5479.7 | 219.2 |
| 50 | 14792.4 | 1250.0 | 16042.4 | 320.8 |
| 100 | 46492.6 | 2500.0 | 48992.6 | 489.9 |
| 200 | 148300 | 5000.0 | 153300 | 766.5 |
| 300 | 292236.1 | 7500.0 | 299736.1 | 999.1 |
| 400 | 469724.5 | 10000.0 | 479724.5 | 1199.3 |
| 500 | 671237.4 | 12500.0 | 683737.4 | 1367.5 |
| 600 | 885221.5 | 15000.0 | 900221.5 | 1500.4 |
| 700 | 1098666.6 | 17500.0 | 1116166.6 | 1594.5 |
| 800 | 1298843.6 | 20000.0 | 1318843.6 | 1648.6 |
| 895 | 1467322.0 | 22375 | 1489697.0 | 1664.5 |
| 900 | 1475480.8 | 22500.0 | 1497980.8 | 1664.4 |
| 1000 | 1622409.7 | 25000.0 | 1647409.7 | 1647.4 |
| 1100 | 1738002.7 | 27500.0 | 1765502.7 | 1605.0 |
| 1200 | 1824394.0 | 30000.0 | 1854394.0 | 1545.3 |
| 1300 | 1886032.9 | 32500.0 | 1918532.9 | 1475.8 |
| 1400 | 1928219.9 | 35000.0 | 1963219.9 | 1402.3 |
| 1500 | 1956037.9 | 37500.0 | 1993537.9 | 1329.0 |
| 1600 | 1973774.6 | 40000.0 | 2013774.6 | 1258.6 |
| 1700 | 1984741.6 | 42500.0 | 2027241.6 | 1192.5 |
| 1800 | 1991332.7 | 45000.0 | 2036332.7 | 1131.3 |
| 1900 | 1995189.4 | 47500.0 | 2042689.4 | 1075.1 |
| 2000 | 1997389.4 | 50000.0 | 2047389.4 | 1023.7 |
| 2100 | 1998614.2 | 52500.0 | 2051114.2 | 976.7 |
| 2200 | 1999280.1 | 55000.0 | 2054280.1 | 933.8 |
| 2300 | 1999633.8 | 57500.0 | 2057133.8 | 894.4 |
| 2400 | 1999817.6 | 60000.0 | 2059817.6 | 858.3 |
| 2500 | 1999911.0 | 62500.0 | 2062411.0 | 825.0 |
| 2600 | 1999957.5 | 65000.0 | 2064957.5 | 794.2 |
| 2700 | 1999980.1 | 67500.0 | 2067480.1 | 765.7 |
| 2800 | 1999990.8 | 70000.0 | 2069990.8 | 739.3 |
| 2900 | 1999995.9 | 72500.0 | 2072495.9 | 714.7 |
| 3000 | 1999998.2 | 75000.0 | 2074998.2 | 691.7 |
| 3100 | 1999999.2 | 77500.0 | 2077499.2 | 670.2 |
| 3200 | 1999999.7 | 80000.0 | 2079999.7 | 650.0 |
| 3300 | 1999999.9 | 82500.0 | 2082499.9 | 631.1 |
| 3400 | 1999999.9 | 85000.0 | 2084999.9 | 613.2 |
| 3415 | 2000000.0 | 85375.0 | 2085375.0 | 610.7 |
The above table is illustrated more effectively in the following chart:
- Graphs of SizePower and GroupPower per Block
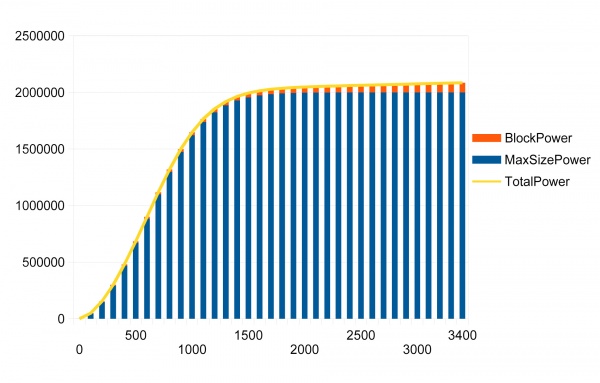
SizePower per optimized group of blocks of a given number, and the GroupPower per Block of each group.

It is easy to see that SizePower has diminishing returns after about 900 blocks. The precise number is 895. This is the number of blocks in a group that yields the maximum GroupPower per block, 1664.5, after which it begins to fall. This is due to the S-curve shape of the SizePower graph. This means that, in terms of mass, reactor systems which use larger groups, and fewer of them, are more efficent than greater numbers of smaller groups.
This diminishing return of SizePower, as well as the additional diminishing return for separate reactor groups, both serve to limit efficient reactors to about 2 million e/sec in practice. Consequently, large ships cannot efficiently generate much more than this without the addition of Power Auxiliary systems. An alternative is to simply continue adding Power Reactors: however, this is inefficient, and the power per second per block will eventually just be BlockPower (25e/sec/block) as SizePower reaches its absolute maximum.
To get to 2 million e/sec (using optimal layouts with each group):
| NumGroups | GroupSize | TotalBlocks | MaxSizePower | BlockPower | TotalPower | Power/Block |
|---|---|---|---|---|---|---|
| 1 | 1528 | 1528 | 1961859.7 | 38250 | 2000059.7 | 1308.9 |
| 2 | 983 | 1966 | 1975701.3 | 49150 | 2000276.3 | 1017.4 |
| 3 | 758 | 2274 | 1981077.4 | 56850 | 2000027.4 | 879.5 |
| 4 | 631 | 2524 | 1984801.0 | 63100 | 2000576.0 | 792.6 |
| 6 | 486 | 2916 | 1988313.8 | 72900 | 2000463.8 | 686.0 |
| 12 | 311 | 3732 | 1993938.6 | 93300 | 2001713.6 | 536.4 |
| 18 | 239 | 4302 | 1996248.5 | 107550 | 2002223.5 | 465.4 |
| 34 | 158 | 5372 | 2001017.1 | 134300 | 2004967.1 | 373.2 |
| 52 | 119 | 6188 | 1999927.0 | 154700 | 2002902.0 | 323.7 |
| 94 | 80 | 7520 | 1999194.0 | 188000 | 2001194.0 | 266.1 |
| 253 | 41 | 10373 | 2008595.1 | 259325 | 2009620.1 | 193.7 |