Legacy Power Systems
This page describes the power generation and storage mechanisms in StarMade.
Contents
Power Generation and Storage Blocks
Power is generated using either Power Reactor Modules or Power Auxiliaries, although the latter is greatly preferable as a supplement to the former (when they have reached or surpassed their peak efficiency), not a replacement. Entities built from a Ship Core have an innate power regen rate of 1 power per second (commonly abbreviated as "e/sec"). Planets and Space Stations do not have this innate power generation. Ships also have a base power capacity of 50,000 energy (as with regeneration, planets and stations have no innate power capacity). Power capacity can be increased using Power Capacitors. All three types of power blocks are more efficient (in terms of power per second per block, or e/sec/block) when placed in particular configurations, as detailed in their sections below.
An important consideration is that all systems drain some amount of power from the ship's capacity, either at a constant rate for a period of time (passive effects, scanner and jump drive charging, or cloaking and jamming), or in instantaneous bursts of varying frequency (most weapons). If the instantaneous power cost of an action (eg. firing a large missile) is greater than the power capacity of the ship, the action will not occur, a "Power Failure" warning will appear below the targeting reticle (as well as a red "E" in a triangle, at the top of the screen), and no power will be drained for that action. In most situations, a ship should at least have sufficient capacity to fire one salvo of its alpha (high damage, long cooldown) weapons. Power capacity should usually also include leeway for power spikes caused by shield regeneration costs, thruster activation, and potentially even enemy EMP attacks (which can cause significant power drain if the attacking ship is focussed on such weaponry).
Power generation will ideally be greater than the maximum expected rate of power usage: failing this, there should be a great enough combination of capacity and regen that the ship will not rapidly drain its capacity if power drain exceeds normal levels. For example, although very few large ships have regen equal to the power demand of charging a large Jump Drive, their capacity is usually greater than the cost to charge the drive.
A further consideration for larger ships is the use of Power Auxiliaries. These blocks are not more useful than Power Reactor Modules until the latter has reached its peak efficiency (as detailed below, this is approximately 2,000,000 e/sec). After this point, the output of Power Reactor Modules peters out, making way for Power Auxiliaries. They have a similar "soft-cap", but this is per physically separate group, rather than a cap placed on a ship as a whole. However, when a block in a given group of them is destroyed, that group will be affected by a series of explosions, proportional to the size of the affected group. Because of this, they serve as a useful, if risky, way for large ships to further increase power generation.
Power Reactor Rules
Power Reactors have some relatively complex rules governing their power output, especially if one is concerned about efficiency (either in terms of power per block, or power per volume). Two separate formulas are used: one which deals with the output of a single group of reactors (which is only used when the ship has exactly one reactor group), and one which is used to calculate the total output of multiple separate groups on a ship.
Single Group Formula
The formula for a single group of power reactors is as follows:
GroupPower = BlockPower + SizePower
where:
BlockPower = 25 * NumberOfBlocks
and:
SizePower = 2000000 * 2 / ( 1 + 1.000348-0.333*(SumOfDimensions/3)1.7) - 2000000
GroupPower is the sum of the following values.
BlockPower is the base power per second per block of Power Reactors: 25e/sec/block.
SizePower is an extra power value dependent on SumOfDimensions: the sum of dimensions of the minimum bounding box for a given reactor group. SumOfDimensions, of course, is not dependent on aspect ratio: a 3x3x3, 1x1x7, and 2x2x5 bounding box all have a SumOfDimensions of 9. SizePower is of the greatest importance to efficient reactor design as it is an exponential function, and every successive increase in SumOfDimensions has greater value than the last.
Note that SizePower has a maximum value of 2,000,000e/sec, and suffers from diminishing returns as it approaches this value. Also note that for multiple reactor groups, the above formula is modified, and results in a diminishing return to TotalPower. TotalPower of an entity is not the sum of the GroupPower of each group. See the Advanced Analysis section for a more detailed explanation of the equation.
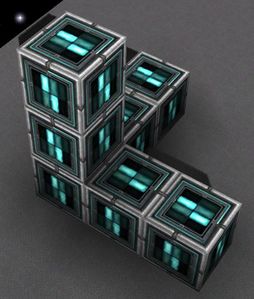
Here are some examples of power reactor groups and how their power outputs are calculated.
- Example power reactor groups and power values
Multiple Group Formula
When there is only one power reactor group on an entity, the GroupPower of that reactor is equal to the total power regen of the entity. However, when there is more than one group, the total power regen of the entity is not the sum of the GroupPower of all groups. Rather, TotalPower of an entity with multiple power reactor groups is subject to diminishing returns, and is given by the following formula:
TotalPower = BlockPower + GroupSumSizePower
where:
BlockPower = 25 * TotalNumberOfBlocksInAllGroups
and:
GroupSumSizePower = 2000000 * 2 / ( 1 + 1.000348-0.333 * GroupSumPower) - 2000000
where:
GroupSumPower = (SumOfDimensionsOfGroup1/3)1.7 + (SumOfDimensionsOfGroup2/3)1.7 ... + (SumOfDimensionsOfGroupn/3)1.7, where n is the number of groups.
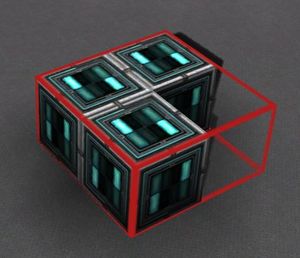
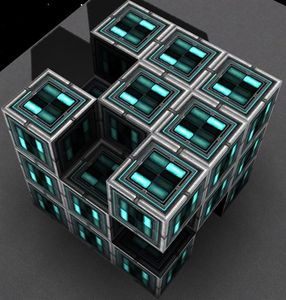
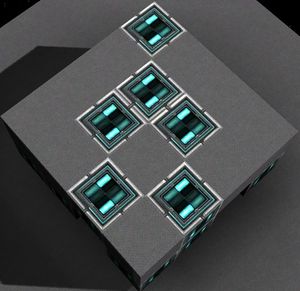
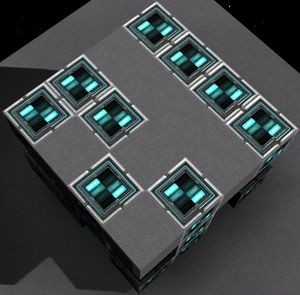
To understand the relationship between SizePower, BlockPower and TotalPower, consider a 3x3x3 space in which to place a set of reactor modules. Below are three layouts in this 3x3 space. Note that all values displayed around rounded.
- Example 3x3x3 layouts with power values
Notice that the first and second versions have the same SizePower, as SizePower depends only on the dimensions of the group's bounding box, and not the number of blocks. The first produces more power because it has a greater BlockPower and the same SizePower, but SizePower still contributes more to TotalPower than BlockPower does. Then look at the third version, which has the same dimensions but two groups instead of one. The SizePower is twice that of the other two because there are two groups and because SizePower counts for much more than BlockPower. Because of this, the TotalPower of the third version is much higher than the first one, in spite of having almost half the BlockPower.
Please note that with very small groups as seen above, the diminishing returns of TotalPower with multiple groups is not noticeable due to rounding of such small numbers. However, note the following examples:
- 1000 blocks in one group: TotalPower = 1,647,409.7 e/sec
- 500 blocks in one group: TotalPower = 683,737.4 e/sec
- 1000 total blocks, in two groups of 500: TotalPower = 1,231,567.2 e/sec, not (2*683,737.4=1,367,474.8).
Optimal layouts
None of the examples above are optimal layouts for the cubic 3x3x3 volume, though the third version is close. To create an optimal layout in a given space is rather complex, but it boils down to the following three rules:
- Maximize the SumOfDimensions for each group, because SizePower is the greatest contributor to TotalPower.
- Maximize the number of such groups in the space, because this allows you to take advantage of SizePower for each group.
- Minimize the amount of space not used by reactor groups, without also decreasing the number of groups. It is relevant to note that a 1-block group produces 140e/sec, whereas adding that block to a group without it serving to increase SizePower will only add 25e/sec (from BlockPower) to that group's output.
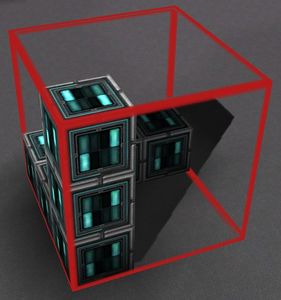
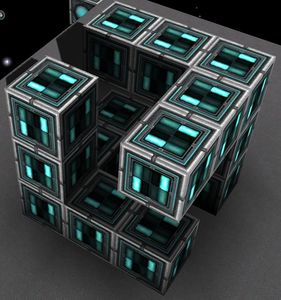
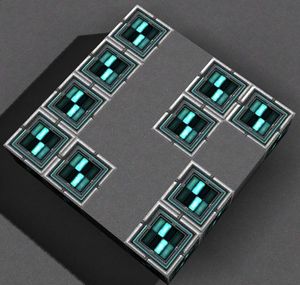
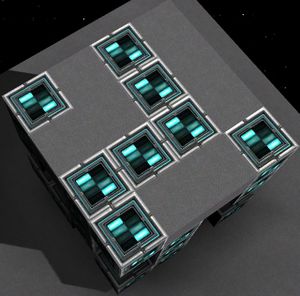
The optimal layout for the 3x3x3 example above fills in as many spaces as possible in the cube without the two groups touching. By filling in empty spaces of the third example above, we can increase the BlockPower of each group to 250e/s, and we are left with only 7 empty spaces (6 exterior and the block in the middle is omitted). It looks like the following:
- Optimal 3x3 reactor layout
Once the space is well packed with Power Reactor Modules the remaining spaces can be filled with any other module. Bear in mind that blocks which benefit from being in physically contiguous groupings, such as Power Capacitors or Power Auxiliaries do not make ideal fillers, as the gaps between reactors may not be contiguous, depending on reactor layout. Using Shield-Rechargers or Shield Capacitors is common, as they do not rely on being in a group.
Cubic layouts are often non-ideal for a given ship, and are an outdated academic excercize which saw use when these formulas were first being tested. The above 3x3x3 example is the optimal cubic structure, for the most power that can be generated in the given cubic volume, but does not provide the greatest power per second per block (the accepted measure of reactor efficiency) for the 20 blocks used. Reactor layouts should be designed to fit the entity they are built for, in particular to maximise SizePower within the space available.
- Optimal maximum-output layouts
Note that, though not pictured above, a straight line of Power Reactor blocks is also a maximum-efficiency layout for a given block count. This is because each block increases SumOfDimensions, ensuring the greatest possible SizePower for the group.
In the picture above, the first structure on the left uses the same number of blocks as the 3x3x3 cubic power structure shown in the lower middle, but generates almost twice the power at 3926.8e/s. For 20 blocks, this is the maximum power that can be generated. However, other shapes can also achieve the same box dimension sum as the first structure. Each of the other four structures on the upper deck in the picture above also generate the maximum power of 3926.8e/s. Thus it is likely for almost any ship volume that a custom, non-cubic reactor structure will generate more power than simply using a compact cubic reactor. Furthermore, the true cubic volume of all of the structures in the image above is actually 20. In other words, each of the above structures have an identical impact on the internal volume of a given ship, which is to consume 20 blocks of the ship's total internal volume, but the 3x3x3 cubic shape only generates half of the other structure's power per second.
The goal in design of a ship's power generation should be to both maximize every group's box dimensions (netting the greatest power per block efficiency) while also reserving large contiguous volumes within the ship for other systems, as well as rooms of both functional (core room and access paths) and non-functional nature. A cubic volume, although easy to fit into a ship, tends to have a relatively low power per block value, voiding the primary goal of efficient reactor design.
To restate the previously-noted conditions of efficient reactor design:
- Build the largest optimized group possible within the volume of the ship: ideally, every Power Reactor in the group will increase SumOfDimensions. Simply placing long lines or 3-axes crosses is common, due to the simplicity of the shapes.
- An allowable exception to this is where a minimal number of redundant (non-SumOfDimensions-increasing blocks) will allow an even greater increase in SumOfDimensions: eg. taking a small detour around other systems to provide a non-negligible increase in SumOfDimensions after the detour.
- Once the first (and usually largest) group is placed, it is likely that more will be required to reach the desired e/sec output. Where possible, run separate groups along the same path as the primary group, ensuring that you do not connect them at any point (diagonal adjacency is usually preferable). Symmetry may prove useful in placing several groups.
- Bear in mind that 1-block groups produce 140e/sec, compared to the 25e/sec that redundant blocks in a group will add. Fill gaps with small groups, rather than connecting large groups redundantly; the latter is likely to produce a loss in TotalPower.
There is also a diminishing return to GroupSumSizePower as it approaches 2,000,000e/sec. See the Advanced Analysis section below.
Additional optimal layouts may be found below.
Power Auxiliary Rules
Power Auxiliaries add a new "auxiliary" power pool to a ship, which can be emptied into the main pool for emergency recharging, or used to provide a constant boost to power generation. They should only be used once Power Reactor Modules have reached or surpassed their peak efficiency. They also provide a new element of risk to manage during ship design, as the chain reactions caused by destroying part of a Power Auxiliary group can be significant if not well mitigated.
- Main article: Power Auxiliary
Power Capacitor Rules
Power Capacitors have a simpler equation governing their storage capacity, and designing layouts is subsequently vastly simpler.
GroupPower = 1000 * NumBlocks1.05
Unlike Power Reactor Modules, there is no SumOfDimensions value, so the dimensions of the group are irrelevant. All that matters is how many modules are in the group. Since GroupPower is a power function again, the more blocks are in the group the more benefit the group gets from each block. This is called BonusPerBlock below. Thus, for a given number of Power Capacitors is it better to have fewer larger groups than many smaller groups.
Ideally, a ship only has one group of Capacitors. Even if there are necessarily several clumps, they would have a line of capacitors running between them to connect them all into one group.
Here's some sample group sizes and their value breakdowns. Note that values are rounded.
| NumBlocks | GroupPower | BonusPerBlock |
|---|---|---|
| 1 | 1,000 | 0 |
| 2 | 2,071 | 35 |
| 3 | 3,169 | 56 |
| 4 | 4,287 | 72 |
| 5 | 5,419 | 84 |
| 6 | 6,562 | 94 |
| 7 | 7,715 | 102 |
| 8 | 8,877 | 110 |
| 9 | 10,045 | 116 |
| 10 | 11,220 | 122 |
| 50 | 60,802 | 216 |
| 100 | 125,893 | 259 |
Power Reactor Advanced Analysis
This data is mostly of use for builders of large and very large ships. Even though a mid-sized ship might be able to make use of 2 million e/sec, it might not have the internal volume to make an optimized group of 800 or more power reactor modules. However, this analysis does show that small to medium ships should still try to utilize the largest optimized block structures that they can manage within the volume of their ship, as opposed to a higher number of smaller block structures, such as those used in the efficient cube structures.
The following table lists the SizePower value generated by an optimal group of blocks of the given number. Note that SizePower does not fully max out at 2,000,000 until the optimized group has 3415 blocks. An optimized group is one with the largest possible box-dimensions for the number of blocks, or a group in which no block fails to increase the box-dimensions of the group:
| Blocks | Max SizePower | BlockPower | GroupPower | Power/Block Ratio |
|---|---|---|---|---|
| 25 | 4854.7 | 625.0 | 5479.7 | 219.2 |
| 50 | 14792.4 | 1250.0 | 16042.4 | 320.8 |
| 100 | 46492.6 | 2500.0 | 48992.6 | 489.9 |
| 200 | 148300 | 5000.0 | 153300 | 766.5 |
| 300 | 292236.1 | 7500.0 | 299736.1 | 999.1 |
| 400 | 469724.5 | 10000.0 | 479724.5 | 1199.3 |
| 500 | 671237.4 | 12500.0 | 683737.4 | 1367.5 |
| 600 | 885221.5 | 15000.0 | 900221.5 | 1500.4 |
| 700 | 1098666.6 | 17500.0 | 1116166.6 | 1594.5 |
| 800 | 1298843.6 | 20000.0 | 1318843.6 | 1648.6 |
| 895 | 1467322.0 | 22375 | 1489697.0 | 1664.5 |
| 900 | 1475480.8 | 22500.0 | 1497980.8 | 1664.4 |
| 1000 | 1622409.7 | 25000.0 | 1647409.7 | 1647.4 |
| 1100 | 1738002.7 | 27500.0 | 1765502.7 | 1605.0 |
| 1200 | 1824394.0 | 30000.0 | 1854394.0 | 1545.3 |
| 1300 | 1886032.9 | 32500.0 | 1918532.9 | 1475.8 |
| 1400 | 1928219.9 | 35000.0 | 1963219.9 | 1402.3 |
| 1500 | 1956037.9 | 37500.0 | 1993537.9 | 1329.0 |
| 1600 | 1973774.6 | 40000.0 | 2013774.6 | 1258.6 |
| 1700 | 1984741.6 | 42500.0 | 2027241.6 | 1192.5 |
| 1800 | 1991332.7 | 45000.0 | 2036332.7 | 1131.3 |
| 1900 | 1995189.4 | 47500.0 | 2042689.4 | 1075.1 |
| 2000 | 1997389.4 | 50000.0 | 2047389.4 | 1023.7 |
| 2100 | 1998614.2 | 52500.0 | 2051114.2 | 976.7 |
| 2200 | 1999280.1 | 55000.0 | 2054280.1 | 933.8 |
| 2300 | 1999633.8 | 57500.0 | 2057133.8 | 894.4 |
| 2400 | 1999817.6 | 60000.0 | 2059817.6 | 858.3 |
| 2500 | 1999911.0 | 62500.0 | 2062411.0 | 825.0 |
| 2600 | 1999957.5 | 65000.0 | 2064957.5 | 794.2 |
| 2700 | 1999980.1 | 67500.0 | 2067480.1 | 765.7 |
| 2800 | 1999990.8 | 70000.0 | 2069990.8 | 739.3 |
| 2900 | 1999995.9 | 72500.0 | 2072495.9 | 714.7 |
| 3000 | 1999998.2 | 75000.0 | 2074998.2 | 691.7 |
| 3100 | 1999999.2 | 77500.0 | 2077499.2 | 670.2 |
| 3200 | 1999999.7 | 80000.0 | 2079999.7 | 650.0 |
| 3300 | 1999999.9 | 82500.0 | 2082499.9 | 631.1 |
| 3400 | 1999999.9 | 85000.0 | 2084999.9 | 613.2 |
| 3415 | 2000000.0 | 85375.0 | 2085375.0 | 610.7 |
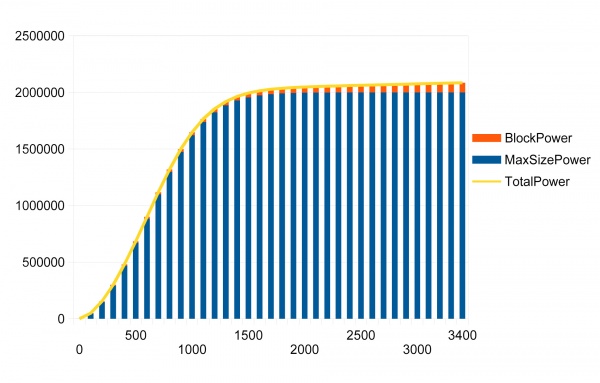
The above table is illustrated better in the following chart:
- Graphs of SizePower and GroupPower per Block
It is easy to see that SizePower has diminishing returns after about 900 blocks. The precise number is 895. This is the number of blocks in a group that yields the largest bonus per block, 1664.5, after which it begins to fall. This is due to the S-curve shape of the SizePower graph. Consequently, if building a large ship with thousands of power reactor blocks, it would seem the power system should be composed of optimized groups of about 700 to 1000 blocks each, this range being close enough to 895 that it does not greatly affect the resulting e/sec produced by a large system. However, there is another diminishing return factor applied to multiple groups within a ship. For example, in the chart above a group of 1000 power reactors, optimally, yields 1647409.7.0 e/sec, and a group of 500 power reactors yields 683737.4 e/sec. This has been verified in-game with build 0.199.132. However, using two groups of 500 power reactors does not yield double the 683737.4 e/sec value (i.e 1367474.8), but only 1231567.2 instead. Likewise, 1200 blocks would yield 1854394.0 e/sec, but two groups of 600 only yield 1510422.0 e/sec, not double the 900221.5 e/sec of one group of 600.
This diminishing return factor for groups is a soft limit which effectively limits ships to not much more than 2 million e/sec in practice. Consequently large ships are currently either limited to this value, or else use a docked power module daughter-ship and power drain beams to add more power generation capacity to a base ship.
To get to 2 million e/sec (using optimal layouts with each group):
| NumGroups | GroupSize | TotalBlocks | MaxSizePower | BlockPower | TotalPower | Power/Block |
|---|---|---|---|---|---|---|
| 1 | 1528 | 1528 | 1961859.7 | 38250 | 2000059.7 | 1308.9 |
| 2 | 983 | 1966 | 1975701.3 | 49150 | 2000276.3 | 1017.4 |
| 3 | 758 | 2274 | 1981077.4 | 56850 | 2000027.4 | 879.5 |
| 4 | 631 | 2524 | 1984801.0 | 63100 | 2000576.0 | 792.6 |
| 6 | 486 | 2916 | 1988313.8 | 72900 | 2000463.8 | 686.0 |
| 12 | 311 | 3732 | 1993938.6 | 93300 | 2001713.6 | 536.4 |
| 18 | 239 | 4302 | 1996248.5 | 107550 | 2002223.5 | 465.4 |
| 34 | 158 | 5372 | 2001017.1 | 134300 | 2004967.1 | 373.2 |
| 52 | 119 | 6188 | 1999927.0 | 154700 | 2002902.0 | 323.7 |
| 94 | 80 | 7520 | 1999194.0 | 188000 | 2001194.0 | 266.1 |
| 253 | 41 | 10373 | 2008595.1 | 259325 | 2009620.1 | 193.7 |
In terms of ship mass, larger groups are more efficient.
Sample Optimized Reactor Layouts
- Optimal 2x2 and 3x3 reactor layouts
- Optimal 4x4 reactor layout
- Optimal 5x5 reactor layout
