Difference between revisions of "Trading Guild"
(added B150) |
(minor grammar tweaks) |
||
| Line 8: | Line 8: | ||
===Ships=== | ===Ships=== | ||
====B110-11==== | ====B110-11==== | ||
| − | The Bahtra B110 | Drone<br/> | + | <big>'''The Bahtra B110 | Drone'''<br/> |
| − | The Trading Guild will often employ the use of drones more than manned fighters. Pilots cost money, more so when they die! Shipping valuable cargo across space can be fatal, surprisingly. The drone here is quite an aggressive looking ship and it is clear that Bahtra intended so! | + | The Trading Guild will often employ the use of drones more than manned fighters. Pilots cost money, more so when they die! Shipping valuable cargo across space can be fatal, surprisingly. The drone here is quite an aggressive looking ship and it is clear that Bahtra intended so!</big> |
{| class="wikitable" | {| class="wikitable" | ||
| − | |rowspan="9" colspan="3"|[[File:B110-12.png| | + | |rowspan="9" colspan="3"|[[File:B110-12.png|700px]] |
!colspan="3"|<big>Stats</big> | !colspan="3"|<big>Stats</big> | ||
|- | |- | ||
| Line 40: | Line 40: | ||
!colspan="7"|<big>Systems</big> | !colspan="7"|<big>Systems</big> | ||
|- | |- | ||
| − | !rowspan="9 | + | !rowspan="9" |Weapons |
| − | |rowspan="9" width=" | + | |rowspan="9" width="50px" style="text-align:center;"|[[File:Cannon Computer.png|100px]] ||rowspan="9" width="70px" style="text-align:center;"|[[Cannon Computer|Unslaved Cannons]] |
!Stat !!colspan="2"| Value | !Stat !!colspan="2"| Value | ||
|- | |- | ||
| Line 65: | Line 65: | ||
|} | |} | ||
====B130-7==== | ====B130-7==== | ||
| − | The Bahtra B130 | Patrol Ship<br/> | + | <big>'''The Bahtra B130 | Patrol Ship'''<br/> |
| − | The Trading Guild utilizes patrol ships and bombers for escorting their cargo ships. These craft are usually guarding small freighters and as such dock with stations fairly often. | + | The Trading Guild utilizes patrol ships and bombers for escorting their cargo ships. These craft are usually guarding small freighters and as such dock with stations fairly often.</big> |
{| class="wikitable" | {| class="wikitable" | ||
| − | |rowspan="9" colspan="3"|[[File:B130-7.png| | + | |rowspan="9" colspan="3"|[[File:B130-7.png|700px]] |
!colspan="3"|<big>Stats</big> | !colspan="3"|<big>Stats</big> | ||
|- | |- | ||
| Line 97: | Line 97: | ||
!colspan="7"|<big>Systems</big> | !colspan="7"|<big>Systems</big> | ||
|- | |- | ||
| − | !rowspan="9 | + | !rowspan="9" |Weapons |
| − | |rowspan="9" width=" | + | |rowspan="9" width="50px" style="text-align:center;"|[[File:Cannon Computer.png|100px]][[File:Punch-Through Effect Computer.png|100px]] ||rowspan="9" width="70px" style="text-align:center;"|[[Cannon Computer]]<br/>+[[Punch-Through Effect Computer|Punch-Through Effect]] (97.0%) |
!Stat !!colspan="2"| Value | !Stat !!colspan="2"| Value | ||
|- | |- | ||
| Line 118: | Line 118: | ||
|- | |- | ||
!rowspan="15" width="30px"|Equipment | !rowspan="15" width="30px"|Equipment | ||
| − | |rowspan="6 | + | |rowspan="6" style="text-align:center;"|[[File:Scanner Computer.png|100px]] ||rowspan="6" style="text-align:center;"|[[Scanner Computer|Scanner System]] |
!Stat !!colspan="2"| Value | !Stat !!colspan="2"| Value | ||
|- | |- | ||
| Line 131: | Line 131: | ||
|Modules/Modules Needed|| style="text-align:center;"| 70 ||style="text-align:center;"| 237 | |Modules/Modules Needed|| style="text-align:center;"| 70 ||style="text-align:center;"| 237 | ||
|- | |- | ||
| − | |rowspan="6 | + | |rowspan="6" style="text-align:center;"|[[File:Jump Drive Computer.png|100px]] ||rowspan="6" style="text-align:center;"|[[Jump Drive Computer|Jump Drive System]] |
!Stat !!colspan="2"| Value | !Stat !!colspan="2"| Value | ||
|- | |- | ||
| Line 144: | Line 144: | ||
|Modules/Modules Needed|| style="text-align:center;"| 336||style="text-align:center;"| 263 | |Modules/Modules Needed|| style="text-align:center;"| 336||style="text-align:center;"| 263 | ||
|- | |- | ||
| − | | | + | | style="text-align:center;"|[[File:Inner Ship Remote.png|100px]] || style="text-align:center;"|[[Inner Ship Remote]]"Engine" |
|colspan="3" style="text-align:center;"|''Toggles the Engine lights on and off.'' | |colspan="3" style="text-align:center;"|''Toggles the Engine lights on and off.'' | ||
|- | |- | ||
| − | | | + | | style="text-align:center;"|[[File:Rail Docker.png|100px]] || style="text-align:center;"|[[Rail Docker]] <br/><small>(Location: 19,15,28)</small> |
|colspan="3" style="text-align:center;"|''Part of a USD dock on the vessel's left side.'' | |colspan="3" style="text-align:center;"|''Part of a USD dock on the vessel's left side.'' | ||
|} | |} | ||
====B150-18==== | ====B150-18==== | ||
| − | The Bahtra B150 | Bomber<br/> | + | <big>'''The Bahtra B150 | Bomber'''<br/> |
| − | The Trading Guild do not often employ bombers in their fleets. Most of their combat tactics involve preventative measures such as Jump Drives and AMS systems. It's also better to sell warfare than it is to engage in it. This particular model is destined to be decommissioned in the near future. | + | The Trading Guild do not often employ bombers in their fleets. Most of their combat tactics involve preventative measures such as Jump Drives and AMS systems. It's also better to sell warfare than it is to engage in it. This particular model is destined to be decommissioned in the near future.</big> |
{| class="wikitable" | {| class="wikitable" | ||
| − | |rowspan="9" colspan="3"|[[File:B150-18.png| | + | |rowspan="9" colspan="3"|[[File:B150-18.png|700px]] |
!colspan="3"|<big>Stats</big> | !colspan="3"|<big>Stats</big> | ||
|- | |- | ||
| Line 161: | Line 161: | ||
|colspan="2" style="text-align:center;"| Bomber | |colspan="2" style="text-align:center;"| Bomber | ||
|- | |- | ||
| − | !Mass <small>(Base/ With Docks)</small> | + | !Mass <br/><small>(Base/ With Docks)</small> |
|style="text-align:center;"| 468.1 ||style="text-align:center;"|470.8 | |style="text-align:center;"| 468.1 ||style="text-align:center;"|470.8 | ||
|- | |- | ||
| Line 184: | Line 184: | ||
!colspan="7"|<big>Systems</big> | !colspan="7"|<big>Systems</big> | ||
|- | |- | ||
| − | !rowspan="20 | + | !rowspan="20" |Weapons |
| − | |rowspan="10" width=" | + | |rowspan="10" width="50px" style="text-align:center;"|[[File:Missile Computer.png|75px]][[File:Damage Beam Computer.png|75px]][[File:Piercing Effect Computer.png|75px]] ||rowspan="10" width="70px" style="text-align:center;"|[[Missile Computer]]<br/>+[[Damage Beam Computer]](93.2%)<br/>+[[Punch-Through Effect Computer|Punch-Through Effect]] (88.6%) |
!Stat !!colspan="2"| Value | !Stat !!colspan="2"| Value | ||
|- | |- | ||
| Line 206: | Line 206: | ||
|Power Usage<span style="color: grey"><small> (Per Activation)</small></span> ||colspan="2" style="text-align:center;"| 532,636<span style="color: grey">.4</span> | |Power Usage<span style="color: grey"><small> (Per Activation)</small></span> ||colspan="2" style="text-align:center;"| 532,636<span style="color: grey">.4</span> | ||
|- | |- | ||
| − | |rowspan="10 | + | |rowspan="10" style="text-align:center;"|[[File:Missile Computer.png|75px]][[File:Damage Beam Computer.png|75px]][[File:Piercing Effect Computer.png|75px]] ||rowspan="10" style="text-align:center;"|[[Missile Computer]]<br/>+[[Damage Beam Computer]](93.2%)<br/>+[[Punch-Through Effect Computer|Punch-Through Effect]] (88.6%) |
!Stat !!colspan="2"| Value | !Stat !!colspan="2"| Value | ||
|- | |- | ||
| Line 228: | Line 228: | ||
|- | |- | ||
!rowspan="14" width="30px"|Equipment | !rowspan="14" width="30px"|Equipment | ||
| − | |rowspan="6 | + | |rowspan="6" style="text-align:center;"|[[File:Scanner Computer.png|100px]] ||rowspan="6" style="text-align:center;"|[[Scanner Computer|Scanner System]] |
!Stat !!colspan="2"| Value | !Stat !!colspan="2"| Value | ||
|- | |- | ||
| Line 241: | Line 241: | ||
|Modules/Modules Needed|| style="text-align:center;"| 76 ||style="text-align:center;"| 228 | |Modules/Modules Needed|| style="text-align:center;"| 76 ||style="text-align:center;"| 228 | ||
|- | |- | ||
| − | |rowspan="6 | + | |rowspan="6" style="text-align:center;"|[[File:Jump Drive Computer.png|100px]] ||rowspan="6" style="text-align:center;"|[[Jump Drive Computer|Jump Drive System]] |
!Stat !!colspan="2"| Value | !Stat !!colspan="2"| Value | ||
|- | |- | ||
| Line 254: | Line 254: | ||
|Modules/Modules Needed|| style="text-align:center;"| 173||style="text-align:center;"| 236 | |Modules/Modules Needed|| style="text-align:center;"| 173||style="text-align:center;"| 236 | ||
|- | |- | ||
| − | | | + | |style="text-align:center;"|[[File:Inner Ship Remote.png|100px]] || style="text-align:center;"|[[Inner Ship Remote]]"[no data]" |
|colspan="3" style="text-align:center;"|''Toggles the Engine lights on and off.'' | |colspan="3" style="text-align:center;"|''Toggles the Engine lights on and off.'' | ||
|- | |- | ||
| − | | | + | |style="text-align:center;"|[[File:Rail Docker.png|100px]] ||style="text-align:center;"|[[Rail Docker]]<br/><small>(Location: 22,14,17)</small> |
|colspan="3" style="text-align:center;"|''Part of a USD dock on the vessel's left side.'' | |colspan="3" style="text-align:center;"|''Part of a USD dock on the vessel's left side.'' | ||
|- | |- | ||
!rowspan="15" width="30px"|Dock(s) | !rowspan="15" width="30px"|Dock(s) | ||
| − | |rowspan="7 | + | |rowspan="7" style="text-align:center;"|<big>1 x AMS Turret<br/>(Small)</big>||rowspan="7" style="text-align:center;"|''Docked on the right side of the vessel. Parallel to the USD dock'' <br/><small>(Location: 10,16,16)</small> |
!Stat !!colspan="2"| Value | !Stat !!colspan="2"| Value | ||
|- | |- | ||
Revision as of 06:42, 20 December 2016
| This article is a work-in-progress. Edits are welcome, however please keep in mind that they may be overwritten or removed if they are not in line with the intention of the article. |
The Trading Guild is one of the major factions that players will encounter while journeying through the universe. They are a generally peaceful trade oriented faction that will start off neutral towards the player but will retaliate if provoked.
Overview
TBA
Blueprints
Ships
B110-11
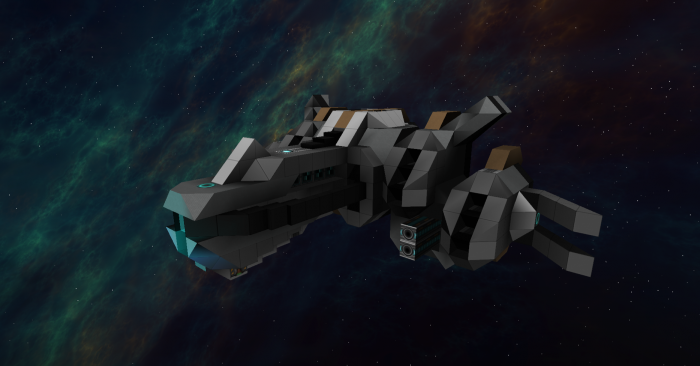
The Bahtra B110 | Drone
The Trading Guild will often employ the use of drones more than manned fighters. Pilots cost money, more so when they die! Shipping valuable cargo across space can be fatal, surprisingly. The drone here is quite an aggressive looking ship and it is clear that Bahtra intended so!
|
Stats | |||||
|---|---|---|---|---|---|---|
| Class | Attack Drone | |||||
| Mass | 104.9 | |||||
| Dimensions (Length/Height/Width) |
19m / 10m / 29m | |||||
| Power ■ (Total/Recharge) |
84,317.6 | 15,944.8 e/sec | ||||
| Thrust / Max Speed ■ | 129.8 | 130.3 | ||||
| Shields ■ (Total/Recharge) |
3,093 | 187 s/sec | ||||
| Armor Hit Points ■ | 46,075 | |||||
| Structure Hit Points ■ | 34,525 | |||||
| Systems | ||||||
| Weapons |  |
Unslaved Cannons | Stat | Value | ||
| Number of Arrays | 2 | |||||
| Damage Output (Per Array) | 580 | |||||
| Block Penetration | 7 | |||||
| Reload (In Seconds) | 1.0 | |||||
| Shots (Per Activation) | 1 | |||||
| Projectile Speed (In Meters per Second) | 937.5 | |||||
| Range (In Sector Lengths) | 1.0 | |||||
| Power Usage (Per Array/Per Activation) | 6,380.00 | 12,760.00 | ||||
| Equipment |  |
Rail Docker (Location: 16,11,20) |
Forward facing dock on the underside of the vessel's nose. | |||
B130-7
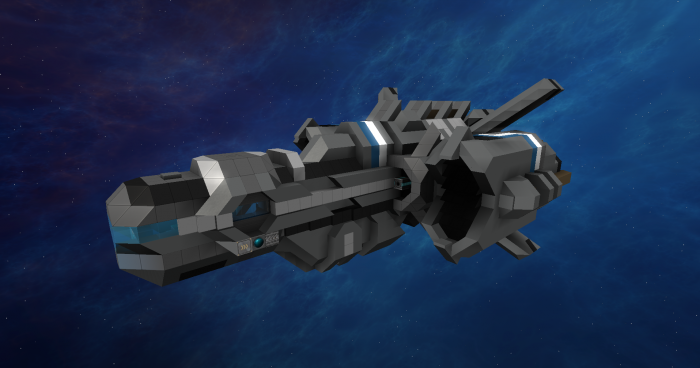
The Bahtra B130 | Patrol Ship
The Trading Guild utilizes patrol ships and bombers for escorting their cargo ships. These craft are usually guarding small freighters and as such dock with stations fairly often.
|
Stats | |||||
|---|---|---|---|---|---|---|
| Class | Light Fighter | |||||
| Mass | 525.3 | |||||
| Dimensions (Length/Height/Width) |
44m / 19m / 29m | |||||
| Power ■ (Total/Recharge) |
130,086.4 | 126,507.6 e/sec | ||||
| Thrust / Max Speed ■ | 894.5 | 165.2 | ||||
| Shields ■ (Total/Recharge) |
12,265 | 968 s/sec | ||||
| Armor Hit Points ■ | 176,625 | |||||
| Structure Hit Points ■ | 179,715 | |||||
| Systems | ||||||
| Weapons |   |
Cannon Computer +Punch-Through Effect (97.0%) |
Stat | Value | ||
| Number of Arrays | 2 | |||||
| Damage Output (Per Array) | 1,300 | |||||
| Block Penetration | 16 | |||||
| Reload (In Seconds) | 1.0 | |||||
| Shots (Per Activation) | 1 | |||||
| Projectile Speed (In Meters per Second) | 937.5 | |||||
| Range (In Sector Lengths) | 1.0 | |||||
| Power Usage (Per Array/Per Activation) | 14,300.00 | 28,600.00 | ||||
| Equipment |  |
Scanner System | Stat | Value | ||
| Number of Blocks | 70 | |||||
| Total Charged Needed | 330,482.0 | |||||
| Charge Time (Approx.) | 50.00 sec | |||||
| Power Usage (Per Second) | 6,380.00 | |||||
| Modules/Modules Needed | 70 | 237 | ||||
 |
Jump Drive System | Stat | Value | |||
| Number of Blocks | 336 | |||||
| Total Charged Needed | 575,673.0 | |||||
| Charge Time (Approx.) | 20.00 sec | |||||
| Power Usage (Per Second while Charging) | 26,800.00 | |||||
| Modules/Modules Needed | 336 | 263 | ||||
 |
Inner Ship Remote"Engine" | Toggles the Engine lights on and off. | ||||
 |
Rail Docker (Location: 19,15,28) |
Part of a USD dock on the vessel's left side. | ||||
B150-18
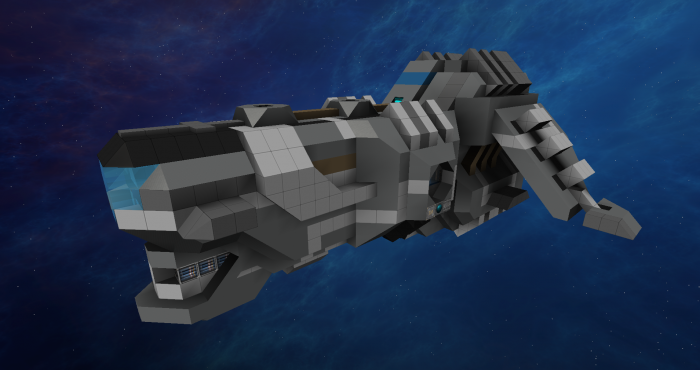
The Bahtra B150 | Bomber
The Trading Guild do not often employ bombers in their fleets. Most of their combat tactics involve preventative measures such as Jump Drives and AMS systems. It's also better to sell warfare than it is to engage in it. This particular model is destined to be decommissioned in the near future.
|
Stats | |||||
|---|---|---|---|---|---|---|
| Class | Bomber | |||||
| Mass (Base/ With Docks) |
468.1 | 470.8 | ||||
| Dimensions (Length/Height/Width) |
40m / 18m / 33m | |||||
| Power ■ (Total/Recharge) |
1,002,367.2 | 101,493.3 e/sec | ||||
| Thrust / Max Speed ■ | 487.3 | 115.1 | ||||
| Shields ■ (Total/Recharge) |
14,114 | 638 s/sec | ||||
| Armor Hit Points ■ | 151,050 | |||||
| Structure Hit Points ■ | 194,625 | |||||
| Systems | ||||||
| Weapons |    |
Missile Computer +Damage Beam Computer(93.2%) +Punch-Through Effect (88.6%) |
Stat | Value | ||
| Number of Arrays | 1 | |||||
| Type | Lock On | |||||
| Damage Output (Per Array) | 106,527.3 | |||||
| Blast Radius (In Blocks) | 16.4 | |||||
| Reload (In Seconds) | 1.0 | |||||
| Shots (Per Activation) | 1 | |||||
| Projectile Speed (In Meters per Second) | 359.3 | |||||
| Range (In Sector Lengths) | 4.6 | |||||
| Power Usage (Per Activation) | 532,636.4 | |||||
   |
Missile Computer +Damage Beam Computer(93.2%) +Punch-Through Effect (88.6%) |
Stat | Value | |||
| Number of Arrays | 1 | |||||
| Type | Lock On | |||||
| Damage Output (Per Array) | 106,527.3 | |||||
| Blast Radius (In Blocks) | 16.4 | |||||
| Reload (In Seconds) | 1.0 | |||||
| Shots (Per Activation) | 1 | |||||
| Projectile Speed (In Meters per Second) | 359.3 | |||||
| Range (In Sector Lengths) | 4.6 | |||||
| Power Usage (Per Activation) | 532,636.4 | |||||
| Equipment |  |
Scanner System | Stat | Value | ||
| Number of Blocks | 76 | |||||
| Total Charged Needed | 335,067.56 | |||||
| Charge Time (Approx.) | 49.00 sec | |||||
| Power Usage (Per Second) | 6,900.00 | |||||
| Modules/Modules Needed | 76 | 228 | ||||
 |
Jump Drive System | Stat | Value | |||
| Number of Blocks | 173 | |||||
| Total Charged Needed | 553,651.75 | |||||
| Charge Time (Approx.) | 30.00 sec | |||||
| Power Usage (Per Second while Charging) | 18,650.00 | |||||
| Modules/Modules Needed | 173 | 236 | ||||
 |
Inner Ship Remote"[no data]" | Toggles the Engine lights on and off. | ||||
 |
Rail Docker (Location: 22,14,17) |
Part of a USD dock on the vessel's left side. | ||||
| Dock(s) | 1 x AMS Turret (Small) |
Docked on the right side of the vessel. Parallel to the USD dock (Location: 10,16,16) |
Stat | Value | ||
| Number of Arrays | 2 | |||||
| Type | Machine Gun | |||||
| Damage Output (Per Array) | 2 | |||||
| Shields ■(Total/Recharge of both Base & Barrel) | 0 | 0 s/sec | ||||
| Armor Hit Points ■ (of both Base & Barrel) | 1,700 | |||||
| Structure Hit Points ■ (of both Base & Barrel) | 980 | |||||