Difference between revisions of "Trading Guild"
(added B150) |
(→B110-11: fixed table) |
||
| (26 intermediate revisions by the same user not shown) | |||
| Line 3: | Line 3: | ||
==Overview== | ==Overview== | ||
| − | + | "The Trading Guild is a collection of large corporations. They work to better themselves primarily through trade and economics. The Trading Guild treats others with neutrality, and they hardly care who or what they sell their products to. Their wealth grants them strength, but they are a relatively peaceful faction." | |
==Blueprints== | ==Blueprints== | ||
===Ships=== | ===Ships=== | ||
====B110-11==== | ====B110-11==== | ||
| − | The Bahtra B110 | Drone<br/> | + | <big><u>'''The Bahtra B110 | Drone'''</u><br/> |
| − | The Trading Guild will often employ the use of drones more than manned fighters. Pilots cost money, more so when they die! Shipping valuable cargo across space can be fatal, surprisingly. The drone here is quite an aggressive looking ship and it is clear that Bahtra intended so! | + | The Trading Guild will often employ the use of drones more than manned fighters. Pilots cost money, more so when they die! Shipping valuable cargo across space can be fatal, surprisingly. The drone here is quite an aggressive looking ship and it is clear that Bahtra intended so!</big> |
{| class="wikitable" | {| class="wikitable" | ||
| − | |rowspan=" | + | |rowspan="10" colspan="3"|[[File:B110-12.png|700px]] |
!colspan="3"|<big>Stats</big> | !colspan="3"|<big>Stats</big> | ||
|- | |- | ||
!Class | !Class | ||
|colspan="2" style="text-align:center;"| Attack Drone | |colspan="2" style="text-align:center;"| Attack Drone | ||
| + | |- | ||
| + | !Blueprint Class | ||
| + | |colspan="2" style="text-align:center;"| Defense | ||
|- | |- | ||
!Mass | !Mass | ||
| Line 40: | Line 43: | ||
!colspan="7"|<big>Systems</big> | !colspan="7"|<big>Systems</big> | ||
|- | |- | ||
| − | ! | + | !style="border-bottom: solid 1px;" rowspan="9" |Weapons |
| − | |rowspan="9" width=" | + | |rowspan="9" width="50px" style="border-bottom: solid 1px; text-align:center;"|[[File:Cannon Computer.png|100px]] ||rowspan="9" width="70px" style="border-bottom: solid 1px; text-align:center;"|[[Cannon Computer|Unslaved Cannons]] |
!Stat !!colspan="2"| Value | !Stat !!colspan="2"| Value | ||
|- | |- | ||
|Number of Arrays ||colspan="2" style="text-align:center;"| 2 | |Number of Arrays ||colspan="2" style="text-align:center;"| 2 | ||
|- | |- | ||
| − | |Damage Output <span style="color: grey"><small>(Per Array)</small></span> ||colspan="2" style="text-align:center;"| | + | |Damage Output <span style="color: grey"><small>(Per Array/Total DPS)</small></span> || style="text-align:center;"| 580 ||colspan="2" style="text-align:center;"|1,160 |
|- | |- | ||
|Block Penetration||colspan="2" style="text-align:center;"| 7 | |Block Penetration||colspan="2" style="text-align:center;"| 7 | ||
| Line 58: | Line 61: | ||
|Range<span style="color: grey"><small> (In Sector Lengths)</small></span> ||colspan="2" style="text-align:center;"| 1<span style="color: grey">.0</span> | |Range<span style="color: grey"><small> (In Sector Lengths)</small></span> ||colspan="2" style="text-align:center;"| 1<span style="color: grey">.0</span> | ||
|- | |- | ||
| − | |Power Usage<span style="color: grey"><small> (Per Array/Per Activation)</small></span> || style="text-align:center;"| 6,380<span style="color: grey">.00</span>||style="text-align:center;"| 12,760<span style="color: grey">.00</span> | + | |style="border-bottom: solid 1px;" |Power Usage<span style="color: grey"><small> (Per Array/Per Activation)</small></span> || style="border-bottom: solid 1px; text-align:center;"| 6,380<span style="color: grey">.00</span>||style="border-bottom: solid 1px; text-align:center;"| 12,760<span style="color: grey">.00</span> |
|- | |- | ||
!rowspan="9" width="30px"|Equipment | !rowspan="9" width="30px"|Equipment | ||
| − | | | + | |width="20px" style="text-align:center;"|[[File:Rail Docker.png|100px]] ||rowspan="5" width="30px" style="text-align:center;"|[[Rail Docker]] <br/><small>(Location: 16,11,20)</small> |
|colspan="3" style="text-align:center;"|''Forward facing dock on the underside of the vessel's nose.'' | |colspan="3" style="text-align:center;"|''Forward facing dock on the underside of the vessel's nose.'' | ||
|} | |} | ||
| + | |||
====B130-7==== | ====B130-7==== | ||
| − | The Bahtra B130 | Patrol Ship<br/> | + | <big><u>'''The Bahtra B130 | Patrol Ship'''</u><br/> |
| − | The Trading Guild utilizes patrol ships and bombers for escorting their cargo ships. These craft are usually guarding small freighters and as such dock with stations fairly often. | + | The Trading Guild utilizes patrol ships and bombers for escorting their cargo ships. These craft are usually guarding small freighters and as such dock with stations fairly often.</big> |
{| class="wikitable" | {| class="wikitable" | ||
| − | |rowspan=" | + | |rowspan="10" colspan="3"|[[File:B130-7.png|700px]] |
!colspan="3"|<big>Stats</big> | !colspan="3"|<big>Stats</big> | ||
|- | |- | ||
!Class | !Class | ||
|colspan="2" style="text-align:center;"| Light Fighter | |colspan="2" style="text-align:center;"| Light Fighter | ||
| + | |- | ||
| + | !Blueprint Class | ||
| + | |colspan="2" style="text-align:center;"| Defense | ||
|- | |- | ||
!Mass | !Mass | ||
| Line 97: | Line 104: | ||
!colspan="7"|<big>Systems</big> | !colspan="7"|<big>Systems</big> | ||
|- | |- | ||
| − | ! | + | !style="border-bottom: solid 1px;" rowspan="9" |Weapons |
| − | |rowspan="9" width=" | + | |rowspan="9" width="50px" style="border-bottom: solid 1px; text-align:center;"|[[File:Cannon Computer.png|100px]][[File:Punch-Through Effect Computer.png|100px]] ||rowspan="9" width="70px" style="border-bottom: solid 1px; text-align:center;"|[[Cannon Computer]]<br/>+[[Punch-Through Effect Computer|Punch-Through Effect]] (97.0%) |
!Stat !!colspan="2"| Value | !Stat !!colspan="2"| Value | ||
|- | |- | ||
|Number of Arrays ||colspan="2" style="text-align:center;"| 2 | |Number of Arrays ||colspan="2" style="text-align:center;"| 2 | ||
|- | |- | ||
| − | |Damage Output <span style="color: grey"><small>(Per Array)</small></span> || | + | |Damage Output <span style="color: grey"><small>(Per Array/Total DPS)</small></span> || style="text-align:center;"| 1,300 ||style="text-align:center;"|2,600 |
|- | |- | ||
|Block Penetration||colspan="2" style="text-align:center;"| 16 | |Block Penetration||colspan="2" style="text-align:center;"| 16 | ||
| Line 115: | Line 122: | ||
|Range<span style="color: grey"><small> (In Sector Lengths)</small></span> ||colspan="2" style="text-align:center;"| 1<span style="color: grey">.0</span> | |Range<span style="color: grey"><small> (In Sector Lengths)</small></span> ||colspan="2" style="text-align:center;"| 1<span style="color: grey">.0</span> | ||
|- | |- | ||
| − | |Power Usage<span style="color: grey"><small> (Per Array/Per Activation)</small></span> || style="text-align:center;"| 14,300<span style="color: grey">.00</span>||style="text-align:center;"| 28,600<span style="color: grey">.00</span> | + | |style="border-bottom: solid 1px;"| Power Usage<span style="color: grey"><small> (Per Array/Per Activation)</small></span> || style="border-bottom: solid 1px; text-align:center;"| 14,300<span style="color: grey">.00</span>||style="border-bottom: solid 1px; text-align:center;"| 28,600<span style="color: grey">.00</span> |
|- | |- | ||
!rowspan="15" width="30px"|Equipment | !rowspan="15" width="30px"|Equipment | ||
| − | |rowspan="6 | + | |rowspan="6" style="text-align:center;"|[[File:Scanner Computer.png|100px]] ||rowspan="6" style="text-align:center;"|[[Scanner Computer|Scanner System]] |
!Stat !!colspan="2"| Value | !Stat !!colspan="2"| Value | ||
|- | |- | ||
| Line 131: | Line 138: | ||
|Modules/Modules Needed|| style="text-align:center;"| 70 ||style="text-align:center;"| 237 | |Modules/Modules Needed|| style="text-align:center;"| 70 ||style="text-align:center;"| 237 | ||
|- | |- | ||
| − | |rowspan="6 | + | |rowspan="6" style="text-align:center;"|[[File:Jump Drive Computer.png|100px]] ||rowspan="6" style="text-align:center;"|[[Jump Drive Computer|Jump Drive System]] |
!Stat !!colspan="2"| Value | !Stat !!colspan="2"| Value | ||
|- | |- | ||
| Line 144: | Line 151: | ||
|Modules/Modules Needed|| style="text-align:center;"| 336||style="text-align:center;"| 263 | |Modules/Modules Needed|| style="text-align:center;"| 336||style="text-align:center;"| 263 | ||
|- | |- | ||
| − | | | + | | style="text-align:center;"|[[File:Inner Ship Remote.png|100px]] || style="text-align:center;"|[[Inner Ship Remote]]"Engine" |
|colspan="3" style="text-align:center;"|''Toggles the Engine lights on and off.'' | |colspan="3" style="text-align:center;"|''Toggles the Engine lights on and off.'' | ||
|- | |- | ||
| − | | | + | | style="text-align:center;"|[[File:Rail Docker.png|100px]] || style="text-align:center;"|[[Rail Docker]] <br/><small>(Location: 19,15,28)</small> |
|colspan="3" style="text-align:center;"|''Part of a USD dock on the vessel's left side.'' | |colspan="3" style="text-align:center;"|''Part of a USD dock on the vessel's left side.'' | ||
|} | |} | ||
====B150-18==== | ====B150-18==== | ||
| − | The Bahtra B150 | Bomber<br/> | + | <big><u>'''The Bahtra B150 | Bomber'''</u><br/> |
| − | The Trading Guild do not often employ bombers in their fleets. Most of their combat tactics involve preventative measures such as Jump Drives and AMS systems. It's also better to sell warfare than it is to engage in it. This particular model is destined to be decommissioned in the near future. | + | The Trading Guild do not often employ bombers in their fleets. Most of their combat tactics involve preventative measures such as Jump Drives and AMS systems. It's also better to sell warfare than it is to engage in it. This particular model is destined to be decommissioned in the near future.</big> |
{| class="wikitable" | {| class="wikitable" | ||
| − | |rowspan=" | + | |rowspan="10" colspan="3"|[[File:B150-18.png|700px]] |
!colspan="3"|<big>Stats</big> | !colspan="3"|<big>Stats</big> | ||
|- | |- | ||
| Line 161: | Line 168: | ||
|colspan="2" style="text-align:center;"| Bomber | |colspan="2" style="text-align:center;"| Bomber | ||
|- | |- | ||
| − | !Mass <small>(Base/ With Docks)</small> | + | !Blueprint Class |
| + | |colspan="2" style="text-align:center;"| Defense | ||
| + | |- | ||
| + | !Mass <br/><small>(Base/ With Docks)</small> | ||
|style="text-align:center;"| 468.1 ||style="text-align:center;"|470.8 | |style="text-align:center;"| 468.1 ||style="text-align:center;"|470.8 | ||
|- | |- | ||
| Line 184: | Line 194: | ||
!colspan="7"|<big>Systems</big> | !colspan="7"|<big>Systems</big> | ||
|- | |- | ||
| − | ! | + | !style="border-bottom: solid 1px;" rowspan="22" |Weapons |
| − | |rowspan=" | + | |rowspan="11" width="50px" style="text-align:center;"|[[File:Missile Computer.png|75px]][[File:Damage Beam Computer.png|75px]][[File:Piercing Effect Computer.png|75px]] ||rowspan="11" width="70px" style="text-align:center;"|[[Missile Computer]]<br/>+[[Damage Beam Computer]](93.2%)<br/>+[[Punch-Through Effect Computer|Punch-Through Effect]] (88.6%) |
!Stat !!colspan="2"| Value | !Stat !!colspan="2"| Value | ||
|- | |- | ||
| Line 191: | Line 201: | ||
|- | |- | ||
|Type||colspan="2" style="text-align:center;"| Lock On | |Type||colspan="2" style="text-align:center;"| Lock On | ||
| + | |- | ||
| + | |Firing Direction <span style="color: grey"><small>(In relation to the vessel)</small></span>||colspan="2" style="text-align:center;"| Forward (Right) | ||
|- | |- | ||
|Damage Output <span style="color: grey"><small>(Per Array)</small></span> ||colspan="2" style="text-align:center;"| 106,527.3 | |Damage Output <span style="color: grey"><small>(Per Array)</small></span> ||colspan="2" style="text-align:center;"| 106,527.3 | ||
| Line 196: | Line 208: | ||
|Blast Radius <span style="color: grey"><small> (In Blocks)</small></span>||colspan="2" style="text-align:center;"| 16.4 | |Blast Radius <span style="color: grey"><small> (In Blocks)</small></span>||colspan="2" style="text-align:center;"| 16.4 | ||
|- | |- | ||
| − | |Reload<span style="color: grey"><small> (In Seconds)</small></span> ||colspan="2" style="text-align:center;"| | + | |Reload<span style="color: grey"><small> (In Seconds)</small></span> ||colspan="2" style="text-align:center;"| 42<span style="color: grey">.9</span> |
|- | |- | ||
|Shots<span style="color: grey"><small> (Per Activation)</small></span> ||colspan="2" style="text-align:center;"| 1 | |Shots<span style="color: grey"><small> (Per Activation)</small></span> ||colspan="2" style="text-align:center;"| 1 | ||
| Line 206: | Line 218: | ||
|Power Usage<span style="color: grey"><small> (Per Activation)</small></span> ||colspan="2" style="text-align:center;"| 532,636<span style="color: grey">.4</span> | |Power Usage<span style="color: grey"><small> (Per Activation)</small></span> ||colspan="2" style="text-align:center;"| 532,636<span style="color: grey">.4</span> | ||
|- | |- | ||
| − | |rowspan=" | + | |rowspan="11" style="border-bottom: solid 1px; text-align:center;"|[[File:Missile Computer.png|75px]][[File:Damage Beam Computer.png|75px]][[File:Piercing Effect Computer.png|75px]] ||rowspan="11" style="border-bottom: solid 1px; text-align:center;"|[[Missile Computer]]<br/>+[[Damage Beam Computer]](93.2%)<br/>+[[Punch-Through Effect Computer|Punch-Through Effect]] (88.6%) |
!Stat !!colspan="2"| Value | !Stat !!colspan="2"| Value | ||
|- | |- | ||
| Line 212: | Line 224: | ||
|- | |- | ||
|Type||colspan="2" style="text-align:center;"| Lock On | |Type||colspan="2" style="text-align:center;"| Lock On | ||
| + | |- | ||
| + | |Firing Direction <span style="color: grey"><small>(In relation to the vessel)</small></span>||colspan="2" style="text-align:center;"| Forward (Left) | ||
|- | |- | ||
|Damage Output <span style="color: grey"><small>(Per Array)</small></span> ||colspan="2" style="text-align:center;"| 106,527.3 | |Damage Output <span style="color: grey"><small>(Per Array)</small></span> ||colspan="2" style="text-align:center;"| 106,527.3 | ||
| Line 217: | Line 231: | ||
|Blast Radius <span style="color: grey"><small> (In Blocks)</small></span>||colspan="2" style="text-align:center;"| 16.4 | |Blast Radius <span style="color: grey"><small> (In Blocks)</small></span>||colspan="2" style="text-align:center;"| 16.4 | ||
|- | |- | ||
| − | |Reload<span style="color: grey"><small> (In Seconds)</small></span> ||colspan="2" style="text-align:center;"| | + | |Reload<span style="color: grey"><small> (In Seconds)</small></span> ||colspan="2" style="text-align:center;"| 42<span style="color: grey">.9</span> |
|- | |- | ||
|Shots<span style="color: grey"><small> (Per Activation)</small></span> ||colspan="2" style="text-align:center;"| 1 | |Shots<span style="color: grey"><small> (Per Activation)</small></span> ||colspan="2" style="text-align:center;"| 1 | ||
| Line 225: | Line 239: | ||
|Range<span style="color: grey"><small> (In Sector Lengths)</small></span> ||colspan="2" style="text-align:center;"| 4<span style="color: grey">.6</span> | |Range<span style="color: grey"><small> (In Sector Lengths)</small></span> ||colspan="2" style="text-align:center;"| 4<span style="color: grey">.6</span> | ||
|- | |- | ||
| − | |Power Usage<span style="color: grey"><small> (Per Activation)</small></span> ||colspan="2" style="text-align:center;"| 532,636<span style="color: grey">.4</span> | + | |style="border-bottom: solid 1px;"|Power Usage<span style="color: grey"><small> (Per Activation)</small></span> ||colspan="2" style="border-bottom: solid 1px;text-align:center;"| 532,636<span style="color: grey">.4</span> |
|- | |- | ||
| − | !rowspan="14" width="30px"|Equipment | + | !style="border-bottom: solid 1px;" rowspan="14" width="30px"|Equipment |
| − | |rowspan="6 | + | |rowspan="6" style="text-align:center;"|[[File:Scanner Computer.png|100px]] ||rowspan="6" style="text-align:center;"|[[Scanner Computer|Scanner System]] |
!Stat !!colspan="2"| Value | !Stat !!colspan="2"| Value | ||
|- | |- | ||
| Line 241: | Line 255: | ||
|Modules/Modules Needed|| style="text-align:center;"| 76 ||style="text-align:center;"| 228 | |Modules/Modules Needed|| style="text-align:center;"| 76 ||style="text-align:center;"| 228 | ||
|- | |- | ||
| − | |rowspan="6 | + | |rowspan="6" style="text-align:center;"|[[File:Jump Drive Computer.png|100px]] ||rowspan="6" style="text-align:center;"|[[Jump Drive Computer|Jump Drive System]] |
!Stat !!colspan="2"| Value | !Stat !!colspan="2"| Value | ||
|- | |- | ||
| Line 254: | Line 268: | ||
|Modules/Modules Needed|| style="text-align:center;"| 173||style="text-align:center;"| 236 | |Modules/Modules Needed|| style="text-align:center;"| 173||style="text-align:center;"| 236 | ||
|- | |- | ||
| − | | | + | |style="text-align:center;"|[[File:Inner Ship Remote.png|100px]] || style="text-align:center;"|[[Inner Ship Remote]]"[no data]" |
| + | |colspan="3" style="text-align:center;"|''Toggles the Engine lights on and off.'' | ||
| + | |- | ||
| + | |style="border-bottom: solid 1px; text-align:center;"|[[File:Rail Docker.png|100px]] ||style="border-bottom: solid 1px; text-align:center;"|[[Rail Docker]]<br/><small>(Location: 22,14,17)</small> | ||
| + | |colspan="3" style="border-bottom: solid 1px; text-align:center;"|''Part of a USD dock on the vessel's left side.'' | ||
| + | |- | ||
| + | !rowspan="15" width="30px"|Dock(s) | ||
| + | |rowspan="7" style="text-align:center;"|<big>1 x AMS Turret<br/>(Small)</big><br/>[[File:Cannon Computer.png|75px]][[File:Cannon Computer.png|75px]]||rowspan="7" style="text-align:center;"|''Docked on the right side of the vessel. Parallel to the USD dock'' <br/><small>(Location: 10,16,16)</small> | ||
| + | !Stat !!colspan="2"| Value | ||
| + | |- | ||
| + | |Number of Arrays ||colspan="2" style="text-align:center;"| 2 | ||
| + | |- | ||
| + | |Type||colspan="2" style="text-align:center;"| Machine Gun | ||
| + | |- | ||
| + | |Damage Output <span style="color: grey"><small>(Per Array/Total DPS)</small></span> || style="text-align:center;"| 2 ||style="text-align:center;"|20 | ||
| + | |- | ||
| + | |Shields <span style="color: orange">■</span><span style="color: grey"><small>(Total/Recharge of both Base & Barrel)</small></span> | ||
| + | |style="text-align:center;"|0|| style="text-align:center;"| 0 s/sec | ||
| + | |- | ||
| + | |Armor Hit Points <span style="color: grey">■</span> <span style="color: grey"><small>(of both Base & Barrel)</small></span> | ||
| + | |colspan="3" style="text-align:center;"| 1,700 | ||
| + | |- | ||
| + | |Structure Hit Points <span style="color: green">■</span><span style="color: grey"><small> (of both Base & Barrel)</small></span> | ||
| + | |colspan="3" style="text-align:center;"| 980 | ||
| + | |- | ||
| + | |} | ||
| + | |||
| + | ====B190-21==== | ||
| + | <big><u>'''The Bahtra B190 | Frigate'''</u><br/> | ||
| + | The B190 is the largest addition to the small category of Trading Guild ships. The vessel is larger and better equipped than the other small fighters and drones in the lineup. As such it is crewed by a number of people at any time and offers a much more hospitable ship environment than other vessels, if only marginally so.</big> | ||
| + | {| class="wikitable" | ||
| + | |rowspan="10" colspan="3"|[[File:B190-18.png|700px]] | ||
| + | !colspan="3"|<big>Stats</big> | ||
| + | |- | ||
| + | !Class | ||
| + | |colspan="2" style="text-align:center;"| Frigate | ||
| + | |- | ||
| + | !Blueprint Class | ||
| + | |colspan="2" style="text-align:center;"| Defense | ||
| + | |- | ||
| + | !Mass <br/><small>(Base/ With Docks)</small> | ||
| + | |style="text-align:center;"| 4,222.7 ||style="text-align:center;"|4,258.7 | ||
| + | |- | ||
| + | !Dimensions<br/> <small>(Length/Height/Width)</small> | ||
| + | |colspan="2" style="text-align:center;"| 141m / 39m / 63m | ||
| + | |- | ||
| + | !Power <span style="color: cornflowerblue">■</span> <br/><small>(Total/Recharge)</small> | ||
| + | |width="100px" style="text-align:center;"| 1,376,640.6|| style="text-align:center;"| 936,479.6 e/sec | ||
| + | |- | ||
| + | !Thrust / Max Speed <span style="color: darkgreen">■</span> | ||
| + | |style="text-align:center;"|6,046.6||style="text-align:center;"| 144.1 | ||
| + | |- | ||
| + | !Shields <span style="color: orange">■</span><br/> <small>(Total/Recharge)</small> | ||
| + | |style="text-align:center;"|319,699|| style="text-align:center;"| 7,716 s/sec | ||
| + | |- | ||
| + | !Armor Hit Points <span style="color: grey">■</span> | ||
| + | |colspan="3" style="text-align:center;"| 1,091,150 | ||
| + | |- | ||
| + | !Structure Hit Points <span style="color: green">■</span> | ||
| + | |colspan="3" style="text-align:center;"| 1,851,410 | ||
| + | |- | ||
| + | !colspan="7"|<big>Systems</big> | ||
| + | |- | ||
| + | !style="border-bottom: solid 1px;" rowspan="18" |Weapons | ||
| + | |rowspan="9" width="50px" style="text-align:center;"|[[File:Cannon Computer.png|75px]][[File:Damage Beam Computer.png|75px]][[File:Explosive Effect Computer.png|75px]] ||rowspan="9" width="70px" style="text-align:center;"|[[Cannon Computer]]<br/>+[[Damage Beam Computer]](100.0%)<br/>+[[Explosive Effect Computer|Explosive Effect]] (25.0%) | ||
| + | !Stat !!colspan="2"| Value | ||
| + | |- | ||
| + | |Number of Arrays ||colspan="2" style="text-align:center;"| 2 | ||
| + | |- | ||
| + | |Damage Output <span style="color: grey"><small>(Per Array/Total DPS)</small></span> || style="text-align:center;"| 40,480.0 ||style="text-align:center;"|11,240 | ||
| + | |- | ||
| + | |Block Penetration||colspan="2" style="text-align:center;"| 34 | ||
| + | |- | ||
| + | |Reload<span style="color: grey"><small> (In Seconds)</small></span> ||colspan="2" style="text-align:center;"| 4<span style="color: grey">.0</span> | ||
| + | |- | ||
| + | |Shots<span style="color: grey"><small> (Per Activation)</small></span> ||colspan="2" style="text-align:center;"| 1 | ||
| + | |- | ||
| + | |Projectile Speed<span style="color: grey"><small> (In Meters per Second)</small></span> ||colspan="2" style="text-align:center;"| 1,875.0 | ||
| + | |- | ||
| + | |Range<span style="color: grey"><small> (In Sector Lengths)</small></span> ||colspan="2" style="text-align:center;"| 3<span style="color: grey">.0</span> | ||
| + | |- | ||
| + | |Power Usage<span style="color: grey"><small> (Per Array/Per Activation)</small></span> || style="text-align:center;"| 445,280<span style="color: grey">.00</span>||style="text-align:center;"| 883,995<span style="color: grey">.6</span> | ||
| + | |- | ||
| + | |rowspan="9" width="50px" style="border-bottom: solid 1px; text-align:center;"|[[File:Cannon Computer.png|75px]][[File:Cannon Computer.png|75px]][[File:Punch-Through Effect Computer.png|75px]] ||rowspan="9" width="70px" style="border-bottom: solid 1px; text-align:center;"|[[Cannon Computer]]<br/>+[[Cannon Computer]](50.0%)<br/>+[[Punch-Through Effect Computer|Punch-Through Effect]] (100.0%) | ||
| + | !Stat !!colspan="2"| Value | ||
| + | |- | ||
| + | |Number of Arrays ||colspan="2" style="text-align:center;"| 3 | ||
| + | |- | ||
| + | |Damage Output <span style="color: grey"><small>(Per Array/Total DPS)</small></span> || style="text-align:center;"| 3,657.5 ||style="text-align:center;"|15,960 | ||
| + | |- | ||
| + | |Block Penetration||colspan="2" style="text-align:center;"| 22 | ||
| + | |- | ||
| + | |Reload<span style="color: grey"><small> (In Seconds)</small></span> ||colspan="2" style="text-align:center;"| 0<span style="color: grey">.55</span> | ||
| + | |- | ||
| + | |Shots<span style="color: grey"><small> (Per Activation)</small></span> ||colspan="2" style="text-align:center;"| 1 | ||
| + | |- | ||
| + | |Projectile Speed<span style="color: grey"><small> (In Meters per Second)</small></span> ||colspan="2" style="text-align:center;"| 937.5 | ||
| + | |- | ||
| + | |Range<span style="color: grey"><small> (In Sector Lengths)</small></span> ||colspan="2" style="text-align:center;"| 1<span style="color: grey">.0</span> | ||
| + | |- | ||
| + | |style="border-bottom: solid 1px;"|Power Usage<span style="color: grey"><small> (Per Array/Per Activation)</small></span> || style="border-bottom: solid 1px; text-align:center;"| 43,890<span style="color: grey">.00</span>||style="border-bottom: solid 1px; text-align:center;"| 258,772<span style="color: grey">.8</span> | ||
| + | |- | ||
| + | !style="border-bottom: solid 1px;" rowspan="19" width="30px"|Equipment | ||
| + | |rowspan="4" width="50px" style="text-align:center;"|[[File:Ion Effect Computer.png|100px]]||rowspan="4" width="70px" style="text-align:center;"|[[Ion Effect Computer|Defensive Ion Effect]] | ||
| + | !Stat !!colspan="2"| Value | ||
| + | |- | ||
| + | |Number of Blocks||colspan="2" style="text-align:center;"| 1902 | ||
| + | |- | ||
| + | |Effect Strength||colspan="2" style="text-align:center;"| 54.1% | ||
| + | |- | ||
| + | |Power Usage<span style="color: grey"><small> (Per Second)</small></span> || colspan="2" style="text-align:center;"| 38,559<span style="color: grey">.5</span> | ||
| + | |- | ||
| + | |rowspan="6" style="text-align:center;"|[[File:Scanner Computer.png|100px]] ||rowspan="6" style="text-align:center;"|[[Scanner Computer|Scanner System]] | ||
| + | !Stat !!colspan="2"| Value | ||
| + | |- | ||
| + | |Number of Blocks ||colspan="2" style="text-align:center;"| 1,214 | ||
| + | |- | ||
| + | |Total Charged Needed ||colspan="2" style="text-align:center;"| 2,236,321<span style="color: grey">.8</span> | ||
| + | |- | ||
| + | |Charge Time<span style="color: grey"><small> (Approx.)</small></span> || colspan="2" style="text-align:center;"| 63<span style="color: grey">.00</span> sec | ||
| + | |- | ||
| + | |Power Usage<span style="color: grey"><small> (Per Second)</small></span> || colspan="2" style="text-align:center;"| 35,350<span style="color: grey">.00</span> | ||
| + | |- | ||
| + | |Modules/Modules Needed|| style="text-align:center;"| 1,214||style="text-align:center;"| 2,120 | ||
| + | |- | ||
| + | |rowspan="6" style="text-align:center;"|[[File:Jump Drive Computer.png|100px]] ||rowspan="6" style="text-align:center;"|[[Jump Drive Computer|Jump Drive System]] | ||
| + | !Stat !!colspan="2"| Value | ||
| + | |- | ||
| + | |Number of Blocks ||colspan="2" style="text-align:center;"| 3,980 | ||
| + | |- | ||
| + | |Total Charged Needed ||colspan="2" style="text-align:center;"| 2,785,452<span style="color: grey">.0</span> | ||
| + | |- | ||
| + | |Charge Time<span style="color: grey"><small> (Approx.)</small></span> || colspan="2" style="text-align:center;"| 13<span style="color: grey">.50</span> sec | ||
| + | |- | ||
| + | |Power Usage<span style="color: grey"><small> (Per Second while Charging)</small></span> || colspan="2" style="text-align:center;"| 209,000<span style="color: grey">.00</span> | ||
| + | |- | ||
| + | |Modules/Modules Needed|| style="text-align:center;"| 3,980||style="text-align:center;"| 2,128 | ||
| + | |- | ||
| + | |style="text-align:center;"|[[File:Inner Ship Remote.png|100px]] || style="text-align:center;"|[[Inner Ship Remote]]"[no data]" | ||
|colspan="3" style="text-align:center;"|''Toggles the Engine lights on and off.'' | |colspan="3" style="text-align:center;"|''Toggles the Engine lights on and off.'' | ||
|- | |- | ||
| − | | | + | |style="text-align:center;"|[[File:Rail Docker.png|100px]] ||style="text-align:center;"|[[Rail Docker]]<br/><small>(Location: 32,14,20)</small> |
|colspan="3" style="text-align:center;"|''Part of a USD dock on the vessel's left side.'' | |colspan="3" style="text-align:center;"|''Part of a USD dock on the vessel's left side.'' | ||
| + | |- | ||
| + | |style="border-bottom: solid 1px; text-align:center;"|[[File:Rail Docker.png|100px]] ||style="border-bottom: solid 1px; text-align:center;"|[[Rail Docker]]<br/><small>(Location: 0,14,18)</small> | ||
| + | |colspan="3" style="border-bottom: solid 1px; text-align:center;"|''Part of a USD dock on the vessel's right side.'' | ||
| + | |- | ||
| + | !rowspan="18" width="30px"|Dock(s) | ||
| + | |rowspan="7" style="text-align:center;"|<big>2 x AMS Turrets<br/>(Small)<br/>[[File:Cannon Computer.png|75px]][[File:Cannon Computer.png|75px]]</big>||rowspan="7" style="text-align:center;"|''Docked on the Top and bottom of the vessel.'' <br/><small>(Location(s): 16,26,-45/16,6,-2)</small> | ||
| + | !Stat !!colspan="2"| Value | ||
| + | |- | ||
| + | |Number of Arrays ||colspan="2" style="text-align:center;"| 2 | ||
| + | |- | ||
| + | |Type||colspan="2" style="text-align:center;"| Machine Gun | ||
| + | |- | ||
| + | |Damage Output <span style="color: grey"><small>(Per Array/Total DPS)</small></span> || style="text-align:center;"| 2 ||style="text-align:center;"|20 | ||
| + | |- | ||
| + | |Shields <span style="color: orange">■</span><span style="color: grey"><small>(Total/Recharge of both Base & Barrel)</small></span> | ||
| + | |style="text-align:center;"|0|| style="text-align:center;"| 0 s/sec | ||
| + | |- | ||
| + | |Armor Hit Points <span style="color: grey">■</span> <span style="color: grey"><small>(of both Base & Barrel)</small></span> | ||
| + | |colspan="3" style="text-align:center;"| 1,700 | ||
| + | |- | ||
| + | |Structure Hit Points <span style="color: green">■</span><span style="color: grey"><small> (of both Base & Barrel)</small></span> | ||
| + | |colspan="3" style="text-align:center;"| 980 | ||
| + | |- | ||
| + | |rowspan="7" style="text-align:center;"|<big>2 x Cannon Turrets</big><br/>[[File:Cannon Computer.png|75px]][[File:Punch-Through Effect Computer.png|75px]]||rowspan="7" style="text-align:center;"|''Docked on the left and right side of the vessel. Near its rear'' <br/><small>(Location(s): 47,16,-24/-15,16,-24)</small> | ||
| + | !Stat !!colspan="2"| Value | ||
| + | |- | ||
| + | |Number of Arrays ||colspan="2" style="text-align:center;"| 2 | ||
| + | |- | ||
| + | |Type||colspan="2" style="text-align:center;"| [[Cannon Computer|Cannons]]+[[Punch-Through Effect Computer|Punch-Through Effect]] | ||
| + | |- | ||
| + | |Damage Output <span style="color: grey"><small>(Per Array/Total DPS)</small></span> ||style="text-align:center;"| 90 ||style="text-align:center;"|180 | ||
| + | |- | ||
| + | |Shields <span style="color: orange">■</span><span style="color: grey"><small>(Total/Recharge of both Base & Barrel)</small></span> | ||
| + | |style="text-align:center;"|0|| style="text-align:center;"| 0 s/sec | ||
| + | |- | ||
| + | |Armor Hit Points <span style="color: grey">■</span> <span style="color: grey"><small>(of both Base & Barrel)</small></span> | ||
| + | |colspan="3" style="text-align:center;"| 7,550 | ||
| + | |- | ||
| + | |Structure Hit Points <span style="color: green">■</span><span style="color: grey"><small> (of both Base & Barrel)</small></span> | ||
| + | |colspan="3" style="text-align:center;"| 2,615 | ||
| + | |- | ||
| + | |rowspan="4" style="text-align:center;"|<big>1 x Rail Decoration</big><br/>(Spinning Radar Dish)||rowspan="4" style="text-align:center;"|''Decorative rail entity.'' | ||
| + | !Stat !!colspan="2"| Value | ||
| + | |- | ||
| + | |Mass||colspan="2" style="text-align:center;"| 1.6 | ||
| + | |- | ||
| + | |Armor Hit Points <span style="color: grey">■</span> | ||
| + | |colspan="3" style="text-align:center;"| 1,550 | ||
| + | |- | ||
| + | |Structure Hit Points <span style="color: green">■</span> | ||
| + | |colspan="3" style="text-align:center;"| 245 | ||
| + | |} | ||
| + | |||
| + | ====C120-12==== | ||
| + | <big><u>'''The Crusa C120 | Shuttle'''</u><br/> | ||
| + | The Trading Guild Shuttle. A small craft with very limited capabilities. Generally used for personal transport.</big> | ||
| + | {| class="wikitable" | ||
| + | |rowspan="10" colspan="3"|[[File:C120-12.png|700px]] | ||
| + | !colspan="3"|<big>Stats</big> | ||
| + | |- | ||
| + | !Class | ||
| + | |colspan="2" style="text-align:center;"| Shuttle | ||
| + | |- | ||
| + | !Blueprint Class | ||
| + | |colspan="2" style="text-align:center;"| General | ||
| + | |- | ||
| + | !Mass <br/><small>(Base/ With Docks)</small> | ||
| + | |style="text-align:center;"| 210.9||style="text-align:center;"|211.7 | ||
| + | |- | ||
| + | !Dimensions<br/> <small>(Length/Height/Width)</small> | ||
| + | |colspan="2" style="text-align:center;"| 31m / 11m / 23m | ||
| + | |- | ||
| + | !Power <span style="color: cornflowerblue">■</span> <br/><small>(Total/Recharge)</small> | ||
| + | |width="100px" style="text-align:center;"| 95,866.5|| style="text-align:center;"| 17,175.3 e/sec | ||
| + | |- | ||
| + | !Thrust / Max Speed <span style="color: darkgreen">■</span> | ||
| + | |style="text-align:center;"|466.8||style="text-align:center;"| 202.9 | ||
| + | |- | ||
| + | !Shields <span style="color: orange">■</span><br/> <small>(Total/Recharge)</small> | ||
| + | |style="text-align:center;"|6,478|| style="text-align:center;"| 170 s/sec | ||
| + | |- | ||
| + | !Armor Hit Points <span style="color: grey">■</span> | ||
| + | |colspan="3" style="text-align:center;"| 82,925 | ||
| + | |- | ||
| + | !Structure Hit Points <span style="color: green">■</span> | ||
| + | |colspan="3" style="text-align:center;"| 64,760 | ||
| + | |- | ||
| + | !colspan="7"|<big>Systems</big> | ||
| + | |- | ||
| + | !style="border-bottom: solid 1px;" rowspan="14" width="30px"|Equipment | ||
| + | |rowspan="6" style="text-align:center;"|[[File:Scanner Computer.png|100px]] ||rowspan="6" style="text-align:center;"|[[Scanner Computer|Scanner System]] | ||
| + | !Stat !!colspan="2"| Value | ||
| + | |- | ||
| + | |Number of Blocks ||colspan="2" style="text-align:center;"| 30 | ||
| + | |- | ||
| + | |Total Charged Needed ||colspan="2" style="text-align:center;"| 249,142<span style="color: grey">.86</span> | ||
| + | |- | ||
| + | |Charge Time<span style="color: grey"><small> (Approx.)</small></span> || colspan="2" style="text-align:center;"| 44<span style="color: grey">.00</span> sec | ||
| + | |- | ||
| + | |Power Usage<span style="color: grey"><small> (Per Second)</small></span> || colspan="2" style="text-align:center;"| 5,750<span style="color: grey">.00</span> | ||
| + | |- | ||
| + | |Modules/Modules Needed|| style="text-align:center;"| 30||style="text-align:center;"| 103 | ||
| + | |- | ||
| + | |rowspan="6" style="text-align:center;"|[[File:Jump Drive Computer.png|100px]] ||rowspan="6" style="text-align:center;"|[[Jump Drive Computer|Jump Drive System]] | ||
| + | !Stat !!colspan="2"| Value | ||
| + | |- | ||
| + | |Number of Blocks ||colspan="2" style="text-align:center;"| 167 | ||
| + | |- | ||
| + | |Total Charged Needed ||colspan="2" style="text-align:center;"| 357,261<span style="color: grey">.0</span> | ||
| + | |- | ||
| + | |Charge Time<span style="color: grey"><small> (Approx.)</small></span> || colspan="2" style="text-align:center;"| 20<span style="color: grey">.00</span> sec | ||
| + | |- | ||
| + | |Power Usage<span style="color: grey"><small> (Per Second while Charging)</small></span> || colspan="2" style="text-align:center;"| 18,350<span style="color: grey">.00</span> | ||
| + | |- | ||
| + | |Modules/Modules Needed|| style="text-align:center;"| 167||style="text-align:center;"| 106 | ||
| + | |- | ||
| + | | style="text-align:center;"|[[File:Inner Ship Remote.png|100px]] || style="text-align:center;"|[[Inner Ship Remote]]"no data" | ||
| + | |colspan="3" style="text-align:center;"|''Toggles the Engine lights on and off.'' | ||
| + | |- | ||
| + | | style="border-bottom: solid 1px; text-align:center;"|[[File:Rail Docker.png|100px]] || style="border-bottom: solid 1px; text-align:center;"|[[Rail Docker]] <br/><small>(Location: 16,11,18)</small> | ||
| + | |colspan="3" style="border-bottom: solid 1px; text-align:center;"|''Located on the under side of the vessel.'' | ||
| + | |- | ||
| + | !rowspan="15" width="30px"|Dock(s) | ||
| + | |rowspan="7" style="text-align:center;"|<big>1 x Rail Door</big>||rowspan="7" style="text-align:center;"|''Used as the primary means to enter the vessel'' | ||
| + | !Stat !!colspan="2"| Value | ||
| + | |- | ||
| + | |Mass||colspan="2" style="text-align:center;"| 0.8 | ||
| + | |- | ||
| + | |Armor Hit Points <span style="color: grey">■</span> | ||
| + | |colspan="3" style="text-align:center;"| 400 | ||
| + | |- | ||
| + | |Structure Hit Points <span style="color: green">■</span> | ||
| + | |colspan="3" style="text-align:center;"| 120 | ||
| + | |} | ||
| + | |||
| + | ====C140-9==== | ||
| + | <big><u>'''Crusa C140 | Salvager'''</u><br/> | ||
| + | The Trading Guild rely on trade more than resource harvesting. Their interest in spending time mining is minimal. Crusa-Corp invested in a cheap hull dedicated for mining that they could sell to civilians.</big> | ||
| + | {| class="wikitable" | ||
| + | |rowspan="10" colspan="3"|[[File:C140-9.png|700px]] | ||
| + | !colspan="3"|<big>Stats</big> | ||
| + | |- | ||
| + | !Class | ||
| + | |colspan="2" style="text-align:center;"| Mining Ship | ||
| + | |- | ||
| + | !Blueprint Class | ||
| + | |colspan="2" style="text-align:center;"| Mining | ||
| + | |- | ||
| + | !Mass | ||
| + | |colspan="2" style="text-align:center;"| 668.4 | ||
| + | |- | ||
| + | !Dimensions<br/> <small>(Length/Height/Width)</small> | ||
| + | |colspan="2" style="text-align:center;"| 53m / 13m / 31m | ||
| + | |- | ||
| + | !Power <span style="color: cornflowerblue">■</span> <br/><small>(Total/Recharge)</small> | ||
| + | |width="100px" style="text-align:center;"| 50,000|| style="text-align:center;"| 64,031.4 e/sec | ||
| + | |- | ||
| + | !Thrust / Max Speed <span style="color: darkgreen">■</span> | ||
| + | |style="text-align:center;"|1,101.5||style="text-align:center;"| 161.1 | ||
| + | |- | ||
| + | !Shields <span style="color: orange">■</span><br/> <small>(Total/Recharge)</small> | ||
| + | |style="text-align:center;"|17,023|| style="text-align:center;"| 1,221 s/sec | ||
| + | |- | ||
| + | !Armor Hit Points <span style="color: grey">■</span> | ||
| + | |colspan="3" style="text-align:center;"| 212,575 | ||
| + | |- | ||
| + | !Structure Hit Points <span style="color: green">■</span> | ||
| + | |colspan="3" style="text-align:center;"| 237,450 | ||
| + | |- | ||
| + | !colspan="7"|<big>Systems</big> | ||
| + | |- | ||
| + | !rowspan="30" width="30px"|Equipment | ||
| + | |rowspan="7" width="50px" style="text-align:center;"|[[File:Salvage Computer.png|100px]][[File:Damage Pulse Computer.png|100px]] ||rowspan="7" width="70px" style="text-align:center;"|[[Salvage Computer]]<br/>+[[Damage Pulse Computer]] (71.3%) | ||
| + | !Stat !!colspan="2"| Value | ||
| + | |- | ||
| + | |Number of Arrays ||colspan="2" style="text-align:center;"| 12 | ||
| + | |- | ||
| + | |Salvage Strength<span style="color: grey"><small>(Per Array)</small></span> ||colspan="2" style="text-align:center;"| 264.7 | ||
| + | |- | ||
| + | |Tick Rate<span style="color: grey"><small> (In Seconds)</small></span>||colspan="2" style="text-align:center;"| 11<span style="color: grey">.0</span> | ||
| + | |- | ||
| + | |Reload<span style="color: grey"><small> (In Seconds)</small></span> ||colspan="2" style="text-align:center;"| 23<span style="color: grey">.0</span> | ||
| + | |- | ||
| + | |Range<span style="color: grey"><small> (In Sector Lengths)</small></span> ||colspan="2" style="text-align:center;"| 0<span style="color: grey">.48</span> | ||
| + | |- | ||
| + | |Power Usage<span style="color: grey"><small> (Per Array/Per Activation)</small></span> || style="text-align:center;"| 52<span style="color: grey">.9</span>||style="text-align:center;"| 10,692<span style="color: grey">.00</span> | ||
| + | |- | ||
| + | |rowspan="4" width="50px" style="text-align:center;"|[[File:Storage.png|100px]]||rowspan="4" width="70px" style="text-align:center;"|[[Storage|Cargo System]] | ||
| + | !colspan="3" height="30px"|Cargo Capacity | ||
| + | |- | ||
| + | |Cargo 1 ||colspan="2" style="text-align:center;"| 1,300 | ||
| + | |- | ||
| + | |style="border-bottom: solid 1px;"|Cargo 2 ||colspan="2" style="border-bottom: solid 1px; text-align:center;"| 100 | ||
| + | |- | ||
| + | |Total Capacity||colspan="2" style="text-align:center;"| 1,400 | ||
| + | |- | ||
| + | |rowspan="4" width="50px" style="text-align:center;"|[[File:Ion Effect Computer.png|100px]]||rowspan="4" width="70px" style="text-align:center;"|[[Ion Effect Computer|Defensive Ion Effect]] | ||
| + | !Stat !!colspan="2"| Value | ||
| + | |- | ||
| + | |Number of Blocks||colspan="2" style="text-align:center;"| 406 | ||
| + | |- | ||
| + | |Effect Strength||colspan="2" style="text-align:center;"| 60% | ||
| + | |- | ||
| + | |Power Usage<span style="color: grey"><small> (Per Second)</small></span> || colspan="2" style="text-align:center;"| 8,350<span style="color: grey">.00</span> | ||
| + | |- | ||
| + | |rowspan="6" style="text-align:center;"|[[File:Scanner Computer.png|100px]] ||rowspan="6" style="text-align:center;"|[[Scanner Computer|Scanner System]] | ||
| + | !Stat !!colspan="2"| Value | ||
| + | |- | ||
| + | |Number of Blocks ||colspan="2" style="text-align:center;"| 304 | ||
| + | |- | ||
| + | |Total Charged Needed ||colspan="2" style="text-align:center;"| 495,560<span style="color: grey">.38</span> | ||
| + | |- | ||
| + | |Charge Time<span style="color: grey"><small> (Approx.)</small></span> || colspan="2" style="text-align:center;"| 40<span style="color: grey">.00</span> sec | ||
| + | |- | ||
| + | |Power Usage<span style="color: grey"><small> (Per Second)</small></span> || colspan="2" style="text-align:center;"| 12,600<span style="color: grey">.00</span> | ||
| + | |- | ||
| + | |Modules/Modules Needed|| style="text-align:center;"| 304||style="text-align:center;"| 318 | ||
| + | |- | ||
| + | |rowspan="6" style="text-align:center;"|[[File:Jump Drive Computer.png|100px]] ||rowspan="6" style="text-align:center;"|[[Jump Drive Computer|Jump Drive System]] | ||
| + | !Stat !!colspan="2"| Value | ||
| + | |- | ||
| + | |Number of Blocks ||colspan="2" style="text-align:center;"| 558 | ||
| + | |- | ||
| + | |Total Charged Needed ||colspan="2" style="text-align:center;"| 632,223<span style="color: grey">.0</span> | ||
| + | |- | ||
| + | |Charge Time<span style="color: grey"><small> (Approx.)</small></span> || colspan="2" style="text-align:center;"| 17<span style="color: grey">.00</span> sec | ||
| + | |- | ||
| + | |Power Usage<span style="color: grey"><small> (Per Second while Charging)</small></span> || colspan="2" style="text-align:center;"| 37,900<span style="color: grey">.00</span> | ||
| + | |- | ||
| + | |Modules/Modules Needed|| style="text-align:center;"| 558||style="text-align:center;"| 335 | ||
| + | |- | ||
| + | | style="text-align:center;"|[[File:Inner Ship Remote.png|100px]] || style="text-align:center;"|[[Inner Ship Remote]]"no data" | ||
| + | |colspan="3" style="text-align:center;"|''Toggles the Engine lights on and off.'' | ||
| + | |- | ||
| + | | style="text-align:center;"|[[File:Rail Docker.png|100px]] || style="text-align:center;"|[[Rail Docker]] <br/><small>(Location: 8,14,27)</small> | ||
| + | |colspan="3" style="text-align:center;"|''Part of a USD dock on the vessel's right side.'' | ||
| + | |} | ||
| + | |||
| + | ====T180-15==== | ||
| + | <big><u>'''The Tak T180 | Small Freighter'''</u><br/> | ||
| + | The Tak 188 is the smallest cargo transport in the Trading Guild Fleet. Because of its modular interior, more space can be dedicated to other system such as thrust, jump drives or shields. This would come with a sacrifice to it's cargo capacity however. The default configuration is displayed here.</big> | ||
| + | {| class="wikitable" | ||
| + | |rowspan="10" colspan="3"|[[File:T180-15.png|700px]] | ||
| + | !colspan="3"|<big>Stats</big> | ||
| + | |- | ||
| + | !Class | ||
| + | |colspan="2" style="text-align:center;"| Freighter | ||
| + | |- | ||
| + | !Blueprint Class | ||
| + | |colspan="2" style="text-align:center;"| Cargo | ||
| + | |- | ||
| + | !Mass<br/><small>(Base/ With Docks)</small> | ||
| + | |style="text-align:center;"| 2,625.6||style="text-align:center;"|2,702.5 | ||
| + | |- | ||
| + | !Dimensions<br/> <small>(Length/Height/Width)</small> | ||
| + | |colspan="2" style="text-align:center;"| 93m / 26m / 47m | ||
| + | |- | ||
| + | !Power <span style="color: cornflowerblue">■</span> <br/><small>(Total/Recharge)</small> | ||
| + | |width="100px" style="text-align:center;"| 325,737.9|| style="text-align:center;"| 89,875 e/sec | ||
| + | |- | ||
| + | !Thrust / Max Speed <span style="color: darkgreen">■</span> | ||
| + | |style="text-align:center;"|1,470.9||style="text-align:center;"| 78.3 | ||
| + | |- | ||
| + | !Shields <span style="color: orange">■</span><br/> <small>(Total/Recharge)</small> | ||
| + | |style="text-align:center;"|43,428|| style="text-align:center;"| 390 s/sec | ||
| + | |- | ||
| + | !Armor Hit Points <span style="color: grey">■</span> | ||
| + | |colspan="3" style="text-align:center;"| 1,201,800 | ||
| + | |- | ||
| + | !Structure Hit Points <span style="color: green">■</span> | ||
| + | |colspan="3" style="text-align:center;"| 396,990 | ||
| + | |- | ||
| + | !colspan="7"|<big>Systems</big> | ||
| + | |- | ||
| + | !style="border-bottom: solid 1px;" rowspan="25" width="30px"|Equipment | ||
| + | |rowspan="10" width="50px" style="text-align:center;"|[[File:Storage.png|100px]]||rowspan="10" width="70px" style="text-align:center;"|[[Storage|Cargo System]] | ||
| + | !colspan="3" height="30px"|Cargo Capacity | ||
| + | |- | ||
| + | |Cargo 1 ||colspan="2" style="text-align:center;"| 29,500 | ||
| + | |- | ||
| + | |Cargo 2 ||colspan="2" style="text-align:center;"| 29,500 | ||
| + | |- | ||
| + | |Cargo 3 ||colspan="2" style="text-align:center;"| 29,500 | ||
| + | |- | ||
| + | |Cargo 4 ||colspan="2" style="text-align:center;"| 29,500 | ||
| + | |- | ||
| + | |Cargo 5 ||colspan="2" style="text-align:center;"| 29,500 | ||
| + | |- | ||
| + | |Cargo 6 ||colspan="2" style="text-align:center;"| 29,500 | ||
| + | |- | ||
| + | |Cargo 7 ||colspan="2" style="text-align:center;"| 29,500 | ||
| + | |- | ||
| + | |style="border-bottom: solid 1px;"|Cargo 8 ||colspan="2" style="border-bottom: solid 1px; text-align:center;"| 29,500 | ||
| + | |- | ||
| + | |Total Capacity||colspan="2" style="text-align:center;"| 236,000 | ||
| + | |- | ||
| + | |rowspan="6" style="text-align:center;"|[[File:Scanner Computer.png|100px]] ||rowspan="6" style="text-align:center;"|[[Scanner Computer|Scanner System]] | ||
| + | !Stat !!colspan="2"| Value | ||
| + | |- | ||
| + | |Number of Blocks ||colspan="2" style="text-align:center;"| 85 | ||
| + | |- | ||
| + | |Total Charged Needed ||colspan="2" style="text-align:center;"| 410,122<span style="color: grey">.44</span> | ||
| + | |- | ||
| + | |Charge Time<span style="color: grey"><small> (Approx.)</small></span> || colspan="2" style="text-align:center;"| 58<span style="color: grey">.00</span> sec | ||
| + | |- | ||
| + | |Power Usage<span style="color: grey"><small> (Per Second)</small></span> || colspan="2" style="text-align:center;"| 7,125<span style="color: grey">.00</span> | ||
| + | |- | ||
| + | |Modules/Modules Needed|| style="text-align:center;"| 85||style="text-align:center;"| 1,299 | ||
| + | |- | ||
| + | |rowspan="6" style="text-align:center;"|[[File:Jump Drive Computer.png|100px]] ||rowspan="6" style="text-align:center;"|[[Jump Drive Computer|Jump Drive System]] | ||
| + | !Stat !!colspan="2"| Value | ||
| + | |- | ||
| + | |Number of Blocks ||colspan="2" style="text-align:center;"| 1,367 | ||
| + | |- | ||
| + | |Total Charged Needed ||colspan="2" style="text-align:center;"| 1,852,415<span style="color: grey">.0</span> | ||
| + | |- | ||
| + | |Charge Time<span style="color: grey"><small> (Approx.)</small></span> || colspan="2" style="text-align:center;"| 24<span style="color: grey">.00</span> sec | ||
| + | |- | ||
| + | |Power Usage<span style="color: grey"><small> (Per Second while Charging)</small></span> || colspan="2" style="text-align:center;"| 78,350<span style="color: grey">.00</span> | ||
| + | |- | ||
| + | |Modules/Modules Needed|| style="text-align:center;"| 1,367||style="text-align:center;"| 1,352 | ||
| + | |- | ||
| + | | style="text-align:center;"|[[File:Inner Ship Remote.png|100px]] || style="text-align:center;"|[[Inner Ship Remote]]"no data" | ||
| + | |colspan="3" style="text-align:center;"|''Toggles the Engine lights on and off.'' | ||
| + | |- | ||
| + | | style="text-align:center;"|[[File:Rail Docker.png|100px]] || style="text-align:center;"|[[Rail Docker]] <br/><small>(Location: -7,13,2)</small> | ||
| + | |colspan="3" style="text-align:center;"|''Part of a USD dock on the vessel's right side.'' | ||
| + | |- | ||
| + | | style="border-bottom: solid 1px; text-align:center;"|[[File:Rail Docker.png|100px]] || style="border-bottom: solid 1px; text-align:center;"|[[Rail Docker]] <br/><small>(Location: 39,13,4)</small> | ||
| + | |colspan="3" style="border-bottom: solid 1px; text-align:center;"|''Part of a USD dock on the vessel's left side.'' | ||
|- | |- | ||
!rowspan="15" width="30px"|Dock(s) | !rowspan="15" width="30px"|Dock(s) | ||
| − | |rowspan=" | + | |rowspan="4" style="text-align:center;"|<big>16 x Rail Door</big>||rowspan="4" style="text-align:center;"|''Comes in sets of 2, Decorative hatch doors that can be opened/closed to reveal a cargo stack.'' |
| + | !Stat !!colspan="2"| Value | ||
| + | |- | ||
| + | |Mass||colspan="2" style="text-align:center;"| 4.3 | ||
| + | |- | ||
| + | |Armor Hit Points <span style="color: grey">■</span> | ||
| + | |colspan="3" style="text-align:center;"| 2,050 | ||
| + | |- | ||
| + | |Structure Hit Points <span style="color: green">■</span> | ||
| + | |colspan="3" style="text-align:center;"| 280 | ||
| + | |- | ||
| + | |rowspan="7" style="text-align:center;"|<big>7 x AMS Turrets<br/>(Small)<br/>[[File:Cannon Computer.png|75px]][[File:Cannon Computer.png|75px]]</big>||rowspan="7" style="text-align:center;"|''Docked on the Top and bottom of the vessel.'' <br/><small>(Location(s): 16,24,-8/16,24,-18/16,24,-48/16,8,-8/16,8,-18/16,8,-28/16,8,-48)</small> | ||
!Stat !!colspan="2"| Value | !Stat !!colspan="2"| Value | ||
|- | |- | ||
| Line 268: | Line 761: | ||
|Type||colspan="2" style="text-align:center;"| Machine Gun | |Type||colspan="2" style="text-align:center;"| Machine Gun | ||
|- | |- | ||
| − | |Damage Output <span style="color: grey"><small>(Per Array)</small></span> || | + | |Damage Output <span style="color: grey"><small>(Per Array/Total DPS)</small></span> || style="text-align:center;"| 2 ||style="text-align:center;"|20 |
|- | |- | ||
|Shields <span style="color: orange">■</span><span style="color: grey"><small>(Total/Recharge of both Base & Barrel)</small></span> | |Shields <span style="color: orange">■</span><span style="color: grey"><small>(Total/Recharge of both Base & Barrel)</small></span> | ||
Latest revision as of 03:25, 18 June 2017
| This article is a work-in-progress. Edits are welcome, however please keep in mind that they may be overwritten or removed if they are not in line with the intention of the article. |
The Trading Guild is one of the major factions that players will encounter while journeying through the universe. They are a generally peaceful trade oriented faction that will start off neutral towards the player but will retaliate if provoked.
Contents
Overview
"The Trading Guild is a collection of large corporations. They work to better themselves primarily through trade and economics. The Trading Guild treats others with neutrality, and they hardly care who or what they sell their products to. Their wealth grants them strength, but they are a relatively peaceful faction."
Blueprints
Ships
B110-11
The Bahtra B110 | Drone
The Trading Guild will often employ the use of drones more than manned fighters. Pilots cost money, more so when they die! Shipping valuable cargo across space can be fatal, surprisingly. The drone here is quite an aggressive looking ship and it is clear that Bahtra intended so!
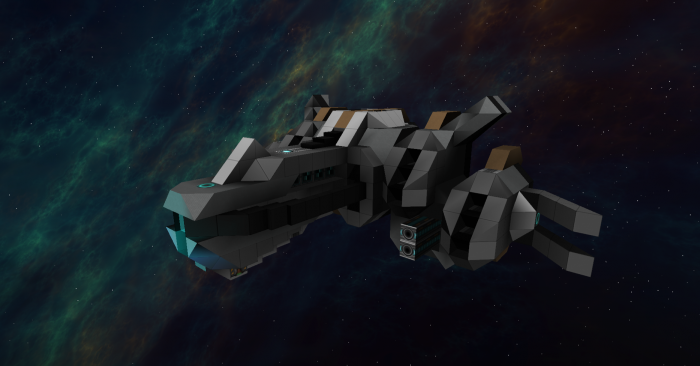
|
Stats | |||||
|---|---|---|---|---|---|---|
| Class | Attack Drone | |||||
| Blueprint Class | Defense | |||||
| Mass | 104.9 | |||||
| Dimensions (Length/Height/Width) |
19m / 10m / 29m | |||||
| Power ■ (Total/Recharge) |
84,317.6 | 15,944.8 e/sec | ||||
| Thrust / Max Speed ■ | 129.8 | 130.3 | ||||
| Shields ■ (Total/Recharge) |
3,093 | 187 s/sec | ||||
| Armor Hit Points ■ | 46,075 | |||||
| Structure Hit Points ■ | 34,525 | |||||
| Systems | ||||||
| Weapons |  |
Unslaved Cannons | Stat | Value | ||
| Number of Arrays | 2 | |||||
| Damage Output (Per Array/Total DPS) | 580 | 1,160 | ||||
| Block Penetration | 7 | |||||
| Reload (In Seconds) | 1.0 | |||||
| Shots (Per Activation) | 1 | |||||
| Projectile Speed (In Meters per Second) | 937.5 | |||||
| Range (In Sector Lengths) | 1.0 | |||||
| Power Usage (Per Array/Per Activation) | 6,380.00 | 12,760.00 | ||||
| Equipment |  |
Rail Docker (Location: 16,11,20) |
Forward facing dock on the underside of the vessel's nose. | |||
B130-7
The Bahtra B130 | Patrol Ship
The Trading Guild utilizes patrol ships and bombers for escorting their cargo ships. These craft are usually guarding small freighters and as such dock with stations fairly often.
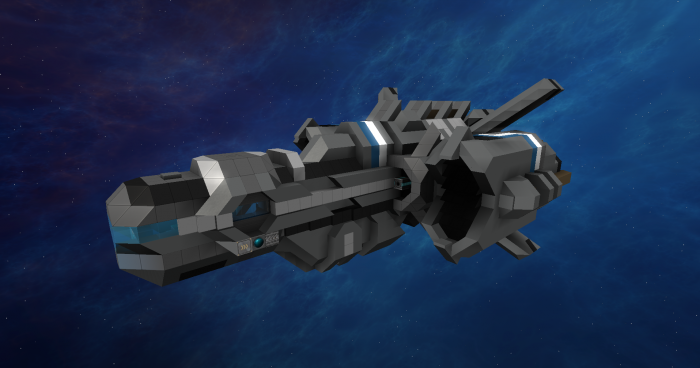
|
Stats | |||||
|---|---|---|---|---|---|---|
| Class | Light Fighter | |||||
| Blueprint Class | Defense | |||||
| Mass | 525.3 | |||||
| Dimensions (Length/Height/Width) |
44m / 19m / 29m | |||||
| Power ■ (Total/Recharge) |
130,086.4 | 126,507.6 e/sec | ||||
| Thrust / Max Speed ■ | 894.5 | 165.2 | ||||
| Shields ■ (Total/Recharge) |
12,265 | 968 s/sec | ||||
| Armor Hit Points ■ | 176,625 | |||||
| Structure Hit Points ■ | 179,715 | |||||
| Systems | ||||||
| Weapons |   |
Cannon Computer +Punch-Through Effect (97.0%) |
Stat | Value | ||
| Number of Arrays | 2 | |||||
| Damage Output (Per Array/Total DPS) | 1,300 | 2,600 | ||||
| Block Penetration | 16 | |||||
| Reload (In Seconds) | 1.0 | |||||
| Shots (Per Activation) | 1 | |||||
| Projectile Speed (In Meters per Second) | 937.5 | |||||
| Range (In Sector Lengths) | 1.0 | |||||
| Power Usage (Per Array/Per Activation) | 14,300.00 | 28,600.00 | ||||
| Equipment |  |
Scanner System | Stat | Value | ||
| Number of Blocks | 70 | |||||
| Total Charged Needed | 330,482.0 | |||||
| Charge Time (Approx.) | 50.00 sec | |||||
| Power Usage (Per Second) | 6,380.00 | |||||
| Modules/Modules Needed | 70 | 237 | ||||
 |
Jump Drive System | Stat | Value | |||
| Number of Blocks | 336 | |||||
| Total Charged Needed | 575,673.0 | |||||
| Charge Time (Approx.) | 20.00 sec | |||||
| Power Usage (Per Second while Charging) | 26,800.00 | |||||
| Modules/Modules Needed | 336 | 263 | ||||
 |
Inner Ship Remote"Engine" | Toggles the Engine lights on and off. | ||||
 |
Rail Docker (Location: 19,15,28) |
Part of a USD dock on the vessel's left side. | ||||
B150-18
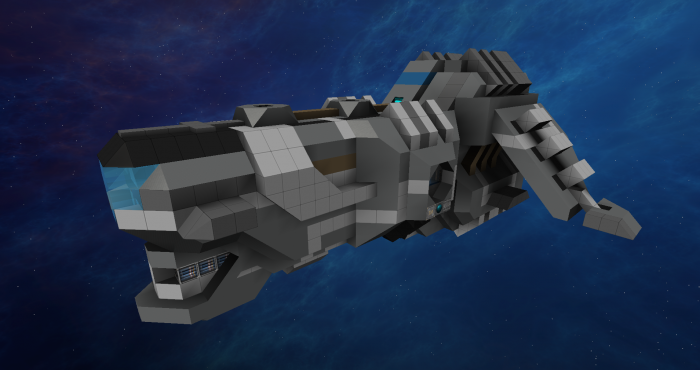
The Bahtra B150 | Bomber
The Trading Guild do not often employ bombers in their fleets. Most of their combat tactics involve preventative measures such as Jump Drives and AMS systems. It's also better to sell warfare than it is to engage in it. This particular model is destined to be decommissioned in the near future.
|
Stats | |||||
|---|---|---|---|---|---|---|
| Class | Bomber | |||||
| Blueprint Class | Defense | |||||
| Mass (Base/ With Docks) |
468.1 | 470.8 | ||||
| Dimensions (Length/Height/Width) |
40m / 18m / 33m | |||||
| Power ■ (Total/Recharge) |
1,002,367.2 | 101,493.3 e/sec | ||||
| Thrust / Max Speed ■ | 487.3 | 115.1 | ||||
| Shields ■ (Total/Recharge) |
14,114 | 638 s/sec | ||||
| Armor Hit Points ■ | 151,050 | |||||
| Structure Hit Points ■ | 194,625 | |||||
| Systems | ||||||
| Weapons |    |
Missile Computer +Damage Beam Computer(93.2%) +Punch-Through Effect (88.6%) |
Stat | Value | ||
| Number of Arrays | 1 | |||||
| Type | Lock On | |||||
| Firing Direction (In relation to the vessel) | Forward (Right) | |||||
| Damage Output (Per Array) | 106,527.3 | |||||
| Blast Radius (In Blocks) | 16.4 | |||||
| Reload (In Seconds) | 42.9 | |||||
| Shots (Per Activation) | 1 | |||||
| Projectile Speed (In Meters per Second) | 359.3 | |||||
| Range (In Sector Lengths) | 4.6 | |||||
| Power Usage (Per Activation) | 532,636.4 | |||||
   |
Missile Computer +Damage Beam Computer(93.2%) +Punch-Through Effect (88.6%) |
Stat | Value | |||
| Number of Arrays | 1 | |||||
| Type | Lock On | |||||
| Firing Direction (In relation to the vessel) | Forward (Left) | |||||
| Damage Output (Per Array) | 106,527.3 | |||||
| Blast Radius (In Blocks) | 16.4 | |||||
| Reload (In Seconds) | 42.9 | |||||
| Shots (Per Activation) | 1 | |||||
| Projectile Speed (In Meters per Second) | 359.3 | |||||
| Range (In Sector Lengths) | 4.6 | |||||
| Power Usage (Per Activation) | 532,636.4 | |||||
| Equipment |  |
Scanner System | Stat | Value | ||
| Number of Blocks | 76 | |||||
| Total Charged Needed | 335,067.56 | |||||
| Charge Time (Approx.) | 49.00 sec | |||||
| Power Usage (Per Second) | 6,900.00 | |||||
| Modules/Modules Needed | 76 | 228 | ||||
 |
Jump Drive System | Stat | Value | |||
| Number of Blocks | 173 | |||||
| Total Charged Needed | 553,651.75 | |||||
| Charge Time (Approx.) | 30.00 sec | |||||
| Power Usage (Per Second while Charging) | 18,650.00 | |||||
| Modules/Modules Needed | 173 | 236 | ||||
 |
Inner Ship Remote"[no data]" | Toggles the Engine lights on and off. | ||||
 |
Rail Docker (Location: 22,14,17) |
Part of a USD dock on the vessel's left side. | ||||
| Dock(s) | 1 x AMS Turret (Small)   |
Docked on the right side of the vessel. Parallel to the USD dock (Location: 10,16,16) |
Stat | Value | ||
| Number of Arrays | 2 | |||||
| Type | Machine Gun | |||||
| Damage Output (Per Array/Total DPS) | 2 | 20 | ||||
| Shields ■(Total/Recharge of both Base & Barrel) | 0 | 0 s/sec | ||||
| Armor Hit Points ■ (of both Base & Barrel) | 1,700 | |||||
| Structure Hit Points ■ (of both Base & Barrel) | 980 | |||||
B190-21
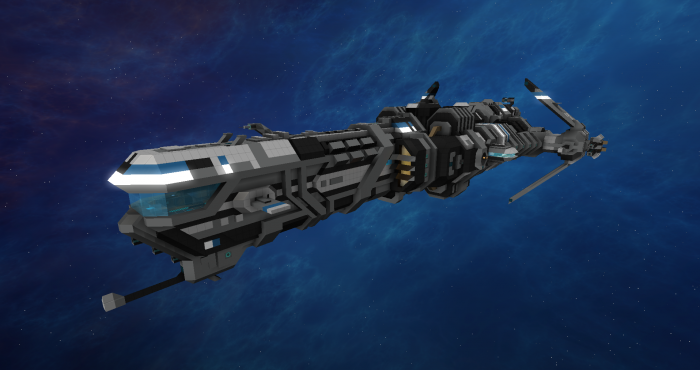
The Bahtra B190 | Frigate
The B190 is the largest addition to the small category of Trading Guild ships. The vessel is larger and better equipped than the other small fighters and drones in the lineup. As such it is crewed by a number of people at any time and offers a much more hospitable ship environment than other vessels, if only marginally so.
|
Stats | |||||
|---|---|---|---|---|---|---|
| Class | Frigate | |||||
| Blueprint Class | Defense | |||||
| Mass (Base/ With Docks) |
4,222.7 | 4,258.7 | ||||
| Dimensions (Length/Height/Width) |
141m / 39m / 63m | |||||
| Power ■ (Total/Recharge) |
1,376,640.6 | 936,479.6 e/sec | ||||
| Thrust / Max Speed ■ | 6,046.6 | 144.1 | ||||
| Shields ■ (Total/Recharge) |
319,699 | 7,716 s/sec | ||||
| Armor Hit Points ■ | 1,091,150 | |||||
| Structure Hit Points ■ | 1,851,410 | |||||
| Systems | ||||||
| Weapons |    |
Cannon Computer +Damage Beam Computer(100.0%) +Explosive Effect (25.0%) |
Stat | Value | ||
| Number of Arrays | 2 | |||||
| Damage Output (Per Array/Total DPS) | 40,480.0 | 11,240 | ||||
| Block Penetration | 34 | |||||
| Reload (In Seconds) | 4.0 | |||||
| Shots (Per Activation) | 1 | |||||
| Projectile Speed (In Meters per Second) | 1,875.0 | |||||
| Range (In Sector Lengths) | 3.0 | |||||
| Power Usage (Per Array/Per Activation) | 445,280.00 | 883,995.6 | ||||
   |
Cannon Computer +Cannon Computer(50.0%) +Punch-Through Effect (100.0%) |
Stat | Value | |||
| Number of Arrays | 3 | |||||
| Damage Output (Per Array/Total DPS) | 3,657.5 | 15,960 | ||||
| Block Penetration | 22 | |||||
| Reload (In Seconds) | 0.55 | |||||
| Shots (Per Activation) | 1 | |||||
| Projectile Speed (In Meters per Second) | 937.5 | |||||
| Range (In Sector Lengths) | 1.0 | |||||
| Power Usage (Per Array/Per Activation) | 43,890.00 | 258,772.8 | ||||
| Equipment |  |
Defensive Ion Effect | Stat | Value | ||
| Number of Blocks | 1902 | |||||
| Effect Strength | 54.1% | |||||
| Power Usage (Per Second) | 38,559.5 | |||||
 |
Scanner System | Stat | Value | |||
| Number of Blocks | 1,214 | |||||
| Total Charged Needed | 2,236,321.8 | |||||
| Charge Time (Approx.) | 63.00 sec | |||||
| Power Usage (Per Second) | 35,350.00 | |||||
| Modules/Modules Needed | 1,214 | 2,120 | ||||
 |
Jump Drive System | Stat | Value | |||
| Number of Blocks | 3,980 | |||||
| Total Charged Needed | 2,785,452.0 | |||||
| Charge Time (Approx.) | 13.50 sec | |||||
| Power Usage (Per Second while Charging) | 209,000.00 | |||||
| Modules/Modules Needed | 3,980 | 2,128 | ||||
 |
Inner Ship Remote"[no data]" | Toggles the Engine lights on and off. | ||||
 |
Rail Docker (Location: 32,14,20) |
Part of a USD dock on the vessel's left side. | ||||
 |
Rail Docker (Location: 0,14,18) |
Part of a USD dock on the vessel's right side. | ||||
| Dock(s) | 2 x AMS Turrets (Small)   |
Docked on the Top and bottom of the vessel. (Location(s): 16,26,-45/16,6,-2) |
Stat | Value | ||
| Number of Arrays | 2 | |||||
| Type | Machine Gun | |||||
| Damage Output (Per Array/Total DPS) | 2 | 20 | ||||
| Shields ■(Total/Recharge of both Base & Barrel) | 0 | 0 s/sec | ||||
| Armor Hit Points ■ (of both Base & Barrel) | 1,700 | |||||
| Structure Hit Points ■ (of both Base & Barrel) | 980 | |||||
2 x Cannon Turrets  |
Docked on the left and right side of the vessel. Near its rear (Location(s): 47,16,-24/-15,16,-24) |
Stat | Value | |||
| Number of Arrays | 2 | |||||
| Type | Cannons+Punch-Through Effect | |||||
| Damage Output (Per Array/Total DPS) | 90 | 180 | ||||
| Shields ■(Total/Recharge of both Base & Barrel) | 0 | 0 s/sec | ||||
| Armor Hit Points ■ (of both Base & Barrel) | 7,550 | |||||
| Structure Hit Points ■ (of both Base & Barrel) | 2,615 | |||||
| 1 x Rail Decoration (Spinning Radar Dish) |
Decorative rail entity. | Stat | Value | |||
| Mass | 1.6 | |||||
| Armor Hit Points ■ | 1,550 | |||||
| Structure Hit Points ■ | 245 | |||||
C120-12
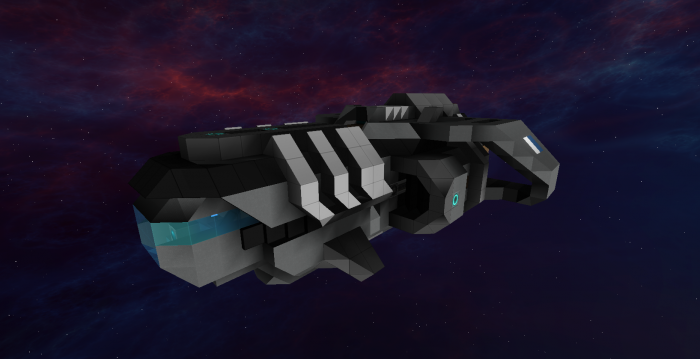
The Crusa C120 | Shuttle
The Trading Guild Shuttle. A small craft with very limited capabilities. Generally used for personal transport.
|
Stats | |||||
|---|---|---|---|---|---|---|
| Class | Shuttle | |||||
| Blueprint Class | General | |||||
| Mass (Base/ With Docks) |
210.9 | 211.7 | ||||
| Dimensions (Length/Height/Width) |
31m / 11m / 23m | |||||
| Power ■ (Total/Recharge) |
95,866.5 | 17,175.3 e/sec | ||||
| Thrust / Max Speed ■ | 466.8 | 202.9 | ||||
| Shields ■ (Total/Recharge) |
6,478 | 170 s/sec | ||||
| Armor Hit Points ■ | 82,925 | |||||
| Structure Hit Points ■ | 64,760 | |||||
| Systems | ||||||
| Equipment |  |
Scanner System | Stat | Value | ||
| Number of Blocks | 30 | |||||
| Total Charged Needed | 249,142.86 | |||||
| Charge Time (Approx.) | 44.00 sec | |||||
| Power Usage (Per Second) | 5,750.00 | |||||
| Modules/Modules Needed | 30 | 103 | ||||
 |
Jump Drive System | Stat | Value | |||
| Number of Blocks | 167 | |||||
| Total Charged Needed | 357,261.0 | |||||
| Charge Time (Approx.) | 20.00 sec | |||||
| Power Usage (Per Second while Charging) | 18,350.00 | |||||
| Modules/Modules Needed | 167 | 106 | ||||
 |
Inner Ship Remote"no data" | Toggles the Engine lights on and off. | ||||
 |
Rail Docker (Location: 16,11,18) |
Located on the under side of the vessel. | ||||
| Dock(s) | 1 x Rail Door | Used as the primary means to enter the vessel | Stat | Value | ||
| Mass | 0.8 | |||||
| Armor Hit Points ■ | 400 | |||||
| Structure Hit Points ■ | 120 | |||||
C140-9
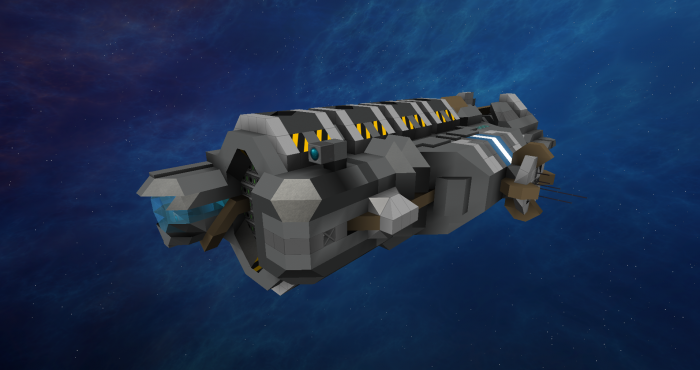
Crusa C140 | Salvager
The Trading Guild rely on trade more than resource harvesting. Their interest in spending time mining is minimal. Crusa-Corp invested in a cheap hull dedicated for mining that they could sell to civilians.
|
Stats | |||||
|---|---|---|---|---|---|---|
| Class | Mining Ship | |||||
| Blueprint Class | Mining | |||||
| Mass | 668.4 | |||||
| Dimensions (Length/Height/Width) |
53m / 13m / 31m | |||||
| Power ■ (Total/Recharge) |
50,000 | 64,031.4 e/sec | ||||
| Thrust / Max Speed ■ | 1,101.5 | 161.1 | ||||
| Shields ■ (Total/Recharge) |
17,023 | 1,221 s/sec | ||||
| Armor Hit Points ■ | 212,575 | |||||
| Structure Hit Points ■ | 237,450 | |||||
| Systems | ||||||
| Equipment |   |
Salvage Computer +Damage Pulse Computer (71.3%) |
Stat | Value | ||
| Number of Arrays | 12 | |||||
| Salvage Strength(Per Array) | 264.7 | |||||
| Tick Rate (In Seconds) | 11.0 | |||||
| Reload (In Seconds) | 23.0 | |||||
| Range (In Sector Lengths) | 0.48 | |||||
| Power Usage (Per Array/Per Activation) | 52.9 | 10,692.00 | ||||
 |
Cargo System | Cargo Capacity | ||||
| Cargo 1 | 1,300 | |||||
| Cargo 2 | 100 | |||||
| Total Capacity | 1,400 | |||||
 |
Defensive Ion Effect | Stat | Value | |||
| Number of Blocks | 406 | |||||
| Effect Strength | 60% | |||||
| Power Usage (Per Second) | 8,350.00 | |||||
 |
Scanner System | Stat | Value | |||
| Number of Blocks | 304 | |||||
| Total Charged Needed | 495,560.38 | |||||
| Charge Time (Approx.) | 40.00 sec | |||||
| Power Usage (Per Second) | 12,600.00 | |||||
| Modules/Modules Needed | 304 | 318 | ||||
 |
Jump Drive System | Stat | Value | |||
| Number of Blocks | 558 | |||||
| Total Charged Needed | 632,223.0 | |||||
| Charge Time (Approx.) | 17.00 sec | |||||
| Power Usage (Per Second while Charging) | 37,900.00 | |||||
| Modules/Modules Needed | 558 | 335 | ||||
 |
Inner Ship Remote"no data" | Toggles the Engine lights on and off. | ||||
 |
Rail Docker (Location: 8,14,27) |
Part of a USD dock on the vessel's right side. | ||||
T180-15
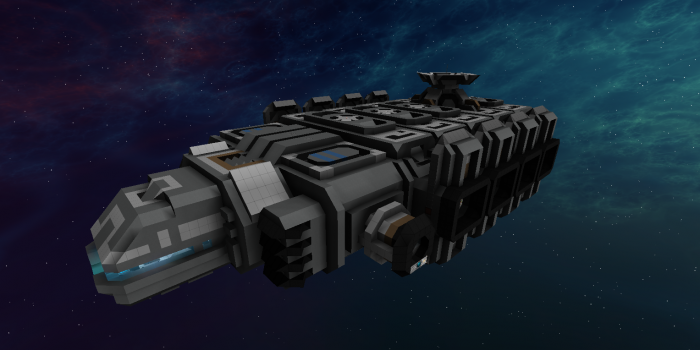
The Tak T180 | Small Freighter
The Tak 188 is the smallest cargo transport in the Trading Guild Fleet. Because of its modular interior, more space can be dedicated to other system such as thrust, jump drives or shields. This would come with a sacrifice to it's cargo capacity however. The default configuration is displayed here.
|
Stats | |||||
|---|---|---|---|---|---|---|
| Class | Freighter | |||||
| Blueprint Class | Cargo | |||||
| Mass (Base/ With Docks) |
2,625.6 | 2,702.5 | ||||
| Dimensions (Length/Height/Width) |
93m / 26m / 47m | |||||
| Power ■ (Total/Recharge) |
325,737.9 | 89,875 e/sec | ||||
| Thrust / Max Speed ■ | 1,470.9 | 78.3 | ||||
| Shields ■ (Total/Recharge) |
43,428 | 390 s/sec | ||||
| Armor Hit Points ■ | 1,201,800 | |||||
| Structure Hit Points ■ | 396,990 | |||||
| Systems | ||||||
| Equipment |  |
Cargo System | Cargo Capacity | |||
| Cargo 1 | 29,500 | |||||
| Cargo 2 | 29,500 | |||||
| Cargo 3 | 29,500 | |||||
| Cargo 4 | 29,500 | |||||
| Cargo 5 | 29,500 | |||||
| Cargo 6 | 29,500 | |||||
| Cargo 7 | 29,500 | |||||
| Cargo 8 | 29,500 | |||||
| Total Capacity | 236,000 | |||||
 |
Scanner System | Stat | Value | |||
| Number of Blocks | 85 | |||||
| Total Charged Needed | 410,122.44 | |||||
| Charge Time (Approx.) | 58.00 sec | |||||
| Power Usage (Per Second) | 7,125.00 | |||||
| Modules/Modules Needed | 85 | 1,299 | ||||
 |
Jump Drive System | Stat | Value | |||
| Number of Blocks | 1,367 | |||||
| Total Charged Needed | 1,852,415.0 | |||||
| Charge Time (Approx.) | 24.00 sec | |||||
| Power Usage (Per Second while Charging) | 78,350.00 | |||||
| Modules/Modules Needed | 1,367 | 1,352 | ||||
 |
Inner Ship Remote"no data" | Toggles the Engine lights on and off. | ||||
 |
Rail Docker (Location: -7,13,2) |
Part of a USD dock on the vessel's right side. | ||||
 |
Rail Docker (Location: 39,13,4) |
Part of a USD dock on the vessel's left side. | ||||
| Dock(s) | 16 x Rail Door | Comes in sets of 2, Decorative hatch doors that can be opened/closed to reveal a cargo stack. | Stat | Value | ||
| Mass | 4.3 | |||||
| Armor Hit Points ■ | 2,050 | |||||
| Structure Hit Points ■ | 280 | |||||
| 7 x AMS Turrets (Small)   |
Docked on the Top and bottom of the vessel. (Location(s): 16,24,-8/16,24,-18/16,24,-48/16,8,-8/16,8,-18/16,8,-28/16,8,-48) |
Stat | Value | |||
| Number of Arrays | 2 | |||||
| Type | Machine Gun | |||||
| Damage Output (Per Array/Total DPS) | 2 | 20 | ||||
| Shields ■(Total/Recharge of both Base & Barrel) | 0 | 0 s/sec | ||||
| Armor Hit Points ■ (of both Base & Barrel) | 1,700 | |||||
| Structure Hit Points ■ (of both Base & Barrel) | 980 | |||||