Difference between revisions of "Reactors"
(fixed some links) |
m (→Reactor Blocks anAdded STtream noded Overview) (Tag: Visual edit) |
||
| (3 intermediate revisions by the same user not shown) | |||
| Line 3: | Line 3: | ||
| text = '''This page is up to date as of version 0.200.335.''' | | text = '''This page is up to date as of version 0.200.335.''' | ||
}} | }} | ||
| − | + | ||
| − | In StarMade, | + | In StarMade, nearly all functional Computers, Modules and Blocks require power. As of version 0.200.311, the StarMade Power System has been overhauled with a different model to generate and utilize ship or station power. The ‘Power 2.0’ system is primarily based on a commensalistic relationship between a series [[Reactor Power]] modules and an array of [[Reactor Stabilizer]] modules. The Reactor Power block produces power, but without the required Reactor Stabilizer modules, the reactor is limited. The stabilizers however are independent, and do not require any other block for functioning or optimization. |
__TOC__ | __TOC__ | ||
| − | == Reactor Overview == | + | == Reactor Blocks and Overview == |
| − | |||
| − | |||
{{infobox block/Reactor Stabilizer}} | {{infobox block/Reactor Stabilizer}} | ||
| − | {{infobox block/Reactor Main}} | + | {{Infobox block/Reactor Stabilizer Stream Node}}{{infobox block/Reactor Main}}There are five possible components to reactors: Reactor Power blocks, Reactor Stabilizer blocks, [[Reactor Stabilizer Stream Node]] blocks, and [[reactor chambers|Reactor Chambers]] and their connecting [[Reactor Conduit |Reactor Conduits]]. |
| + | === System Modules === | ||
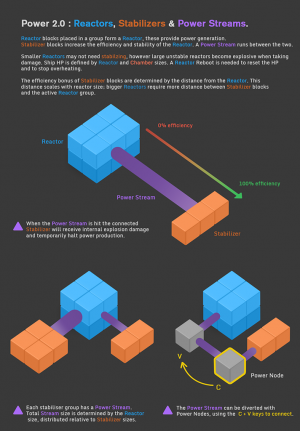
| + | The [[:File:Developer Stabilizer Demo.png|original info-card]] is used as a graphical depiction of the generic effects of the two block types working in harmony. As with the previous version of the power system, the sheer amount of raw power is dependent on number of placed reactor blocks within a group. However, group and dimension sizes no longer matter, and only the sheer number of power reactors are what determines the possible power output. | ||
| − | + | Reactor Chambers provide ship-wide buffs and special abilities, however add complexity to the reactor. Reactor Chambers are linked to the reactor with Conduits. The minimum size of the Reactor Chambers is correlated to Reactor size. This minimum size can be seen in the Reactor menu and when placing Chamber blocks. Each chamber will use a portion of ''Reactor Points'', a virtual mechanic, that adds up to 100%. Making Chamber designs that go over 100% eventually deactivate all Chambers effecting the mother entity. This page will not discuss Reactor Chambers and Conduit usage in detail. | |
| − | + | Finally, an optional block to add to and customize Reactor Systems is the Reactor Stabilizer Stream Node. The Reactor Stream, that is created from the center of the active Reactor group to the center of each Stabilizer Group, will be redirected through the nodes. Multiple nodes may be placed to for a multi-point form for the stream to reroute through. This allows for builders to route the stream through protected areas of the entity, protecting the stream from possible damage. Damage hitting the streams will temporarily reduce power output. | |
| − | + | [[File:Developer Stabilizer Demo.png|thumb|Developer Chart From Jan 20, 2018 News Update.]] | |
| − | + | === Power Distribution === | |
| + | The biggest change in power mechanic for the ship or station usage of the power system is that there is no longer a capacitance or battery power, but rather only a constant stream of limited recharging power. As such, every usage of the power system is now in terms of amount of energy per sec (e/sec) versus raw or instantaneous energy upon activation. The difference, between a resting or charging amount of energy needed is dependent on the system type and size. E.g, the basic factory will use 10 e/sec when not in use, but when activated, jumps to 50 e/sec (with no upgrades or modifiers). | ||
| − | + | The power distribution of the ship or station will depend on the individual entity, modified by the player. When power usage overtakes power production, certain systems will start to receive reduced or no power, as listed in a priority list set by the player. An entity may have more than one reactor group (a connected series of Reactor Power blocks), but only one reactor will be active, using that groups power production and size as the determining factor for active chambers, and power production available to systems on the entity. Therefore multiple reactors turn into redundant or modifying reactors to change the secondary effects of chambers to the ship. This page will not go into detail about this or other power routing systems as set in the game. | |
| − | [[ | + | === Legacy Reactors === |
| − | + | Information on legacy power systems can be found[[ Power Systems | here]]. However, it is strongly recommended that you no longer use legacy power. It currently remains in-game for compatibility reasons, However it is largely unsupported and will be fully deprecated in the future. | |
| − | + | == Power Generation == | |
| − | + | The current power model in simply a linear relationship between the number of reactors and amount of power generated. As of 0.200.335, the amount is set to 100 e/sec/block. However, as soon as there are more than 10 reactor blocks in a single reactor, each additional block reduces the reactor’s stability. Stability of the reactor is the second factor of power generation. As soon as the power stability goes below 25% power generation is capped, and the maximum power generation without stabilizers is 4000 e/sec., which occurs with a reactor group size of 40 blocks. | |
| − | + | === Variables === | |
| + | Below is a list of variables their current settings as of 0.200.335, as listed in <gamefolder>\StarMade\data\config\blockBehaviorConfig.xml: | ||
| − | + | {| class="wikitable" | |
| + | |+Variables, Power | ||
| + | !Config File Name | ||
| + | !Meaning | ||
| + | !Symbol | ||
| + | !Value | ||
| + | |- | ||
| + | |ReactorCalcStyle | ||
| + | |Active Calculation Model: | ||
| + | Linear, Logarithmic and Logarithmic_Leveled are possible | ||
| + | | | ||
| + | |EXP | ||
| + | |- | ||
| + | |ReactorStabilizerDistanceExpMult | ||
| + | |Exponential Multiplier | ||
| + | |C<sub>1</sub> | ||
| + | |10 | ||
| + | |- | ||
| + | |ReactorStabilizerDistanceExp | ||
| + | |Exponent | ||
| + | |a | ||
| + | |0.333 | ||
| + | |- | ||
| + | |ReactorStabilizerStartingDistance | ||
| + | |Offset Distance, Constant | ||
| + | |s<sub>0</sub> | ||
| + | | -7.5 | ||
| + | |- | ||
| + | |ReactorStabilizerLinearFalloffOne | ||
| + | |Optimal Distance Constant of Stabilizers | ||
| + | |F<sub>1</sub> | ||
| + | |1.0 | ||
| + | |- | ||
| + | |ReactorStabilizerLinearFalloffZero | ||
| + | |Minimum Distance Constant of Stabilizers | ||
| + | |F<sub>0</sub> | ||
| + | |0.0 | ||
| + | |- | ||
| + | |ReactorStabilizerFreeMainReactorBlocks | ||
| + | |Number of Reactors that are not affected by Stability | ||
| + | |B<sub>f</sub> | ||
| + | |10 | ||
| + | |- | ||
| + | |ReactorStabilizerDistanceTotalMult | ||
| + | |Final Multiplier | ||
| + | |C<sub>0</sub> | ||
| + | |2.0 | ||
| + | |- | ||
| + | |ReactorStabilizationPowerEffectiveFull | ||
| + | |Percent of Stability required for Full Power Output | ||
| + | |E | ||
| + | |0.25 | ||
| + | |} | ||
| + | From the following formula, the amount of reactors ('''B''') outputs generation ('''P''', e/sec) inherent to a group that has zero stabilizers can be determined: <blockquote>P = B · 100 · ''min'' [ 1 , 10 / (B·E) ]</blockquote>This simple formula shows that the power generated is linearly associated with number of reactor blocks in the group. Then, if the number blocks exceeds ''10/E'' (that is, 40 blocks), then power is capped and at which stabilizers are required. | ||
| − | + | == Reactor Stabilizer Placement == | |
| − | + | === Overview === | |
| + | Stabilizers, primarily, add potential power capability to a reactor. Secondary effects like damage reduction and other effectiveness due to stability will not be discussed in this page. The relationship between the number of stabilizers and the distance they are away from the active reactor group is determined by an exponential equation that is dependent on the size of the reactor core, and number of stabilizers you wish to use. The values determined by the distance models output two values for use with a single reactor core, the minimum number of stabilizers required, and a minimum distance for optimal stabilization. The game GUI already has a built-in indicator to show where the stabilizers will be most effective. Any effectiveness less than 100% simply means you must linearly compensate for that distance with more stabilizers. I.e. 2 stabilizers at 50% effectiveness is equal to 1 stabilizer at 100%. | ||
| − | + | In version 0.200.332, the most recent changes to the stabilizer/power system, the stabilizers have two unique properties when designing and working with power systems. | |
| + | # Size of Stabilizer Group and Distance from the active Reactor | ||
| + | # Number of Independent Stabilizer Groups and their relative location around the active Reactor | ||
| + | [[File:Optimum distance.png|thumb|504x504px|Log-Axis graph showing # reactors to optimum distance for stabilizers.]] | ||
| − | == | + | === 1 - Single Group and Distance === |
| + | To reach 100% stability in for the reactor core, there must be 10 less stabilizers than the number of reactor blocks, placed at or farther than, the optimum distance. | ||
| − | + | When working with stabilizer groups that are not at 100% optimized distance, a linear relationship is used. The values ''ReactorStablizerLinearFalloff'' ''One'' determine at what distance the individual stabilizer becomes 100% effective. This optimum distance is the distance that is determined by the exponential curve. As you grow the size of your reactor core, the distance ('''D''', blocks) that the stabilizers need to be at to achieve optimum stabilization per block is exponential as below:<blockquote>D<sub>opt</sub> = F<sub>1</sub> · C<sub>0</sub> · [s<sub>0</sub> + (C<sub>1</sub> · (B - B<sub>f</sub>)<sup>a</sup>) ]</blockquote>Of course, because StarMade is voxel (discrete) game, the location must be to the next integer value for a stabilizer to be placed with 100% efficiency. Additionally, the player may choose to design a ship or station that does not use optimum distance to stabilize the power reactor, possibly due to size restrictions. The minimum distance required for an individual stabilizer block to add stability to the power reactor replaces the '''F<sub>1</sub>''' with '''F<sub>0</sub>'''. <blockquote>D<sub>min</sub> = F<sub>0</sub> · C<sub>0</sub> · [s<sub>0</sub> + (C<sub>1</sub> · (B - B<sub>f</sub>)<sup>a</sup>) ]</blockquote>With the current values of '''F<sub>0</sub>''', this distance (as of 0.200.335) is simply 0. This means as long as you do not place the stabilizer directly next to the reactor core, the entity will benefit from increased stability. | |
| − | + | The minimum number of stabilizers ('''S<sub>min</sub>''') required to bring a reactor to full power is determined when the stability is greater than ''ReactorStabilizationPowerEffectiveFull'' ('''E'''), currently set to 25%.<blockquote>S<sub>min</sub> = ''max''[ 0, (E - 10/B) / (1/B) ] = ''max''[ 0, (E · B - 10)]</blockquote>Notice, that therefore stabilizers are only required when the reactor has more than 40 blocks, as discussed briefly above. As soon as the number of reactor blocks exceeds, 40, then the simple formula is '''E · B - 10'''. Additionally, the below formula can be used to determine the amount of stability ('''Y''') added by the currently placed stabilizers in a single group is a sum of the stability added by each individual stabilizer block, as distance '''D<sub>i</sub>''' :<blockquote>Y = <big>Σ</big><sub>i</sub> ''min''[1, ''max''[ 0 , ((D<sub>i</sub> - D<sub>min</sub>) / (D<sub>opt</sub> - D<sub>min</sub>)) ] ] / B</blockquote>To add values as of 0.200.335:<blockquote>Y = <big>Σ</big><sub>i</sub> ''min''[1, (D<sub>i</sub> / D<sub>opt</sub> ) ] / B</blockquote>And, finally, pre- 0.200.332, the above equation applied to each and every independent group of stabilizers., up to 20 groups, by default. A group was defined as any array of stabilizer blocks that either touched or were within 3 (by default) blocks or each other. | |
| + | === 2 - Advanced Stabilizer Placement === | ||
[[File:Zones Illustration -3.png|thumb|Stabilizer Zones Around a Reactor]] | [[File:Zones Illustration -3.png|thumb|Stabilizer Zones Around a Reactor]] | ||
| − | + | Post Version 0.200.332, the dimensional bonus were added to the stabilizers system. | |
| + | |||
| + | From the config files: | ||
| + | {| class="wikitable" | ||
| + | |+ | ||
| + | !Stage | ||
| + | !Value | ||
| + | |- | ||
| + | |2 | ||
| + | |1 | ||
| + | |- | ||
| + | |3 | ||
| + | |1 | ||
| + | |- | ||
| + | |4 | ||
| + | |0.8 | ||
| + | |- | ||
| + | |5 | ||
| + | |0.6 | ||
| + | |- | ||
| + | |6 | ||
| + | |0.5 | ||
| + | |} | ||
| + | The unlisted stage, stage 1, is simply the first placed stabilizer group. Concisely, stabilizer groups of the same size receive bonus stabilization if they are on independent sides of the reactor core. The core, having 6 sides (just like dice), therefore has 6 slots to place the a stabilizer group to use for the bonuses. The bonuses are determined by summing each stage up to the number of sides used. If a reactor core has 4 same size stabilizer groups on 4 different sides of the core, then summing up the first four stages (where stage one is simply ‘1’) then you get 1+1+1+0.8 = 3.8. This factor 3.8 is applied to every stabilizer block in the 4 same size groups. At all 6 side covered, the number of total stabilizer blocks is therefore decreased by a 4.9x amount. The assumption made is that the stabilizer groups are equidistant (or at least optimum) from the reactor core center, and are all the same size. As soon as either distance or size of the stabilizer groups are changed, the contributions to the dimensional bonuses are reduced and modified. If there are more than one stabilizer group on a 'side' of the reactor, then the largest stabilizer group is used for the purposes of the dimensional bonus. | ||
| − | + | To point this into an example, a ship has a core made up by a 7x7x7 cubic reactor (343 blocks). The Optimum distance for effective stabilizers is 123.4, therefore 124 blocks away. All values in the table should be rounded up to the nearest integer for complete placement of the stabilizers. | |
| + | {| class="wikitable" | ||
| + | |+Required Stabilizers | ||
| + | !Sides | ||
| + | !Stab. / Side | ||
| + | !Total Stab. | ||
| + | |- | ||
| + | |1 | ||
| + | |333 | ||
| + | |333 | ||
| + | |- | ||
| + | |2 | ||
| + | |83.25 | ||
| + | |166.5 | ||
| + | |- | ||
| + | |3 | ||
| + | |37.0 | ||
| + | |111.0 | ||
| + | |- | ||
| + | |4 | ||
| + | |21.9 | ||
| + | |87.6 | ||
| + | |- | ||
| + | |5 | ||
| + | |15.1 | ||
| + | |75.7 | ||
| + | |- | ||
| + | |6 | ||
| + | |11.3 | ||
| + | |68.0 | ||
| + | |} | ||
| − | == | + | == Optimization == |
| + | Based on the exponential distance model, there is no loss or change of reactor power per block. While there is code in the config files for a ‘soft cap’ of power, tests do not indicate a loss of power per block (i.e. 100 e/sec/block) above the indicated level (150000) of blocks or power, therefore, the system is theoretically infinitely scalable (not playtime tested yet) providing an immense and very large power generation for a very large number of draining blocks. | ||
| − | + | Therefore there is not a definitive “optimum” power structure like the legacy model, which capped out at a certain size per independent group, caused by the capping or ‘soft cap’ built into the power system. Comparing number of reactor blocks to various metrics, there is not a optimum, but rather a fractional exponential relationship, similar in nature to the relationship between optimum distance and # reactor blocks. Tests of many different metrics have been conducted with no indication of a local optimum between 1 and 10^6 reactor blocks comparing the equations and in game determination. | |
==Related== | ==Related== | ||
Revision as of 06:27, 10 October 2018
| This page is up to date as of version 0.200.335. |
In StarMade, nearly all functional Computers, Modules and Blocks require power. As of version 0.200.311, the StarMade Power System has been overhauled with a different model to generate and utilize ship or station power. The ‘Power 2.0’ system is primarily based on a commensalistic relationship between a series Reactor Power modules and an array of Reactor Stabilizer modules. The Reactor Power block produces power, but without the required Reactor Stabilizer modules, the reactor is limited. The stabilizers however are independent, and do not require any other block for functioning or optimization.
Contents
Reactor Blocks and Overview
| Reactor Stabilizer | |
|---|---|
 | |
| Hit Points | 100 |
| Armor | 0.5% |
| Volume | 0.1 |
| Mass | 0.15 |
| Luminosity | none |
| Data Value (ID) | 1009 |
| Reactor Stabilizer Stream Node | |
|---|---|
 | |
| Hit Points | 50 |
| Armor | 0.0% |
| Mass | 0.10 |
| Luminosity | none |
| Data Value (ID) | 66 |
| Reactor Power | |
|---|---|
 | |
| Hit Points | 100 |
| Armor | 0.5% |
| Mass | 0.40 |
| Luminosity | none |
| Data Value (ID) | 1008 |
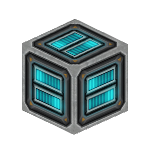
There are five possible components to reactors: Reactor Power blocks, Reactor Stabilizer blocks, Reactor Stabilizer Stream Node blocks, and Reactor Chambers and their connecting Reactor Conduits.
System Modules
The original info-card is used as a graphical depiction of the generic effects of the two block types working in harmony. As with the previous version of the power system, the sheer amount of raw power is dependent on number of placed reactor blocks within a group. However, group and dimension sizes no longer matter, and only the sheer number of power reactors are what determines the possible power output.
Reactor Chambers provide ship-wide buffs and special abilities, however add complexity to the reactor. Reactor Chambers are linked to the reactor with Conduits. The minimum size of the Reactor Chambers is correlated to Reactor size. This minimum size can be seen in the Reactor menu and when placing Chamber blocks. Each chamber will use a portion of Reactor Points, a virtual mechanic, that adds up to 100%. Making Chamber designs that go over 100% eventually deactivate all Chambers effecting the mother entity. This page will not discuss Reactor Chambers and Conduit usage in detail.
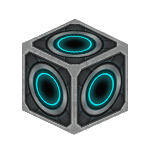
Finally, an optional block to add to and customize Reactor Systems is the Reactor Stabilizer Stream Node. The Reactor Stream, that is created from the center of the active Reactor group to the center of each Stabilizer Group, will be redirected through the nodes. Multiple nodes may be placed to for a multi-point form for the stream to reroute through. This allows for builders to route the stream through protected areas of the entity, protecting the stream from possible damage. Damage hitting the streams will temporarily reduce power output.
Power Distribution
The biggest change in power mechanic for the ship or station usage of the power system is that there is no longer a capacitance or battery power, but rather only a constant stream of limited recharging power. As such, every usage of the power system is now in terms of amount of energy per sec (e/sec) versus raw or instantaneous energy upon activation. The difference, between a resting or charging amount of energy needed is dependent on the system type and size. E.g, the basic factory will use 10 e/sec when not in use, but when activated, jumps to 50 e/sec (with no upgrades or modifiers).
The power distribution of the ship or station will depend on the individual entity, modified by the player. When power usage overtakes power production, certain systems will start to receive reduced or no power, as listed in a priority list set by the player. An entity may have more than one reactor group (a connected series of Reactor Power blocks), but only one reactor will be active, using that groups power production and size as the determining factor for active chambers, and power production available to systems on the entity. Therefore multiple reactors turn into redundant or modifying reactors to change the secondary effects of chambers to the ship. This page will not go into detail about this or other power routing systems as set in the game.
Legacy Reactors
Information on legacy power systems can be found here. However, it is strongly recommended that you no longer use legacy power. It currently remains in-game for compatibility reasons, However it is largely unsupported and will be fully deprecated in the future.
Power Generation
The current power model in simply a linear relationship between the number of reactors and amount of power generated. As of 0.200.335, the amount is set to 100 e/sec/block. However, as soon as there are more than 10 reactor blocks in a single reactor, each additional block reduces the reactor’s stability. Stability of the reactor is the second factor of power generation. As soon as the power stability goes below 25% power generation is capped, and the maximum power generation without stabilizers is 4000 e/sec., which occurs with a reactor group size of 40 blocks.
Variables
Below is a list of variables their current settings as of 0.200.335, as listed in <gamefolder>\StarMade\data\config\blockBehaviorConfig.xml:
| Config File Name | Meaning | Symbol | Value |
|---|---|---|---|
| ReactorCalcStyle | Active Calculation Model:
Linear, Logarithmic and Logarithmic_Leveled are possible |
EXP | |
| ReactorStabilizerDistanceExpMult | Exponential Multiplier | C1 | 10 |
| ReactorStabilizerDistanceExp | Exponent | a | 0.333 |
| ReactorStabilizerStartingDistance | Offset Distance, Constant | s0 | -7.5 |
| ReactorStabilizerLinearFalloffOne | Optimal Distance Constant of Stabilizers | F1 | 1.0 |
| ReactorStabilizerLinearFalloffZero | Minimum Distance Constant of Stabilizers | F0 | 0.0 |
| ReactorStabilizerFreeMainReactorBlocks | Number of Reactors that are not affected by Stability | Bf | 10 |
| ReactorStabilizerDistanceTotalMult | Final Multiplier | C0 | 2.0 |
| ReactorStabilizationPowerEffectiveFull | Percent of Stability required for Full Power Output | E | 0.25 |
From the following formula, the amount of reactors (B) outputs generation (P, e/sec) inherent to a group that has zero stabilizers can be determined:
P = B · 100 · min [ 1 , 10 / (B·E) ]
This simple formula shows that the power generated is linearly associated with number of reactor blocks in the group. Then, if the number blocks exceeds 10/E (that is, 40 blocks), then power is capped and at which stabilizers are required.
Reactor Stabilizer Placement
Overview
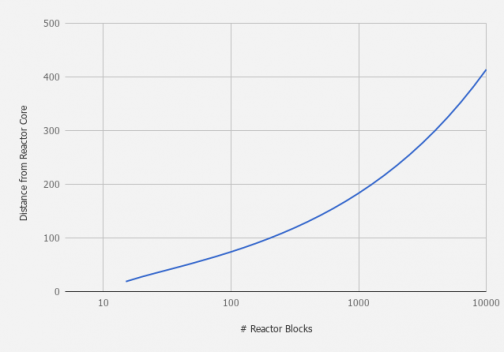
Stabilizers, primarily, add potential power capability to a reactor. Secondary effects like damage reduction and other effectiveness due to stability will not be discussed in this page. The relationship between the number of stabilizers and the distance they are away from the active reactor group is determined by an exponential equation that is dependent on the size of the reactor core, and number of stabilizers you wish to use. The values determined by the distance models output two values for use with a single reactor core, the minimum number of stabilizers required, and a minimum distance for optimal stabilization. The game GUI already has a built-in indicator to show where the stabilizers will be most effective. Any effectiveness less than 100% simply means you must linearly compensate for that distance with more stabilizers. I.e. 2 stabilizers at 50% effectiveness is equal to 1 stabilizer at 100%.
In version 0.200.332, the most recent changes to the stabilizer/power system, the stabilizers have two unique properties when designing and working with power systems.
- Size of Stabilizer Group and Distance from the active Reactor
- Number of Independent Stabilizer Groups and their relative location around the active Reactor
1 - Single Group and Distance
To reach 100% stability in for the reactor core, there must be 10 less stabilizers than the number of reactor blocks, placed at or farther than, the optimum distance.
When working with stabilizer groups that are not at 100% optimized distance, a linear relationship is used. The values ReactorStablizerLinearFalloff One determine at what distance the individual stabilizer becomes 100% effective. This optimum distance is the distance that is determined by the exponential curve. As you grow the size of your reactor core, the distance (D, blocks) that the stabilizers need to be at to achieve optimum stabilization per block is exponential as below:
Dopt = F1 · C0 · [s0 + (C1 · (B - Bf)a) ]
Of course, because StarMade is voxel (discrete) game, the location must be to the next integer value for a stabilizer to be placed with 100% efficiency. Additionally, the player may choose to design a ship or station that does not use optimum distance to stabilize the power reactor, possibly due to size restrictions. The minimum distance required for an individual stabilizer block to add stability to the power reactor replaces the F1 with F0.
Dmin = F0 · C0 · [s0 + (C1 · (B - Bf)a) ]
With the current values of F0, this distance (as of 0.200.335) is simply 0. This means as long as you do not place the stabilizer directly next to the reactor core, the entity will benefit from increased stability. The minimum number of stabilizers (Smin) required to bring a reactor to full power is determined when the stability is greater than ReactorStabilizationPowerEffectiveFull (E), currently set to 25%.
Smin = max[ 0, (E - 10/B) / (1/B) ] = max[ 0, (E · B - 10)]
Notice, that therefore stabilizers are only required when the reactor has more than 40 blocks, as discussed briefly above. As soon as the number of reactor blocks exceeds, 40, then the simple formula is E · B - 10. Additionally, the below formula can be used to determine the amount of stability (Y) added by the currently placed stabilizers in a single group is a sum of the stability added by each individual stabilizer block, as distance Di :
Y = Σi min[1, max[ 0 , ((Di - Dmin) / (Dopt - Dmin)) ] ] / B
To add values as of 0.200.335:
Y = Σi min[1, (Di / Dopt ) ] / B
And, finally, pre- 0.200.332, the above equation applied to each and every independent group of stabilizers., up to 20 groups, by default. A group was defined as any array of stabilizer blocks that either touched or were within 3 (by default) blocks or each other.
2 - Advanced Stabilizer Placement
Post Version 0.200.332, the dimensional bonus were added to the stabilizers system.
From the config files:
| Stage | Value |
|---|---|
| 2 | 1 |
| 3 | 1 |
| 4 | 0.8 |
| 5 | 0.6 |
| 6 | 0.5 |
The unlisted stage, stage 1, is simply the first placed stabilizer group. Concisely, stabilizer groups of the same size receive bonus stabilization if they are on independent sides of the reactor core. The core, having 6 sides (just like dice), therefore has 6 slots to place the a stabilizer group to use for the bonuses. The bonuses are determined by summing each stage up to the number of sides used. If a reactor core has 4 same size stabilizer groups on 4 different sides of the core, then summing up the first four stages (where stage one is simply ‘1’) then you get 1+1+1+0.8 = 3.8. This factor 3.8 is applied to every stabilizer block in the 4 same size groups. At all 6 side covered, the number of total stabilizer blocks is therefore decreased by a 4.9x amount. The assumption made is that the stabilizer groups are equidistant (or at least optimum) from the reactor core center, and are all the same size. As soon as either distance or size of the stabilizer groups are changed, the contributions to the dimensional bonuses are reduced and modified. If there are more than one stabilizer group on a 'side' of the reactor, then the largest stabilizer group is used for the purposes of the dimensional bonus.
To point this into an example, a ship has a core made up by a 7x7x7 cubic reactor (343 blocks). The Optimum distance for effective stabilizers is 123.4, therefore 124 blocks away. All values in the table should be rounded up to the nearest integer for complete placement of the stabilizers.
| Sides | Stab. / Side | Total Stab. |
|---|---|---|
| 1 | 333 | 333 |
| 2 | 83.25 | 166.5 |
| 3 | 37.0 | 111.0 |
| 4 | 21.9 | 87.6 |
| 5 | 15.1 | 75.7 |
| 6 | 11.3 | 68.0 |
Optimization
Based on the exponential distance model, there is no loss or change of reactor power per block. While there is code in the config files for a ‘soft cap’ of power, tests do not indicate a loss of power per block (i.e. 100 e/sec/block) above the indicated level (150000) of blocks or power, therefore, the system is theoretically infinitely scalable (not playtime tested yet) providing an immense and very large power generation for a very large number of draining blocks.
Therefore there is not a definitive “optimum” power structure like the legacy model, which capped out at a certain size per independent group, caused by the capping or ‘soft cap’ built into the power system. Comparing number of reactor blocks to various metrics, there is not a optimum, but rather a fractional exponential relationship, similar in nature to the relationship between optimum distance and # reactor blocks. Tests of many different metrics have been conducted with no indication of a local optimum between 1 and 10^6 reactor blocks comparing the equations and in game determination.
Related
| Game Mechanics |
|---|
| Build Mode • Credit • Defense Systems • Docking/Rails • Doors • Effects • Faction • Fleets • Flight Mode • Linking • Logic Signals • Map • Player • Player Items • Production • Propulsion Systems • Reactors • Reactor Chambers • Resources • Shipyards • Shops • Space Station • Support Tool Systems • Trade Network • Warp Gate • Weapons |
