Reactors
| This page is up to date as of version 0.201.200. |
In StarMade, nearly all functional Computers, Modules and Blocks require power. As of version 0.201.200, the StarMade Power System has been overhauled with a different model to generate and utilize ship or station power. The ‘Power 2.0’ system is primarily based on a commensalistic relationship between a series Reactor Power modules and an array of Reactor Stabilizer modules. The Reactor Power block produces power, but without the required Reactor Stabilizer modules, the reactor is limited. The stabilizers however are independent, and do not require any other block for functioning or optimization.
Contents
Reactor Blocks and Overview
| Reactor Stabilizer | |
|---|---|
 | |
| Hit Points | 100 |
| Armor | 0.5% |
| Volume | 0.1 |
| Mass | 0.15 |
| Luminosity | none |
| Data Value (ID) | 1009 |
| Reactor Stabilizer Stream Node | |
|---|---|
 | |
| Hit Points | 50 |
| Armor | 0.0% |
| Mass | 0.10 |
| Luminosity | none |
| Data Value (ID) | 66 |
| Reactor Power | |
|---|---|
 | |
| Hit Points | 100 |
| Armor | 0.5% |
| Mass | 0.40 |
| Luminosity | none |
| Data Value (ID) | 1008 |
There are five possible components to reactors: Reactor Power blocks, Reactor Stabilizer blocks, Reactor Stabilizer Stream Node blocks, and Reactor Chambers and their connecting Reactor Conduits.
System Modules
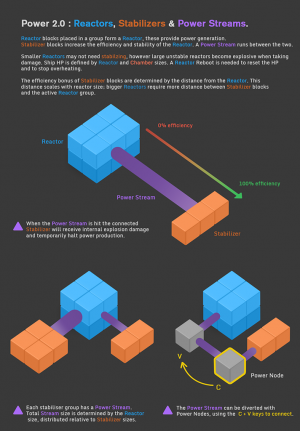
The original info-card is used as a graphical depiction of the generic effects of the two block types working in harmony. As with the previous version of the power system, the sheer amount of raw power is dependent on number of placed reactor blocks within a group. However, group and dimension sizes no longer matter, and only the sheer number of power reactors are what determines the possible power output.
Reactor Chambers provide ship-wide buffs and special abilities, however add complexity to the reactor. Reactor Chambers are linked to the reactor with Conduits. The minimum size of the Reactor Chambers is correlated to Reactor size. This minimum size can be seen in the Reactor menu and when placing Chamber blocks. Each chamber will use a portion of Reactor Points, a virtual mechanic, that adds up to 100%. Making Chamber designs that go over 100% eventually deactivate all Chambers effecting the mother entity. This page will not discuss Reactor Chambers and Conduit usage in detail.
Finally, an optional block to add to and customize Reactor Systems is the Reactor Stabilizer Stream Node. The Reactor Stream, that is created from the center of the active Reactor group to the center of each Stabilizer Group, will be redirected through the nodes. Multiple nodes may be placed to for a multi-point form for the stream to reroute through. This allows for builders to route the stream through protected areas of the entity, protecting the stream from possible damage. Damage hitting the streams will temporarily reduce power output.
Power Distribution
The biggest change in power mechanic for the ship or station usage of the power system is that there is no longer a capacitance or battery power, but rather only a constant stream of limited recharging power. As such, every usage of the power system is now in terms of amount of energy per sec (e/sec) versus raw or instantaneous energy upon activation. The difference, between a resting or charging amount of energy needed is dependent on the system type and size. E.g, the basic factory will use 10 e/sec when not in use, but when activated, jumps to 50 e/sec (with no upgrades or modifiers).
The power distribution of the ship or station will depend on the individual entity, modified by the player. When power usage overtakes power production, certain systems will start to receive reduced or no power, as listed in a priority list set by the player. An entity may have more than one reactor group (a connected series of Reactor Power blocks), but only one reactor will be active, using that groups power production and size as the determining factor for active chambers, and power production available to systems on the entity. Therefore multiple reactors turn into redundant or modifying reactors to change the secondary effects of chambers to the ship. This page will not go into detail about this or other power routing systems as set in the game.
Legacy Reactors
Information on legacy power systems can be found here. However, it is strongly recommended that you no longer use legacy power. It currently remains in-game for compatibility reasons, However it is largely unsupported and will be fully deprecated in the future.
Power system and stabilizer placement
Overview
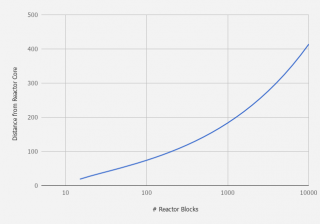
The power generation of a reactor is linearly related to the number of Reactor Power blocks placed. All reactors above a certain size need stabilizing and this can be done by placing down Stabilizer blocks at a distance from the reactor. The distance at which a Stabilizer block provides maximum stability is called the optimum distance and its value increases exponentially with the number of Reactor Power blocks used by default. If Stabilizers are not placed at an optimum distance from the reactor, they provide a fraction of the maximum stability which decreases linearly with distance. The Build Mode GUI indicates where stabilizers will be most effective. Stabilizers optimally should be grouped because only a certain number of Stabilizer groups are counted taken into consideration when determining stability. Stabilizer groups placed on multiple zones of the reactor axes benefit from reduced optimum distances. Reactors with low stability take higher damage upon being hit and give a reduced power output.
Note that all distances are measured from the approximate shape of the reactor and in blocks. Values should be rounded off to the next integer.
Stability and power equations
Below is a list of variables and their current settings as of 0.201.200, as listed in <gamefolder>\StarMade\data\config\blockBehaviorConfig.xml:
| Config file name | Meaning | Symbol | Default value |
|---|---|---|---|
| ReactorCalcStyle | Active Calculation Model:
Linear, Logarithmic and Logarithmic_Leveled are possible |
EXP | |
| ReactorStabilizerDistanceExpMult | Exponential Multiplier | C1 | 10 |
| ReactorStabilizerDistanceExp | Exponent | a | 0.333 |
| ReactorStabilizerStartingDistance | Offset Distance, Constant | s0 | -7.5 |
| ReactorStabilizerLinearFalloffOne | Optimal Distance Constant of Stabilizers | F1 | 1.0 |
| ReactorStabilizerLinearFalloffZero | Minimum Distance Constant of Stabilizers | F0 | 0.0 |
| ReactorStabilizerFreeMainReactorBlocks | Number of Reactors that are not affected by stability | Bf | 10 |
| ReactorStabilizerDistanceTotalMult | Final Multiplier | C0 | 2.0 |
| ReactorStabilizationPowerEffectiveFull | Percent of stability required for Full Power Output | E | 0.25 |
| ReactorStabilizerDistanceExpSoftCapBlocksStart | Number of Reactor Power blocks | 150000 | |
| ReactorStabilizerGroupingProximity | Proximity of Stabilizer groups below which they get grouped | G0 | 3 |
| ReactorStabilizerGroupsMax | Maximum number of Stabilizer groups taken into account | 20 |
The stability of a reactor is determined by summing up the stabilities provided by each Stabilizer block. The stability depends on the number of Reactor Power blocks used (B), the number of Stabilizer blocks used, the distances of each Stabilizer from the reactor (Di) and the relative location of the Stabilizer group of which the Stabilizer is a part. Stabilizers should be grouped as the game takes into account up to 20 different Stabilizer groups.
The following formulae are valid when the ReactorCalcStyle is set to EXP.
The optimum distance (Dopt) a Stabilizer block needs to be to contribute maximum to stability is:
Dopt = F1 · C0 · [s0 + (C1 · (B - Bf)a)]
The minimum distance a Stabilizer block needs to be to contribute to stability is:
Dmin = F0 · C0 · [s0 + (C1 · (B - Bf)a)]
As of 0.201.200, the value of F0 (and hence Dmin) is simply set to 0. This means that unless you place a Stabilizer directly beside the reactor, it will contribute to stability.
To encourage building in multiple dimensions, post 0.200.332, dimensional bonuses were added to the stabilizers system. A reduction by a factor of (J) is provided to the optimum distance (Dopt) of all Stabilizers that are part of a Stabilizer group that is in a different zone relative to the reactor axes. A "zone" is simply a division of the space around a reactor. The "zone" of a Stabilizer group is determined by checking the distance of it center from the positive and negative X, Y and Z reactor axes. There are in total 6 zones (and Stages) relative to the reactor axes in which Stabilizer groups can be placed (closer to +X / +Y / +Z / -X / -Y / -Z axes). The reactor axes can be rotated in the Advanced Build Mode menu, although this is rarely used.
The reduction (J) depends upon the number of different zones relative to the reactor axes that stabilizer groups are placed in. Stage x corresponds to x different zones being occupied by Stabilizer groups.
The assumption made is that the stabilizer groups are equidistant (or at least optimum) from the reactor, and are all the same size. As soon as either distance or size of the stabilizer groups are changed, the contributions to the dimensional bonuses are reduced and modified. If there are more than one stabilizer groups in a zone, the group that contributes the most to stability is used for the purposes of the dimensional bonus.
Stabilizer groups within a distance (G0) of each other are grouped as one while calculating dimensional bonuses and a single Reactor Stabilizer Stream runs to them. This distance (G0) is set to 3 as of 0.201.200.
The value of (J) can be found by summing up all the additional bonuses for each Stage up to the present Stage. Below is a list of the additional stage bonuses as of 0.201.200, as listed in <gamefolder>\StarMade\data\config\blockBehaviorConfig.xml:
| Config file name | Meaning | Default Value | J (dimensional bonus) |
|---|---|---|---|
| Stage 1 | 1 | 1 | |
| ReactorStablizationBonus2 | Additional bonus for Stage 2 | 1 | 1 + 1 = 2 |
| ReactorStablizationBonus3 | Additional bonus for Stage 3 | 1 | 1 + 1 + 1 = 3 |
| ReactorStablizationBonus4 | Additional bonus for Stage 4 | 0.8 | 1 + 1 + 1 + 0.8 = 3.8 |
| ReactorStablizationBonus5 | Additional bonus for Stage 5 | 0.6 | 1 + 1 + 1 + 0.8 + 0.6 = 4.4 |
| ReactorStablizationBonus6 | Additional bonus for Stage 6 | 0.5 | 1 + 1 + 1 + 0.8 + 0.6 + 0.5 = 4.9 |
The optimum distance (Dopt) for each stabilizer then decreases by a factor of (J) for each Stabilizer block which is part of the group contributing to the dimensional bonus, meaning the optimum distance (Dopt) decreases by a factor of 2, 3, 3.8, 4.4, 4.9 for a Stage 2, 3, 4, 5, 6 reactor respectively.
The amount of stability (Y) added by each Stabilizer block at distance (Di) from the reactor is:
Y = min[1, [(Di - Dmin) / (Dopt - Dmin)]] / B
The total stability (Ynet) for a given Reactor Stabilizer setup is determined by summing up the stabilities due to each of the Stabilizer blocks:
Ynet = min[1, [Bf / B + ΣiY]
This value is the overall "Stability" of the reactor. It lies between 0 (0%) and 1 (100%) and is displayed in the Entity Sidebar in Build Mode. The Power (e/sec) generation of a reactor follows a linear relation with the number of Reactor Power modules placed (B), with each Reactor Power block contributing 100 e/sec as long as the stability of the reactor (Ynet) is greater than ReactorStabilizationPowerEffectiveFull (E) which is set to 0.25 (25%) as of 0.201.200. When stabilization falls below E, the power generation decreases linearly.
Power = min[100 · B, 100 · B · (Ynet / E)]
Finally, using the default values as of 0.201.200 in the above formulae, the system can be summarized:
- Each Reactor Power block will add 100 e/sec to the recharge rate of the reactor as long as the stability of the reactor is above 25%.
- A reactor will achieve full power generation at 25% stability or higher and power generation will linearly decrease power generation when stability decreases to below 25%.
- A reactor with lesser than 10 Reactor Power blocks will need 0 Stabilizers to achieve 100% stability. Addition of further Reactor Power blocks will lower the stability of the reactor.
- A reactor with more than than 10 Reactor Power blocks and with 0 Stabilizers will have a power generation of 4000 e/sec.
- For a reactor with more than than 10 Reactor Power blocks to attain 25% stability, the number of Stabilizer blocks that should be placed at optimum distance or more is given by (B / 4) - 10.
- For a reactor with more than than 10 Reactor Power blocks to attain 100% stability, the number of Stabilizer blocks that should be placed at optimum distance or more is given by B - 10.
- Stabilizers placed at less than optimum distance linearly contribute lesser to stability. One block at optimum distance has an equal contribution to stability as two blocks placed at half the optimal distance.
- When equally sized stabilizer groups are placed on two, three, four, five or six zones of the reactor axes, the optimal distance for Stabilizers of those groups decreases by a factor of 2, 3, 3.8, 4.4 and 4.9 respectively.
- Taking the example of a ship that has a cubic reactor made up of 7 x 7 x 7 = 343 Reactor Power blocks, the optimum distance at which to place stabilizers to gain maximum stability is 124 (123.4) blocks away. We would need 343 - 10 = 333 Stabilizer blocks to be placed at 124 blocks or more away to achieve 100% stability. If we placed Stabilizer blocks in two equal groups on different sides of the reactor, we would need 333 / 2 = 167 (166.5) blocks placed on each of the two sides, each group at a distance of 124/2 = 62 blocks from the reactor core. Placing Stabilizer blocks in three groups on three different sides of the reactor, we would need 333 / 3 = 111 blocks placed on each of the three sides, each group at a distance of 124 / 3 = 42 (41.13) blocks. This reactor will have a recharge rate of 34300 e/sec when its stability is above 0.25 (25%). At 0.2 (20%) stability, the recharge rate would drop to 0.2 / 0.25 = 0.8 (80%) of 34300 which is 27440 e/sec and at 10% stability, the recharge rate would drop to 0.1/0.25 = 0.4 (40%) of 34300 which is 13720 e/sec.
Optimization
Based on the exponential distance model when a = 0.333, there is no loss or change of Reactor Power per block. While there is code in the config files for a ‘soft cap’ of power, tests do not indicate a loss of power per block (i.e. 100 e/sec/block) above the indicated level (150000) of blocks or power, therefore, the system is theoretically infinitely scalable (not playtime tested yet) providing an immense and very large power generation for a very large number of draining blocks.
Therefore there is not a definitive “optimum” power structure like the legacy model, which capped out at a certain size per independent group, caused by the capping or ‘soft cap’ built into the power system. Comparing number of Reactor Power blocks to various metrics, there is not a optimum, but rather a fractional exponential relationship, similar in nature to the relationship between optimum distance and number of Reactor Power blocks blocks. Tests of many different metrics have been conducted with no indication of a local optimum between 1 and 10^6 Reactor Power blocks comparing the equations and in game determination.
Related
| Game Mechanics |
|---|
| Build Mode • Credit • Defense Systems • Docking/Rails • Doors • Effects • Faction • Fleets • Flight Mode • Linking • Logic Signals • Map • Player • Player Items • Production • Propulsion Systems • Reactors • Reactor Chambers • Resources • Shipyards • Shops • Space Station • Support Tool Systems • Trade Network • Warp Gate • Weapons |

